As we all know, users can use JavaScript to operate the HTML page's elements with the support of the DOM node interface. When users apply the above manipulations, they can modify both the style and data within the HTML elements, including the attributes of the elements, such as the class names.
So, when users are dealing with modifying or styling animation on HTML elements, they often need to add, remove, toggle, replace, append or change the class name from an HTML element.
This article helps users understand the concept of applying different techniques, such as adding, removing, replacing the CSS classes from an HTML element using JavaScript.
How to remove a CSS class from an HTML element using JavaScript?
Generally, the easiest way to redirect an animation from one element to another HTML element is when users simply write the animation script on a class name or an ID. Also, if they need to shift the whole animation, they can easily remove or change the class name or the ID of the HTML element of the webpage.
It will be better not to rewrite the whole animation script of another element as that can raise the load on the server.
To remove the CSS class, we will use the .classList.remove() function. It will remove the class property used in CSS.
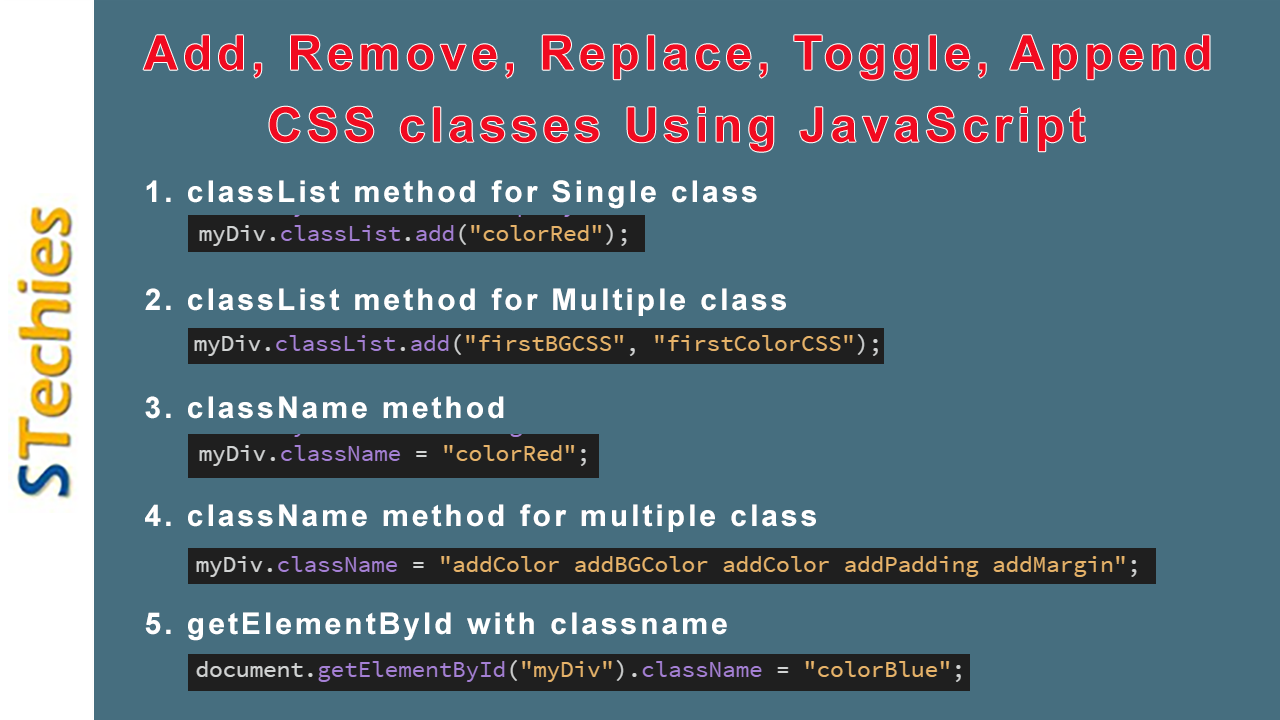
Add, Remove, Append &Toggle CSS Classes in JavaScript
- classList method for Single class
- classList method for Multiple class
- className method
- className method for multiple class
- getElementById with classname
Method 1: Using ClassList method for Single Class
Syntax:
ELEMENT.classList.remove("CLASS_NAME");
Code:
<!doctype html>
<html>
<head>
<meta charset="utf-8">
<title>Add, Remove, Replace, Toggal, Append CSS classes from HTML elements in JavaScript</title>
<style>
.colorRed{
background: red;
color: white;
padding: 20px;
margin: 10px;
}
.colorBlue{
background: blue;
color: white;
padding: 20px;
margin: 10px;
}
.fontstyle{
font-size: 30px;
}
</style>
<script>
function removeCss(){
const myDiv = document.querySelector('#myDiv');
myDiv.classList.remove("colorRed");
}
function addCss(){
const myDiv = document.querySelector('#myDiv');
myDiv.classList.add("colorRed");
}
function toggleCss(){
const myDiv = document.querySelector('#myDiv');
myDiv.classList.toggle("colorRed");
}
function replaceCss(){
const myDiv = document.querySelector('#myDiv');
myDiv.classList.replace("colorRed", "colorBlue");
}
function appendCss(){
const myDiv = document.querySelector('#myDiv');
myDiv.classList.add("fontstyle");
}
</script>
</head>
<body>
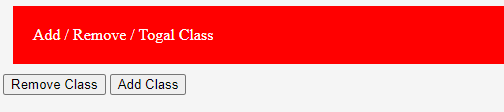
<div id="myDiv">Add / Remove / Togal / Replace Clss</div>
<button onClick="addCss();">Add Class</button>
<button onClick="removeCss();">Remove Class</button>
<button onClick="toggleCss();">Toggle Class</button>
<button onClick="replaceCss();">Replace "colorRed" with "colorBlue" Class</button>
<button onClick="appendCss();">Append "fontstyle" Class</button>
</body>
</html>
Output:


Explanation:
The above code snippet shows that we have added CSS classes where we can use the five distinct functions of the CSS class, namely, add, remove, toggle, replace and append the HTML elements. First, we constructed an HTML element using the <div> tag. We then used the HTML <button> tag to create five clickable buttons.
When end-users click those buttons, it will call the CSS class functions accordingly. The first button will add CSS classes, the second button will remove the CSS classes, the third will toggle the HTML element, the fourth for replacing the element, and the last button will append using the JS functions.
When a user clicks on the first button, the browser will call the addClass(), removeClass(), toggleClass(), replaceClass(), and appendClass() methods and add the class to the HTML element.
Method 2: Using ClassList method for Multiple Class
Code:
<!doctype html>
<html>
<head>
<meta charset="utf-8">
<title>Add, Remove, Replace, Toggal, Append Classes from HTML elements in JavaScript</title>
<style>
.firstBGCSS{
background: red;
padding: 20px;
margin: 10px;
}
.firstColorCSS{
color: white;
}
.secondBGCSS{
background: blue;
padding: 20px;
margin: 10px;
}
.secondColorCSS{
color: yellow;
}
</style>
<script>
function AddMultipleCss(){
const myDiv = document.querySelector('#myDiv');
myDiv.classList.add("firstBGCSS", "firstColorCSS");
}
function RemoveMultipleCss(){
const myDiv = document.querySelector('#myDiv');
myDiv.classList.remove("firstBGCSS", "firstColorCSS");
}
</script>
</head>
<body>
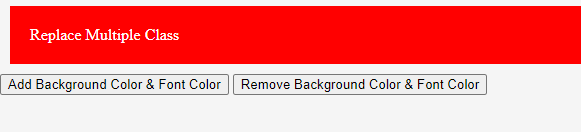
<div id="myDiv">Replace Multiple Class</div>
<button onClick="AddMultipleCss();">Add Background Color & Font Color</button>
<button onClick="RemoveMultipleCss();">Remove Background Color & Font Color</button>
</body>
</html>
Output:
After Clicking Remove Background Color & Font Color

Explanation:
The above code snippet shows that we have appended the CSS classes using the classList method. We have used two different functions, namely; AddMultipleClass() and RemoveMultipleClass(), that add and remove the CSS classes in two distinct steps.
The first step involves the append button that, on clicking, calls the AddMultipleClass and the second button calls the RemoveMultipleClass() function.
Medhod 3: Add, Remove Class Using className Method
Code:
<!doctype html>
<html>
<head>
<meta charset="utf-8">
<title>Add, Remove, Replace, Toggal, Append Classes from HTML elements in JavaScript</title>
<style>
.colorRed{
background: red;
color: white;
padding: 20px;
margin: 10px;
}
.colorBlue{
background: blue;
color: white;
padding: 20px;
margin: 10px;
}
</style>
<script>
function removeClass(){
const myDiv = document.getElementById('myDiv');
myDiv.className = "";
}
function addClass(){
const myDiv = document.getElementById('myDiv');
myDiv.className = "colorRed";
}
</script>
</head>
<body>
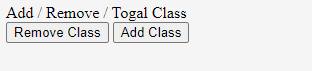
<div class="colorRed" id="myDiv">Add / Remove / Togal Class</div>
<button onClick="removeClass();">Remove Class</button>
<button onClick="addClass();">Add Class</button>
</body>
</html>
Output:
After Clicking Remove CSS
Explanation:
The above code snippet shows that we have used the removeClass() and addClass() functions. It adds and removes the CSS classes in two distinct steps.
The first step involves the append button that, on clicking, calls the addClass and the second button calls the removeClass() function.
Method 4: Add Multiple Class in HTML element using className method
Code:
<!doctype html>
<html>
<head>
<meta charset="utf-8">
<title>Add, Remove, Replace, Toggal, Append Classes from HTML elements in JavaScript</title>
<style>
	.addBGColor{
		background: red;
	}
	.addColor{
		color: blue;
	}
	.addPadding{
		padding: 20px;
	}
	.addMargin{
		margin: 20px;
	}
</style>
<script>
	function addMultipleCSS(){
		const myDiv = document.getElementById('myDiv');
  		myDiv.className = "addColor addBGColor addColor addPadding addMargin";
	}
</script>
</head>

<body>
	<div id="myDiv">Add Multiple Class</div>
	<button onClick="addMultipleCSS();">Add BG Color, Font Color, Padding, Margin Class</button>

</body>
</html>
Output:
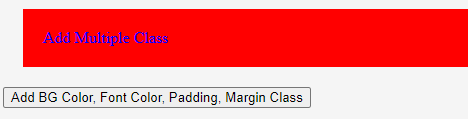
Explanation:
It is another example that adds multiple CSS classes to the HTML element; using JS. Here, we used the className method that defines the CSS class.
Method 5: Example using getElementById with classname Method
Code:
<!doctype html>
<html>
<head>
<meta charset="utf-8">
<title>Add, Remove, Replace, Toggal, Append Classes from HTML elements in JavaScript</title>
<style>
.colorRed{
background: red;
color: white;
padding: 20px;
margin: 10px;
}
.colorBlue{
background: blue;
color: white;
padding: 20px;
margin: 10px;
}
</style>
<script>
function removeCSS(){
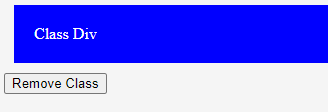
document.getElementById("myDiv").className = "colorBlue";
}
</script>
</head>
<body>
<div id="myDiv" class="colorRed">Class Div</div>
<button onClick="removeCSS();">Remove Class</button>
</body>
</html>
Output:
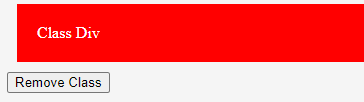
After clicking the remove button:
Conclusion:
Users can use JavaScript for any purpose. They can use JavaScript to add, remove, toggle, replace or append a class name from the HTML element on the webpage with the help of different JavaScript functions.
Even users can use it to remove multiple CSS classes from the class list of an element. In this article, we first show how to create a plain HTML with the HTML <div> element on it to use this method.
Lastly, to examine the code snippet, we created an HTML file (with a .html file extension) and run it in the browser. Users can check the output using the browser's developer tools.