How To Create Android SQLite Database and Tables
This tutorial explains how you can get started with SQLite using Android. how we can create a database and perform some database queries like insertion, up gradation, deletion or other queries on SQLite database using Android. So lets get started and lets see some important stuff regarding SQLite on Android.
What is SQLite?
SQLite is database which is a open source database so you can use it for free and its relational database, okay and the most important feature about SQLite database is it’s a local database so it doesn’t require any server or any ODBC or JDBC query or connection for its functionality.
It's just, You can say it saves the data in word text file and saved locally on you can say mobile device or tablet or whatever Android device you are using and Android comes with the built-in SQLite database implementation. So you don’t need to install any extra libraries to use SQLite with Android
To create or update a database in your Android Application you just need to create a subclass of the SQLiteOpenHelper class. In the constructor of your subclass you call the super() method of SQLiteOpenHelper.
Please follow the steps below in order to create database tables:
Step 1) So just open your Android studio, we are going to start a new Android Application and we will name our application as SQLite app for example and then click next or select you minimum sdk. Click next and select a blank activity next, and leave main activity as default and click finish.
Step 2) Now once your basic app is created, what we’re going to do is we’re going to create a class for handling the SQLite database. So go to your app folder and in the app folder go to your java folder and inside here go to the package in which your main activity and right click the package and we’re going to create a new java class.
.jpg)
.jpg)
Step 3) Now below is a basic blank class and in here we want to create or extend this class using our SQLiteOpenHelper, so just write extend SQLiteOpenHelper.
.jpg)
Step 4) It might show some error because we haven’t imported the classes related to this SQLite open helper so just click Alt+Enter, and just click the button called import class and its going to import this class okay.
.jpg)
Step 5) Still it might show you some error because we need to create or implement some of the methods from it so you will be able to see a small bulb there. You just need to click this bulb and you just need to click implement methods and there are two methods related to this class which are onCreate and onUpgrade. You are going to select both of them and click OK.
.jpg)
.jpg)
Step 6) And one more thing which is required to be created is a default constructor so once again click this red bulb here and just choose constructor matching super and we are going to select first of them and just create it.
.jpg)
.jpg)
Step 7) So we have successfully created our database helper class which extends from SQLite open helper which is the main class for handling SQLite and we have some basic methods and constructor.
.jpg)
.jpg)
.jpg)
Step 8) Now for creating the database, first of all, we need a database name. Now let us see how we are going to create a database and what will be the name of our database and all other stuff. So for this, for example, to start with we are going to create a base like SQLite database like shown in the images below and the name of the database will be Student.db.
.jpg)
Note: The SQLite database is not case sensitive so you can use upper cases and smaller cases together its doesn’t matter in SQLite.
So our database name will be student.b and its going to contain four columns:
1) id of the student
2) name of the student
3) surname or last name of the student
4) marks scored by the student.
We are going to create a database or insert some data like this so id can be one two three four for example, name, surname and marks scored by the students.
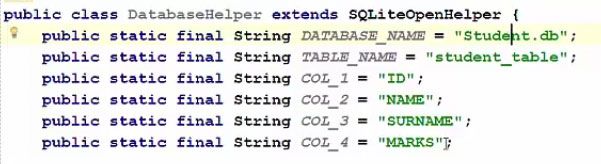
Step 9) Now we will declare some variables so that we can define the names of our database. So let's declare our variable which we are going to assign the database name so let's declare a variable name called database_name, we will assign the name of our database, for example, 'student.db'. And second what we are going to do is we are going to declare our table name, so this will be a table name and let's give the name to our table as 'student_table' which will resonate perfectly with our table.

Step 10) And as we have discussed, this table is going to contain 4 columns, one, two, three, four and for simplicity lets keep all the variables as a string. First column name was ID for the student and the column name is ID right, so do something like this, col 1, col 1 is ID, similarly column 1, column 2, column 3 column 4. Column 2, column 3, column 4, first column is ID, the second column is name, the third column is surname and fourth column is marks. So these are the four column, this is our table name and this is our database name.
Step 11) Now in order to create our database, we are going to create our database in the constructor. So we need to call a function which creates a database. So for simplicity let's reduce our constructor which only takes this context and as you can see here this superclass, we can just give the name of the database. Our database name is this variable, pass it here. Thirds is factory, we are going to pass null here, and the version. For example, version is equal to 1. Now whenever this constructor is called, your database will be created.

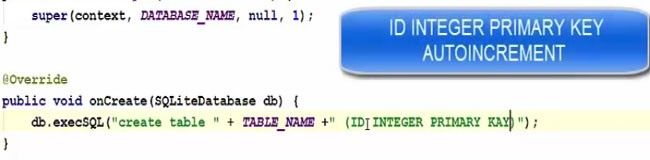
Step 12) Now in order to create the table inside your database, we are going to create a table whenever the onCreate method of this class is called . So you can see SQLite database class is the argument inside onCreate.

Step 13) So we can just take the db which is the variable of SQLite database, so take this instance db and call a method called .exacsql and what it does is it executes whatever query you pass inside this method as an argument.

Step 13) It takes the string variable or the string query so here you can prepare the creatable query and whenever its called, its going to execute the query and is going to create this table. So lets write our query, for example create the table name, so create table and the table name in our case is this one so you can use his concatenation operator to concatenate this and then inside your bracket your column name comes right. So first column name is ID or you can just take these name or column 1, column 2, column 3 and column 4 .
So just write create table and your table name and then in the brackets comes the ID which is the first column name and then comes he attributes of this column, so it’ll be integer and its going to be my primary key. Primary key means the unique key which you will be able to identify the rows, okay. And then its going to auto increment.
Auto increment means its going to increment automatically even if you don’t provide any data for it okay. The second column name is name itself and the attribute, the data type for it is text, for example the third column will be surname and the data type is text for it also. And the fourth column is the marks column. So marks, lets create it as integer.
.jpg)
So we have created table using this query and your table name is student table and in the brackets we have provided four columns to it, ID it’s the primary key an its going to auto increment. Name which is a text, surname which is a text and marks which is an integer data type.
.jpg)
Now one more thing which we can do is, in the upgrade method we can once again call the exact sql and in here we can just drop our table if it exists in case of upgradation.

So once again we are going to create this table so you can directly on create here, on create and pass an db instance.

Now once this is done, what we are going to do is, this is just for checking, we are going to write a single line of code, so that our database and table is created. So just go to the constructor in here and just create an instance of SQLite database.

And now what we’re going to do is we are going to take this DatabaseHelperClass and create an instance of the database helper class in our main activity .java class.


Now in our onCreate method of main activity of java file, you can just create a new instance mydb new and then new database helper.This takes one argument which is the context.

Now once everything is done now what it's going to do is, it's going to call the constructor of database helper class.And what we are doing in the constructor we are creating the database And the table. So once the constructor is called, this code is called and it is going to create the database and the table for you
So run the program, our app is running so you will notice activity which is blank activity and it's not going to do anything right now.
Read Next Insert data into SQLite database