What is Release Strategy?
SAP has introduced the concept of Release Strategy to control the process of purchasing. When a Purchase order is made it is not directly sent to the vendor first it requires approval from other departments in order to avoid any inconvenience or unauthorized transactions.
For this reason, it is very important to control the procurement process by approval of the purchase order. This approval is known as Release Strategy. In other words, Release Strategy is used to approve the Purchasing document.
For example, we are making a release strategy for the following release conditions:
Case 1: If the Order value is <= 20000 then it is released by Gen. Manager.
Case 2: If the Order value >20000 and <= 60000 then it is released by Gen. Manager and Manager.
Case 3: if the Order value is > 60000 then it is released by Gen. Manager, Manager, and Team Lead.
Process Flow of Release Strategy
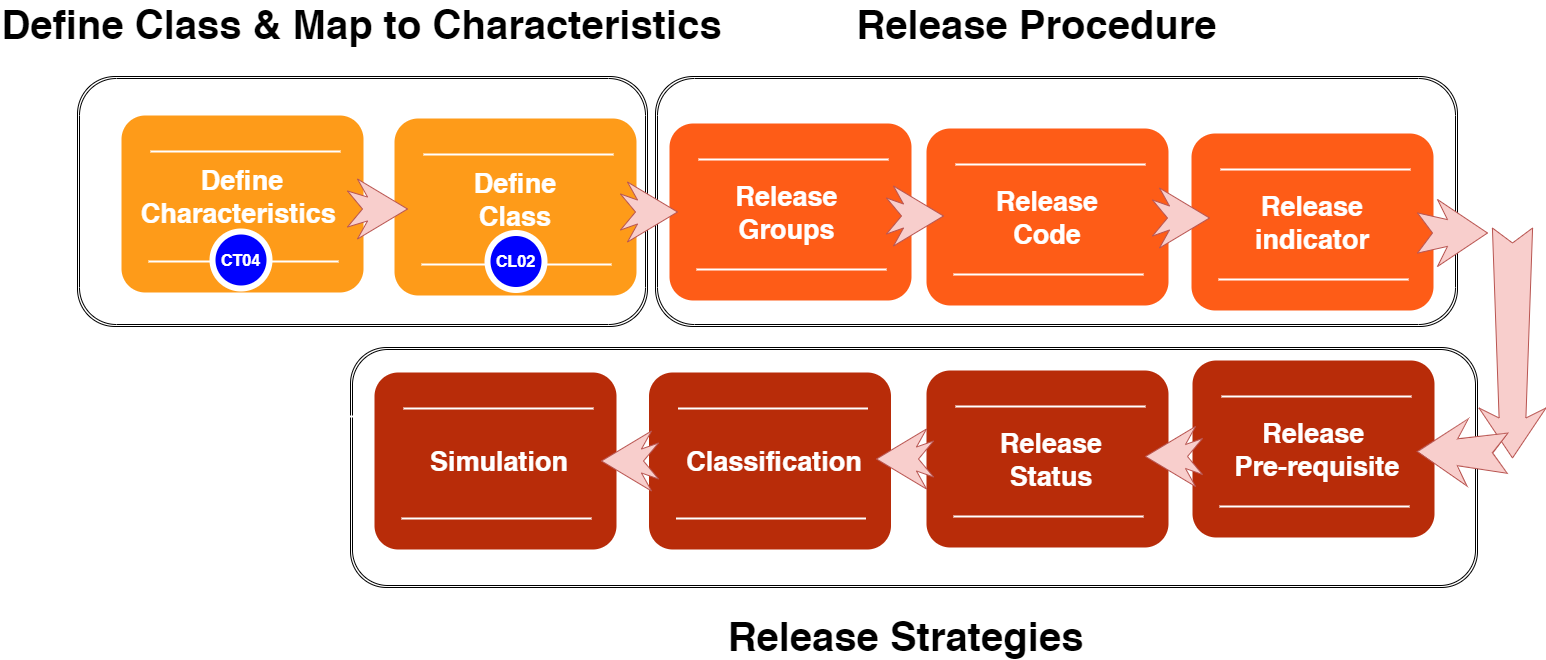
Create Characteristics-> Create Class-> Define Release Procedure for Purchase Order (Create Release Groups-> Create Release Codes-> Release Indicators-> Create Release Strategies)
The main table required for the Release Strategy is:
- Purchase Order: RFQ
- Outline Agreement: CEKKO
- Purchase Requisition: CEBAN
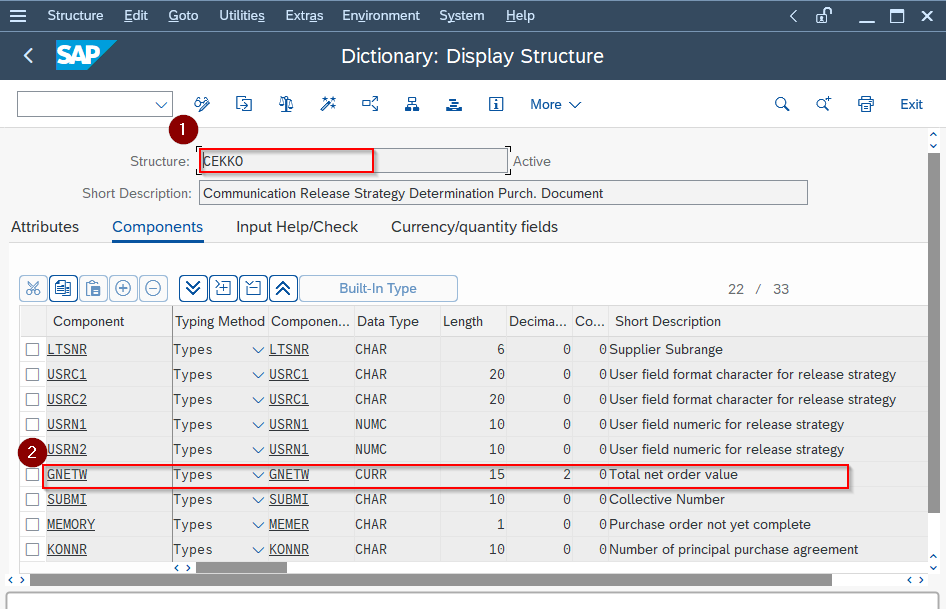
To get all the information required for creating the Characteristics table CEKKO is very important.
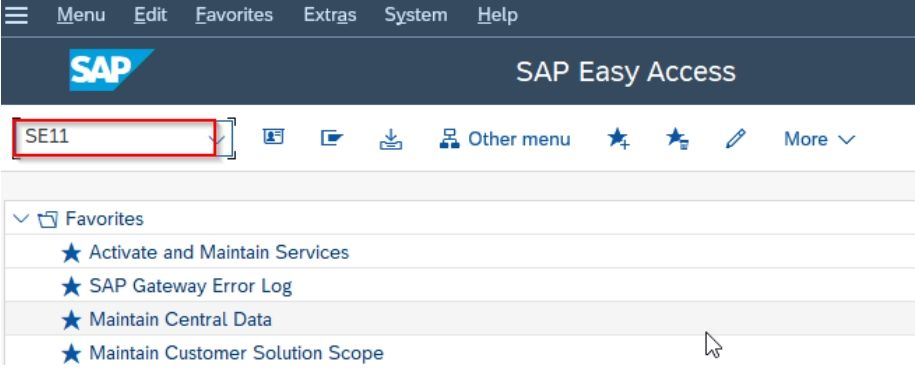
Goto table CEKKO by T.Code SE11 or SE12.
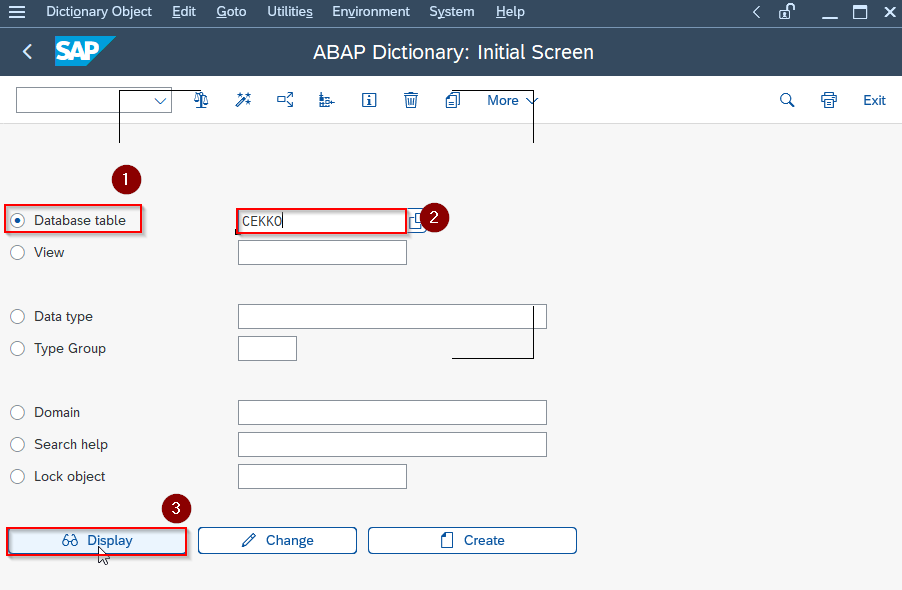
Select the Database table field as CEKKO for Purchase Order and press the Display button.
Steps to configure Release Strategy for Purchase Order
Define Characteristic
Characteristics define the property of the object.
For example in the case of Purchase Order, we are using characteristics Purchase Organization, Purchase Group and Net Value etc.
The value of the characteristics can be in character format, numeric format, alphanumeric format, or date format.
Steps to create characteristics for a release procedure for Purchase Orders.
Step 1: In the command box type SPRO -> Sap IMG -> Material Management -> Purchasing -> Purchase Order -> Release Procedure For Purchase Orders -> Edit Characteristics
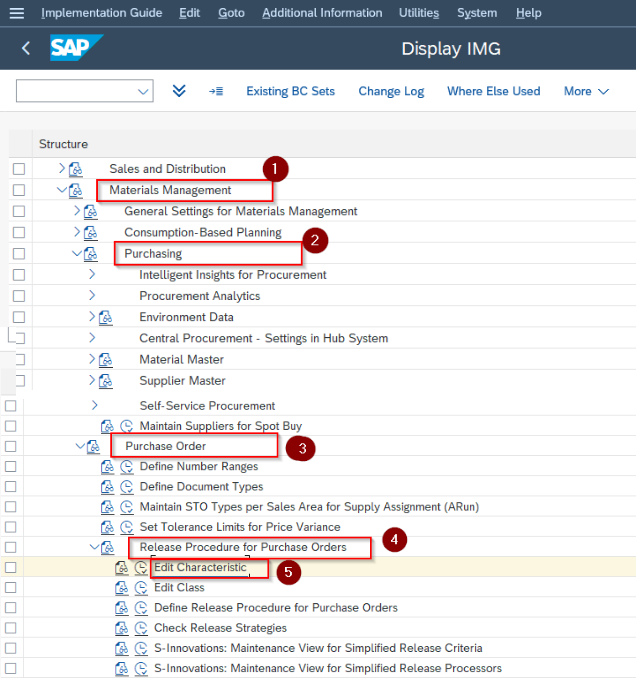
or T.Code CT04 is used for creating Characteristics
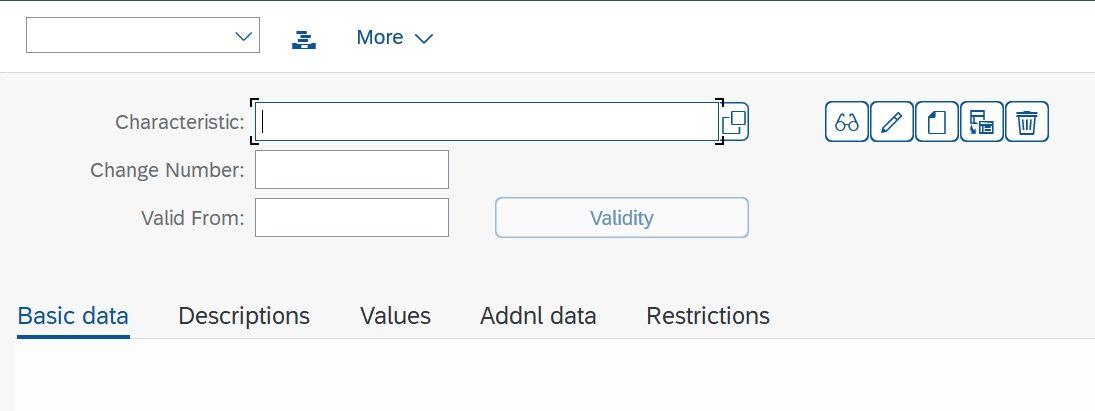
Step 2: On the Characteristics, screen create a characteristic for each field for your release strategy.
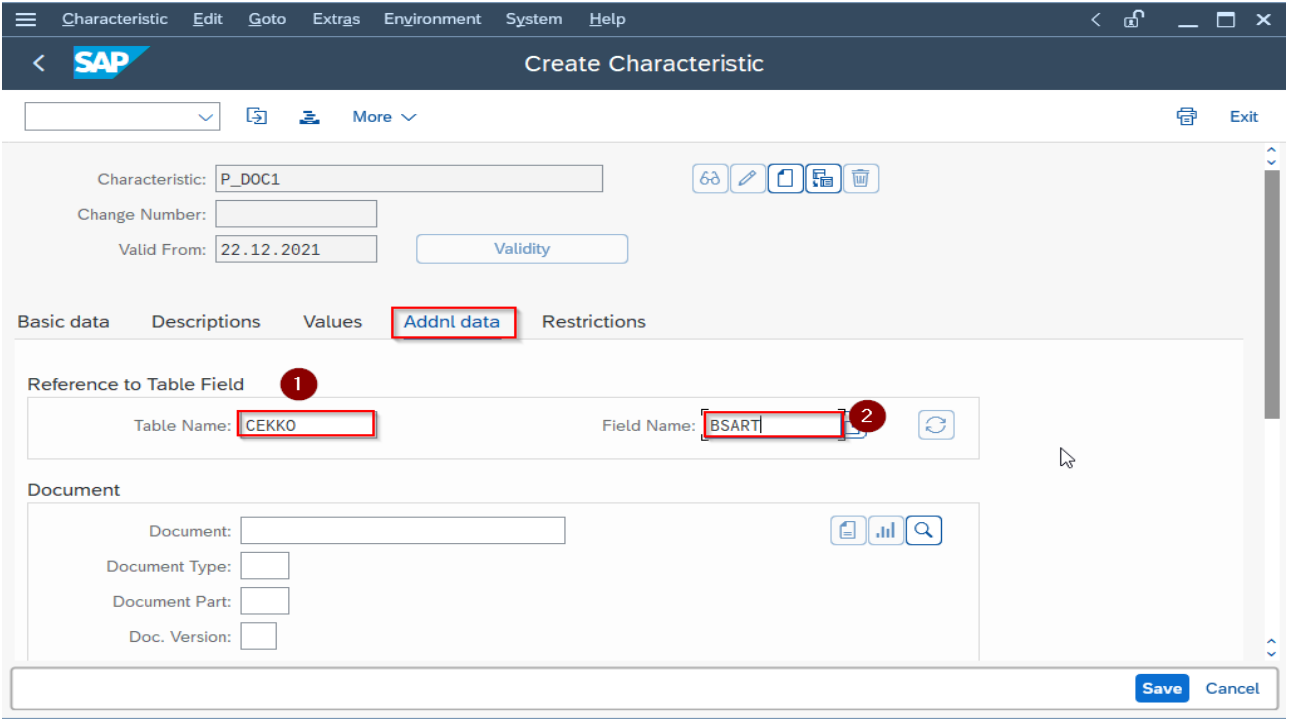
In the Characteristics tab type the names for the characteristic, you can give any name. For example Characteristic: P_DOC1
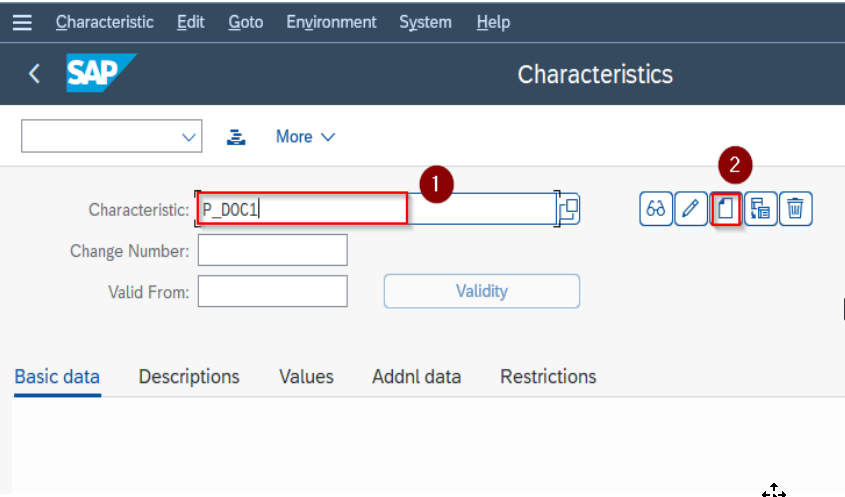
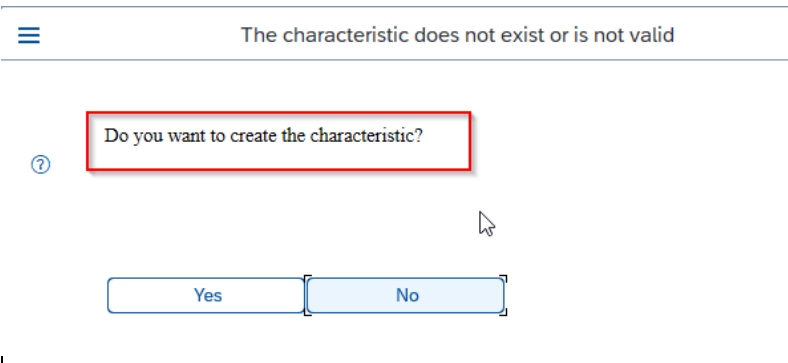
and select the create icon or press enter button then comes the screen asking, Do you want to create the characteristic? Press the Yes button.
Step3: On the Create Characteristic screen fill in the required information for the Addnl. data tab.
- Table Name: Type the as CEKKO
- Field Name: Type here BSART.
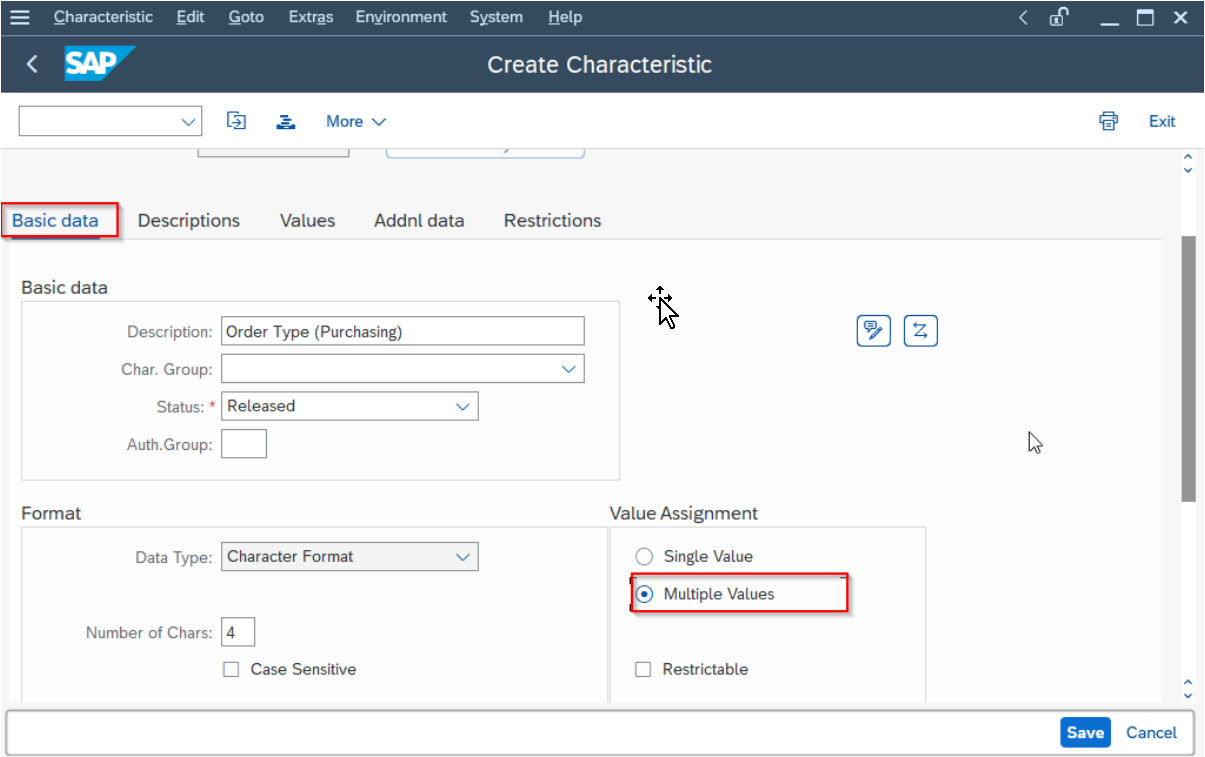
Select the Basic data tab
Value assignment: Select the Multiple Values option.(If the characteristic has only one value then Select Single Values option and if it has more than one value or range of values then select the Multiple values option.)
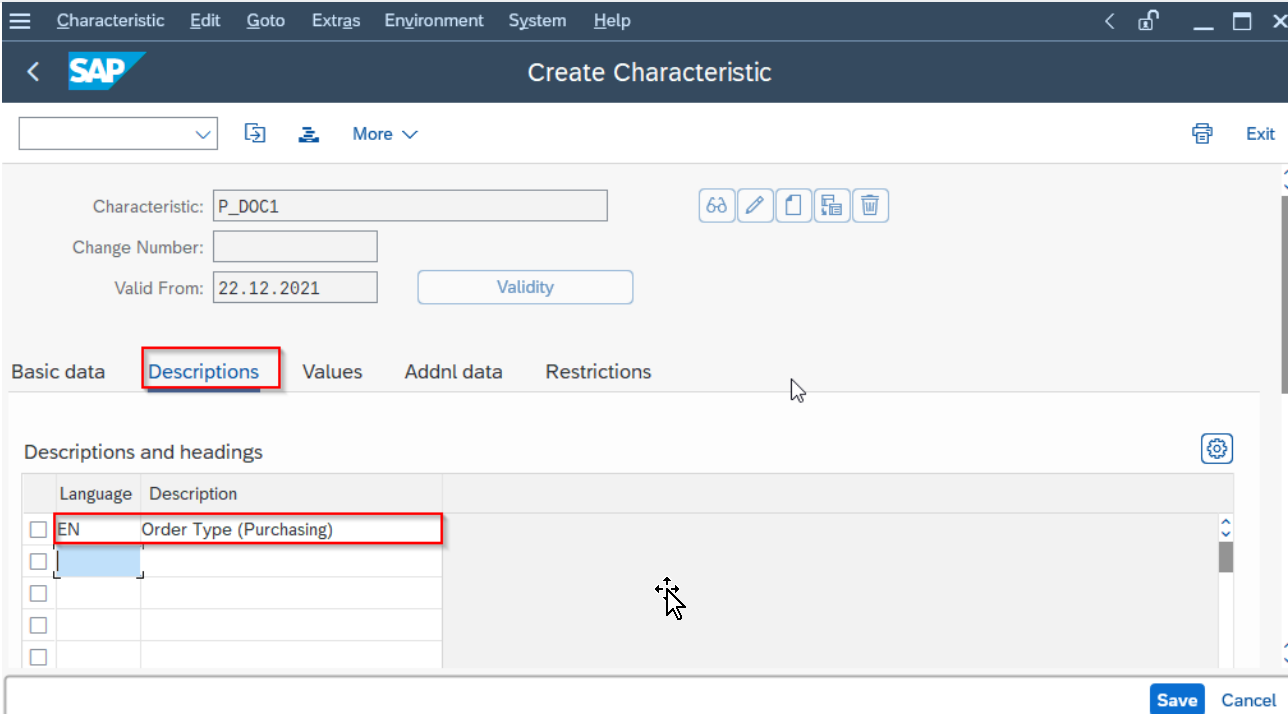
Select the Descriptions tab it shows the description of the characteristic.
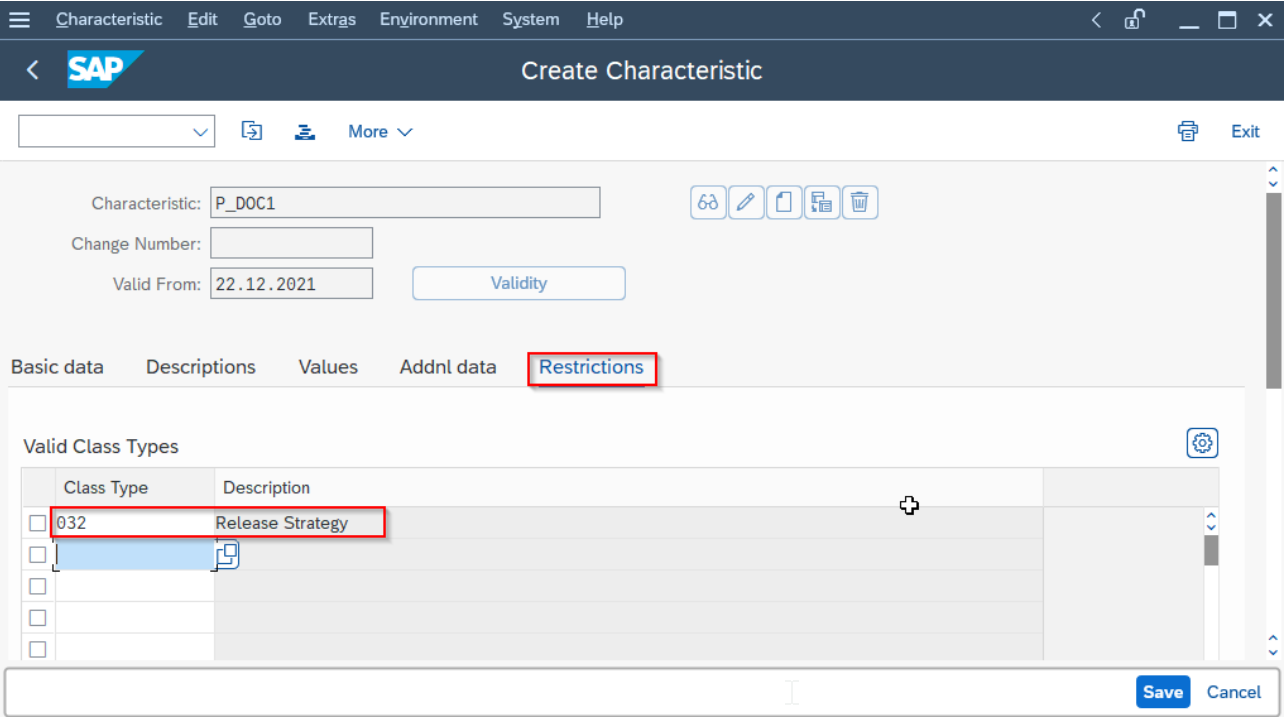
Select the Restrictions tab and select Class Type as 032 for release strategy.
Step 4: Press the Save button and the Characteristic P_DOC1 is saved.
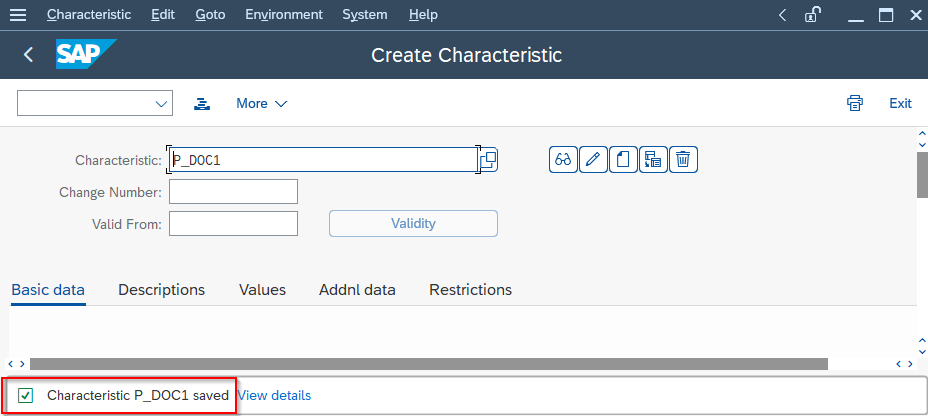
This way our first characteristic P_DOC1 is created, in the same way we are creating two more characteristics.
Similarly, create two other characteristics
- P_ORG for Purchasing Organization where all the steps are the same except the Addnl. data field. Select the table name as CEKKO and field name as EKORG.
- PO_ TOTAL VALUE for Purchase order Net value where few steps are different. Select the table name CEKKO and field GNETW for purchase order net value.
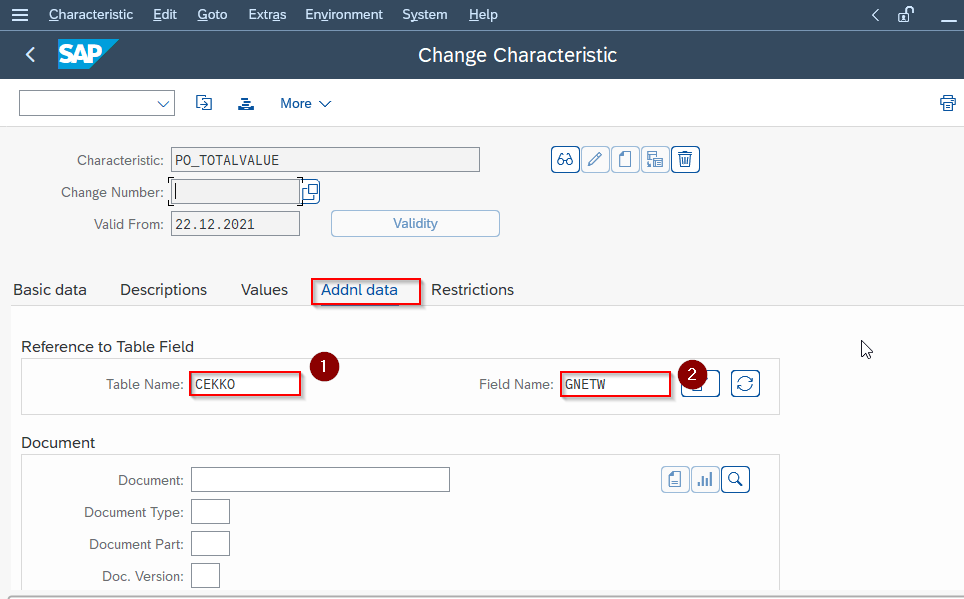
.png)
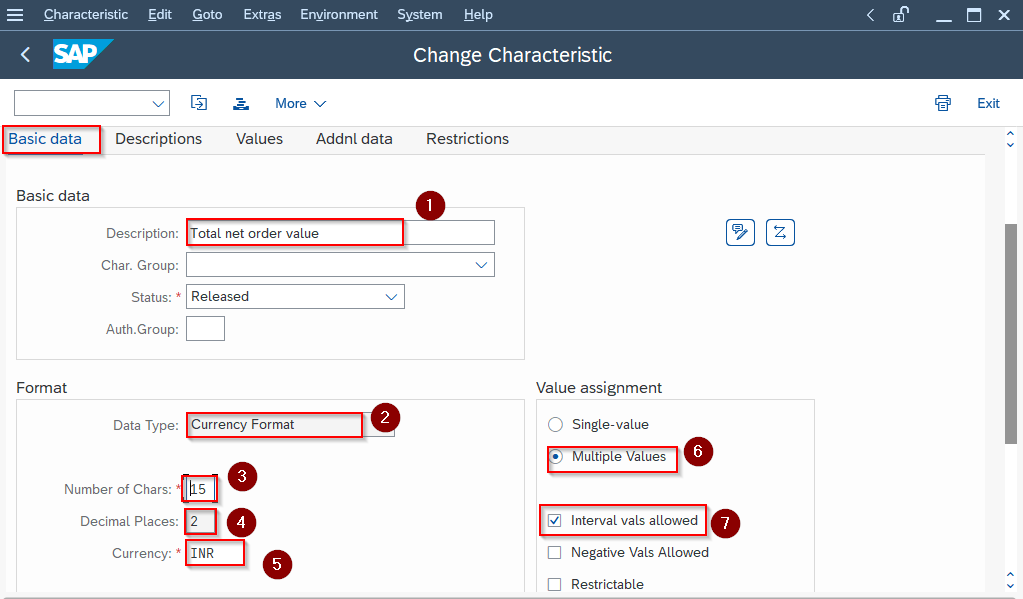
- Data type: Select as Currency Format
- Number of Chars. : Select 15 as shown in the above table CEKKO.
- Currency: Please mention INR as a currency for the characteristic, since this field is related to numbers and net value of purchase order.
In the Value Assignment block
- Select the Multiple Value radio button for more than one value.
- Tick the check box “Interval vals allowed” for a numeric range of values.
Steps to Create Classes for Purchase order Release Strategy
After creating Characteristics the next step is to assign them to the classes.
The class contains a list of all the characteristics we have created. It is created under the class type 032 which is the class type for release strategy.
Steps to create Classes for a release procedure for purchase orders.
Step 1: In the command box type SPRO-> SAP IMG-> Material Management-> Purchasing-> Purchase Order-> Release Procedure For Purchase Orders-> Edit Class
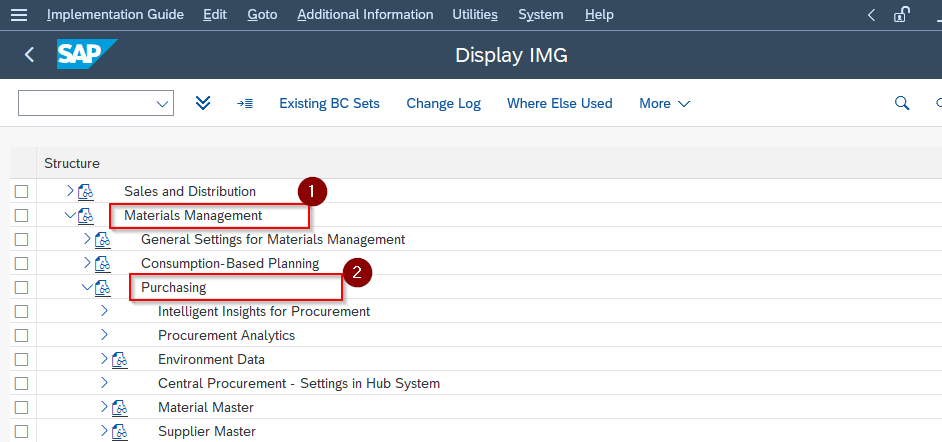
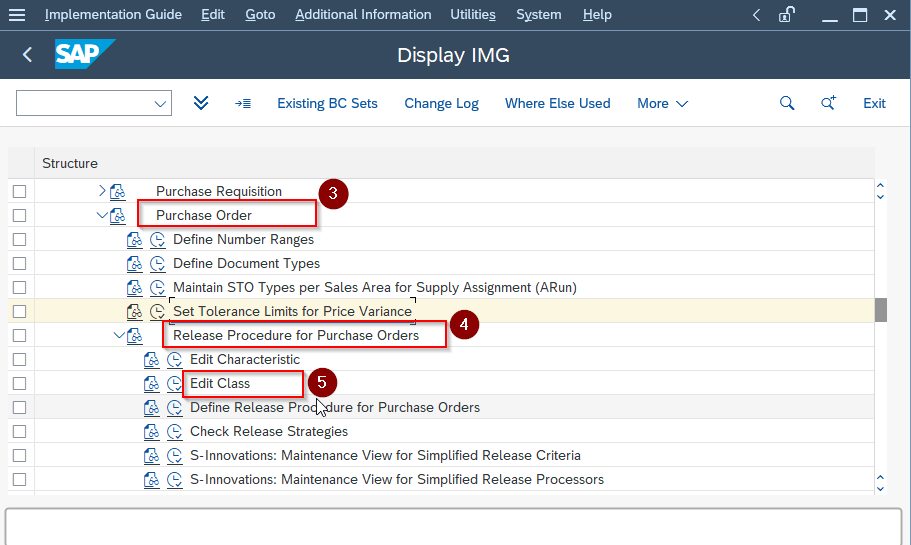
In the step "Define Release Procedure for Purchase Orders" you assign this class to the release strategy.
or Goto T.Code CL02 to create the Class.
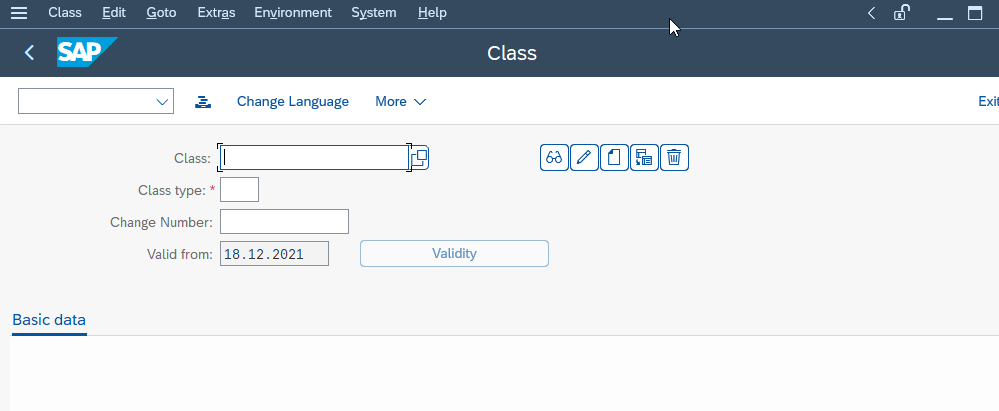
Step 2: On the Class, screen fill in the required fields:
- Class: Type the name of the class you can choose any name. For example MM_PO_RS
- Class Type: 032 for release strategy
Then press the Create icon.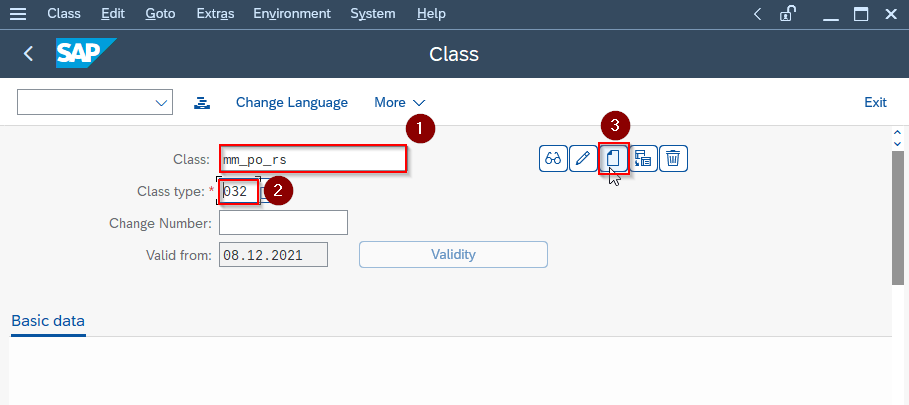
Step 3: On Create Class screen select the Basic data tab
- Description: Type the appropriate description of the class.
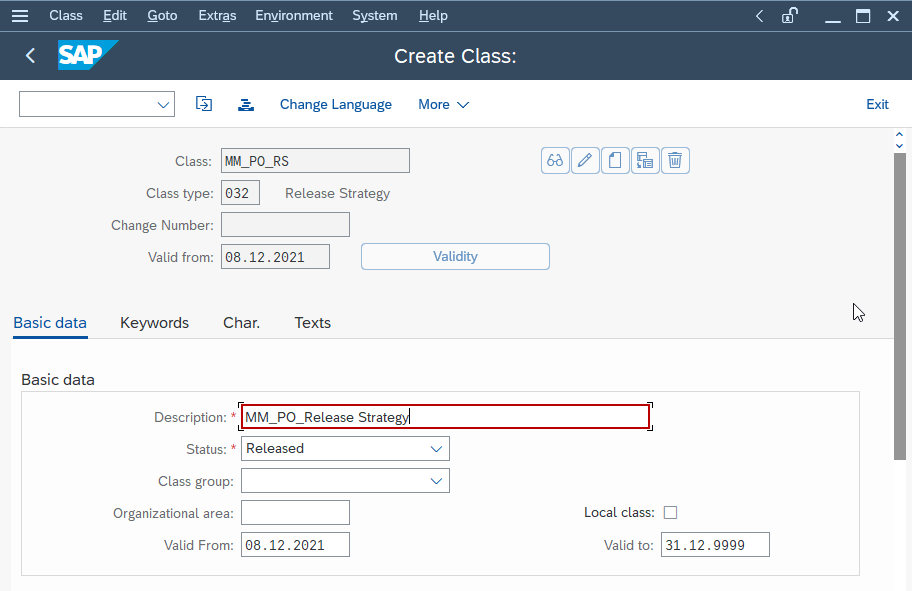
Select the Char. tab and assign the characteristics to the class.
In the Char. field type the name of the characteristics you created earlier.
- P_DOC1
- P_ORG
- PO_TOTAL VALUE
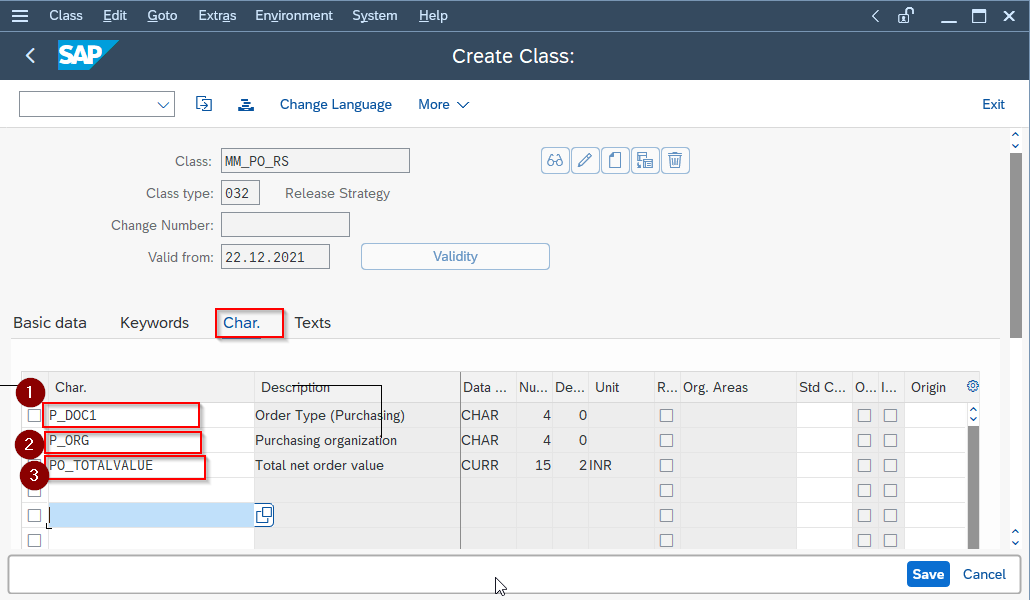
Then press the Save button.
Steps to define Release Strategy for Purchase Order
Release Group -> Release Codes -> Release Indicator -> Release Strategies (Release Pre-requisite -> Release Status -> Classification -> Stimulation)
After creating the classes the next step is to configure the elements required in Release Strategy.
- Release Groups
- Release Codes
- Release Indicator
- Release Strategies
- Workflow
Steps to configure Release Groups
After creating Class it is assigned to the Release Group. The same class is assigned to all the Release Group.
Step1: Goto SPRO -> Sap IMG -> Material Management -> Purchasing -> Purchase Order -> Release Procedure for Purchase Orders -> Define Release Procedure for Purchase Orders
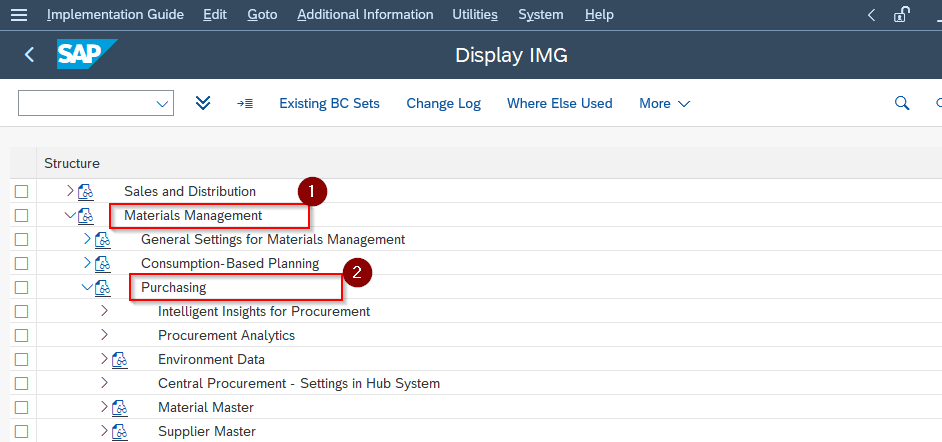
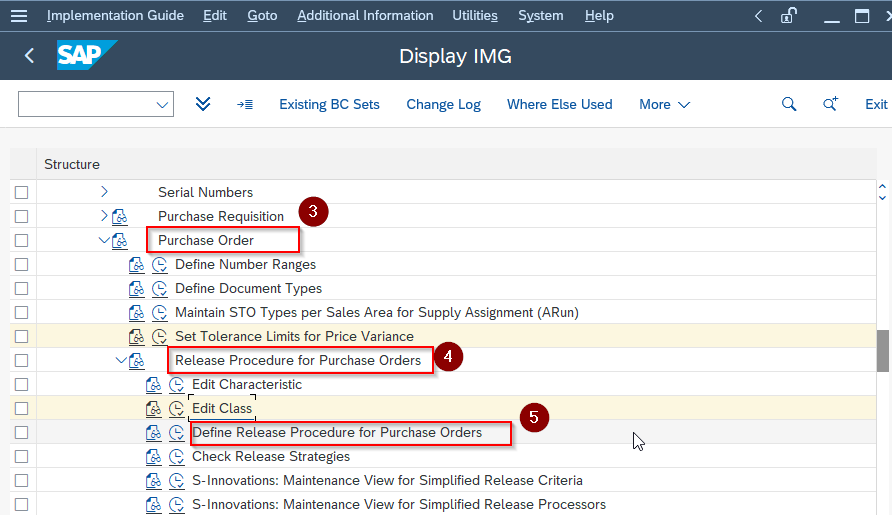
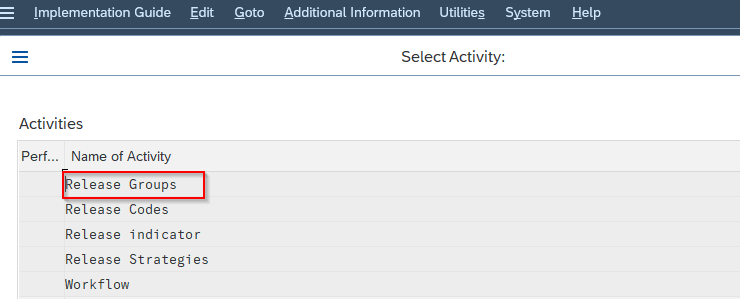
Select Release Groups from the Select Activity screen
Step 2: On Change View “Release Groups: External Purchasing Document”: Overview screen select New Entries button.
- Rel. Grp: Here type the name of the release group. It is a two-digit alphanumeric code. Here we are creating the release groups B1, B2, and B3.
- Class: Here type the name of the class which we have created earlier. For example MM_PO_RS.
- Description: Here type the description about the release group.
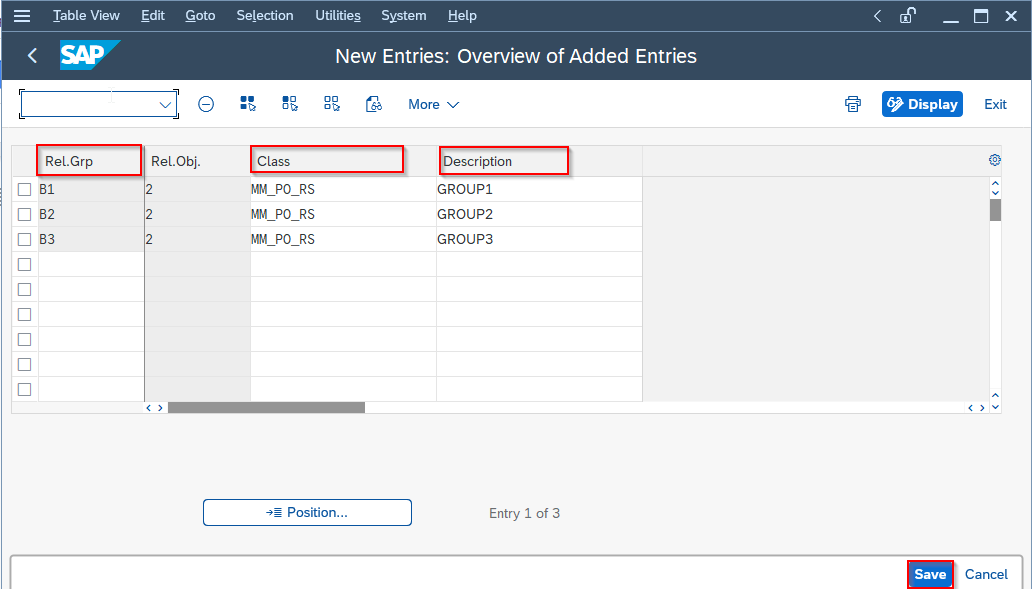
Then press the Save button.
Steps to configure Release Codes
Release Code is the approver of the release strategy. The person responsible for releasing the purchase order is the Release code. It is a two-digit code assigned to the respective officer. For example General Manager, Manager, Team Lead, etc.
Step 1: Goto SPRO -> Sap IMG -> Material Management -> Purchasing -> Purchase Order -> Release Procedure for Purchase Orders -> Define Release Procedure for Purchase Orders ->
On the Select Activity, screen choose Release Codes

Step 2: On the Change View “Release Codes: External Purchasing Documents”: Overview screen select New Entries tab.
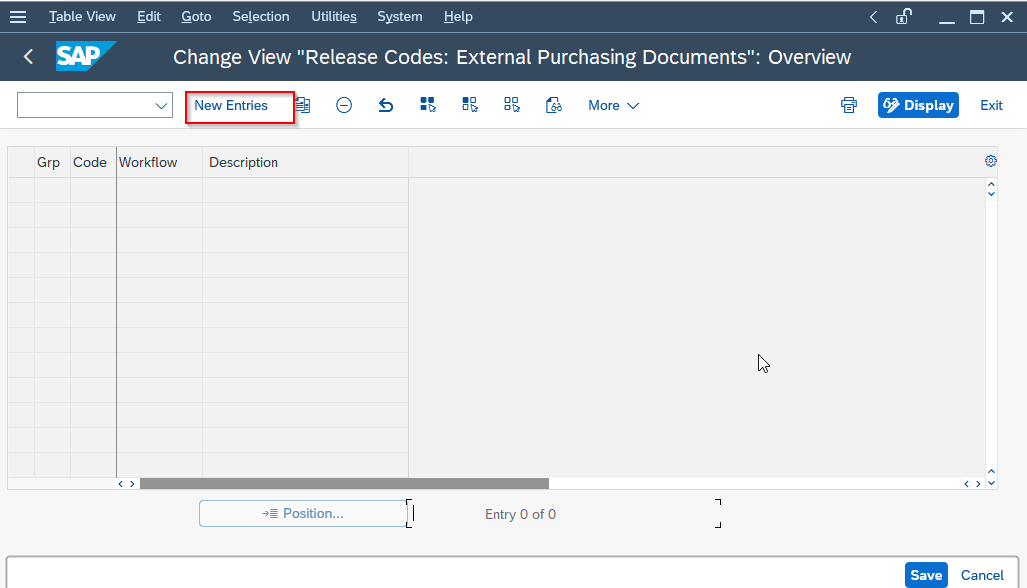
Step 3: On the New Entries: Overview of Added Entries screen fills the important fields.
- Grp: Here type the code of the release group you created. For example B1.
- Code: Here you can type any two-digit code for your release group. For example A1.
- Description: Here type the description of the release code.
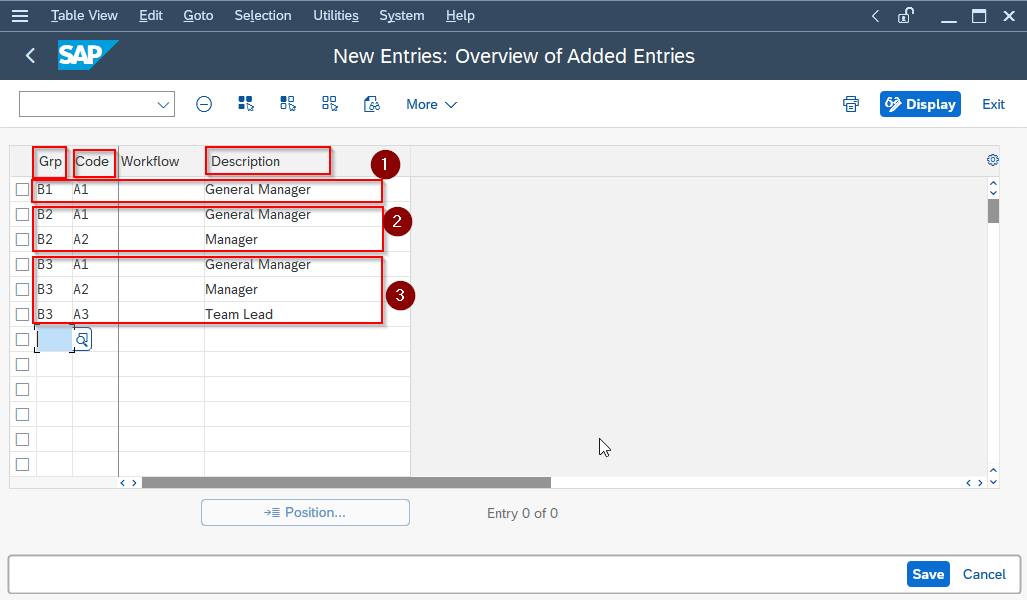
Click the Save button.
Steps to configure Release Indicator
Release indicators tell us the status of the Purchase Order whether it is released or not. Mainly there are two types of Release Indicators: Released and Blocked and there is one more indicator: Partial Release.
- Released: When all the levels are approved.
- Blocked: When all the levels are not approved.
- Partial Release: When Only one or two levels are approved.
Step 1: Goto SPRO -> Sap IMG -> Material Management -> Purchasing -> Purchase Order -> Release Procedure for Purchase Orders -> Define Release Procedure for Purchase Orders ->
On Select, Activity screen choose the Release indicator
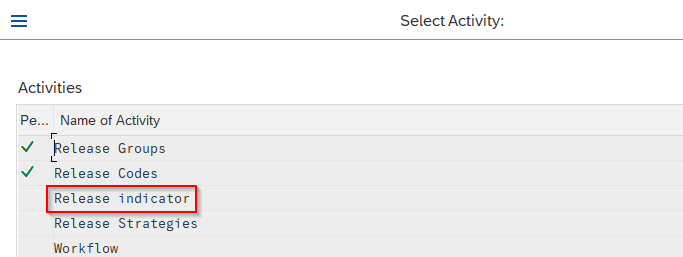
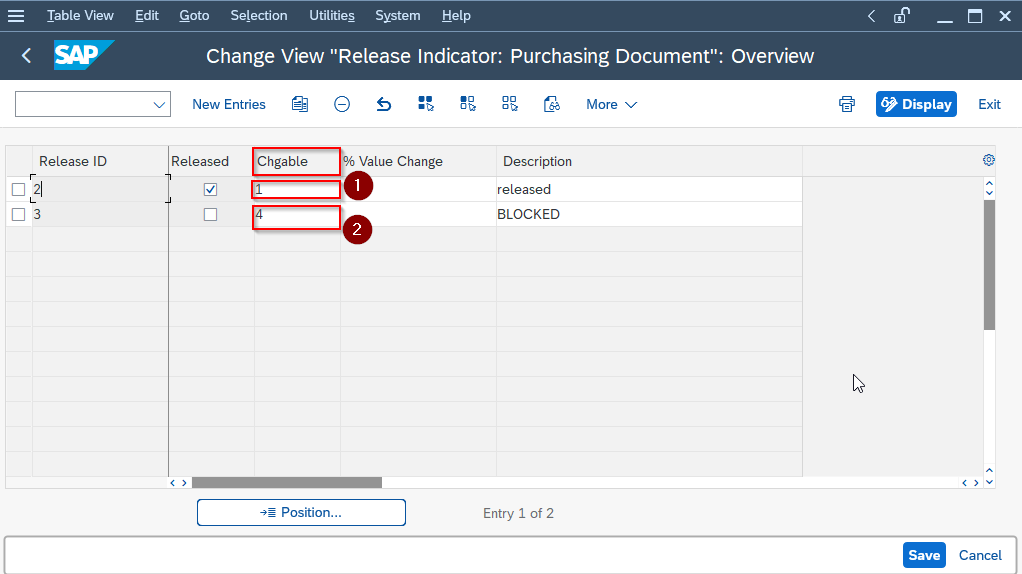
Step 2: On Change View “Release Indicator: Purchasing Document”: Overview screen here we are taking two release indicators.
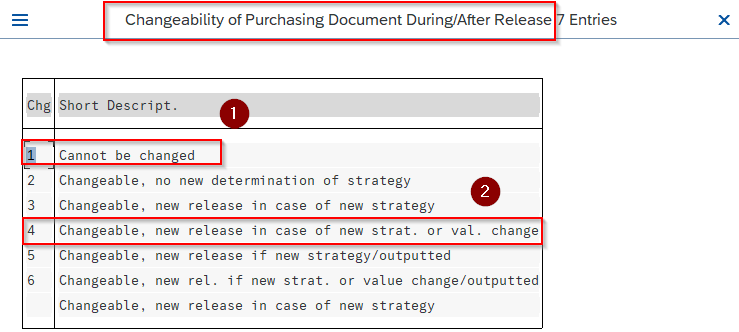
For Release ID 2 select the Chgable value 1(which cannot be changed)
For Release ID 3 select the Chgable value 4(it can be changed)
Press the Save button
Steps to configure Release Strategies:
As per the business requirements, we decide how many release strategies we require.
Step 1: Goto SPRO -> Sap IMG -> Material Management -> Purchasing -> Purchase Order -> Release Procedure for Purchase Orders -> Define Release Procedure for Purchase Orders ->
On the Select Activity, screen choose Release Strategies

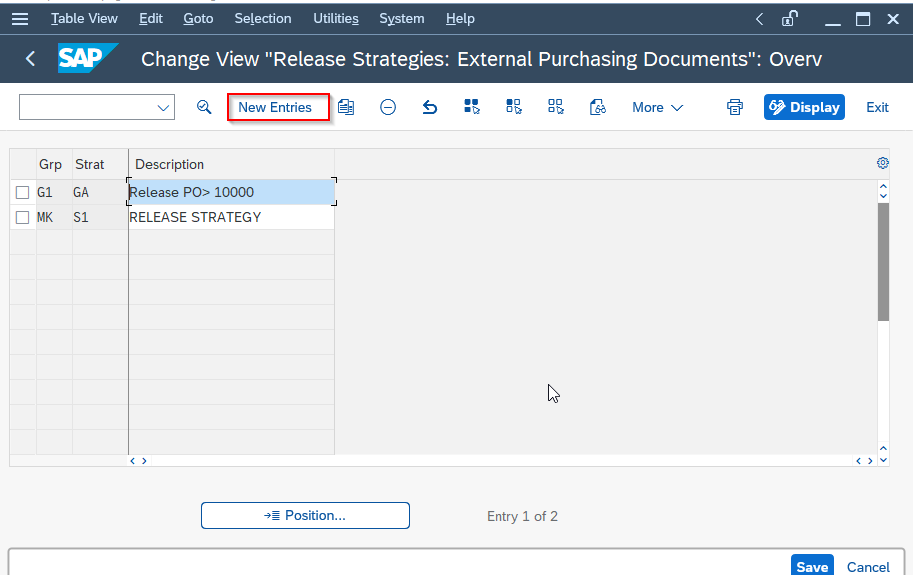
Step 2: On Change View “Release Strategies: External Purchasing Documents”: Overview screen select New Entries button
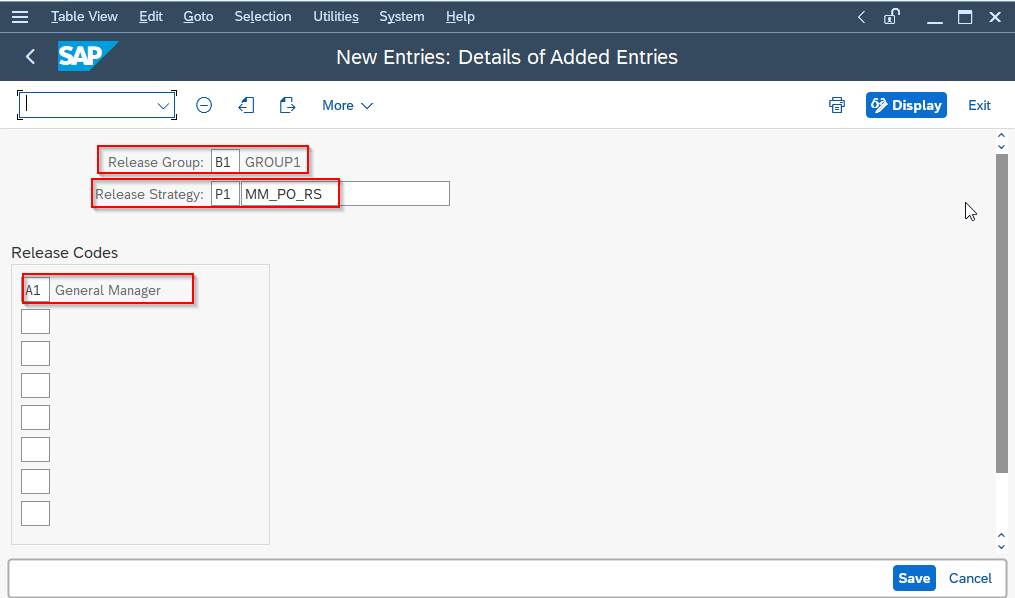
Step 3: On the New Entries: Details of Added Entries fill the required information.
- Release Group: Type here the name of the release group. For example B1.
- Release strategy: Type here the name of the release strategy. For example P1.
- Description: Type here the name of the release strategy we created earlier. For example MM_PO_RS.
Click on the Release Prerequisites button
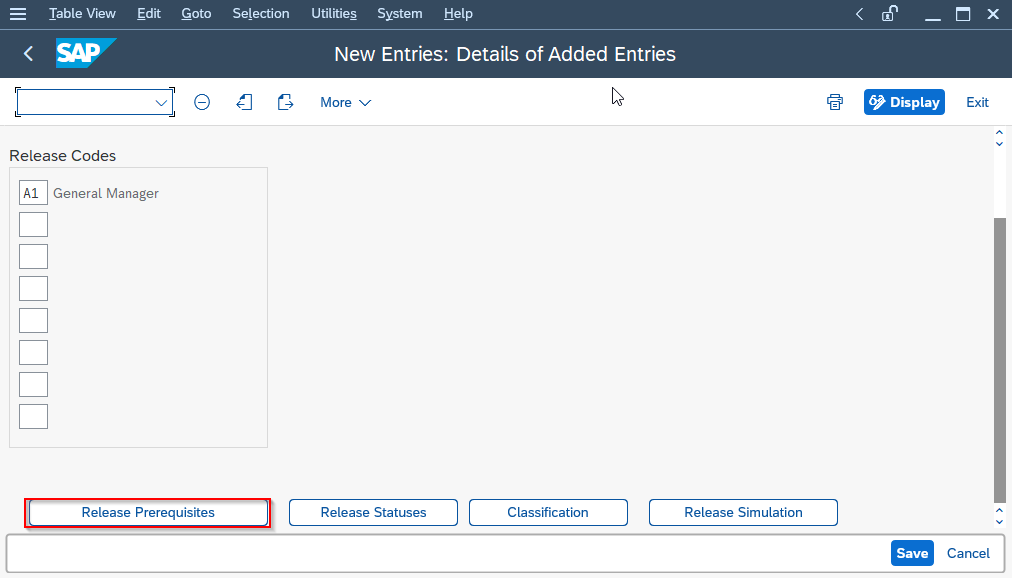
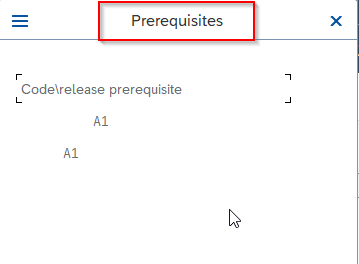
and press the Continue button. After that click on the Release Statuses button.
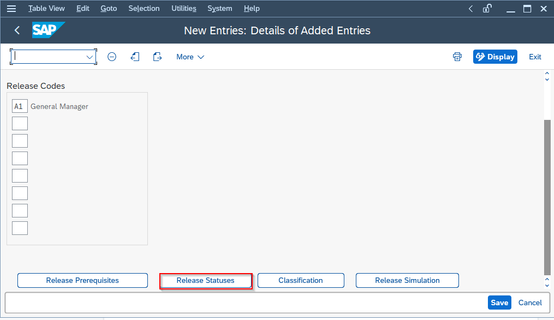
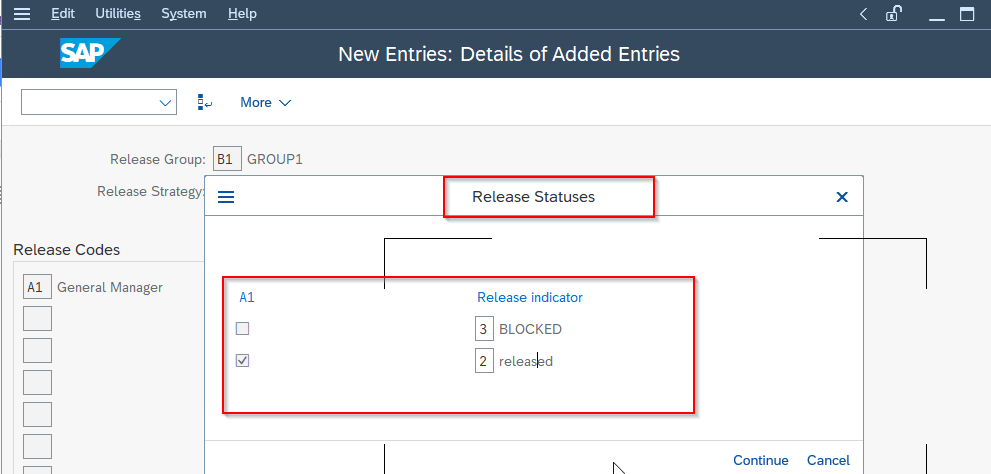
and press the Continue button. Then click on the Classification button to select the Classification values for the selected characteristics in release class.
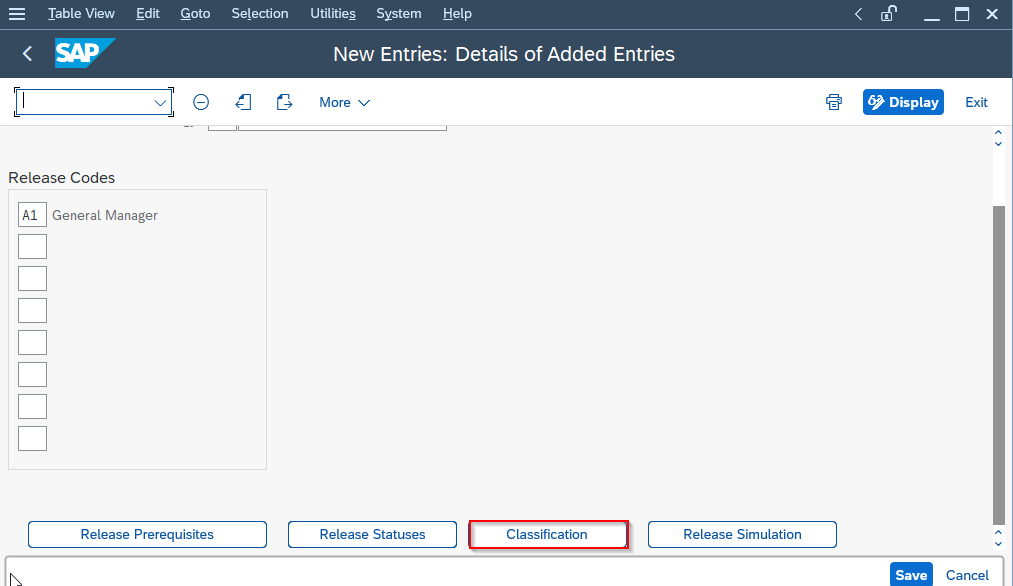
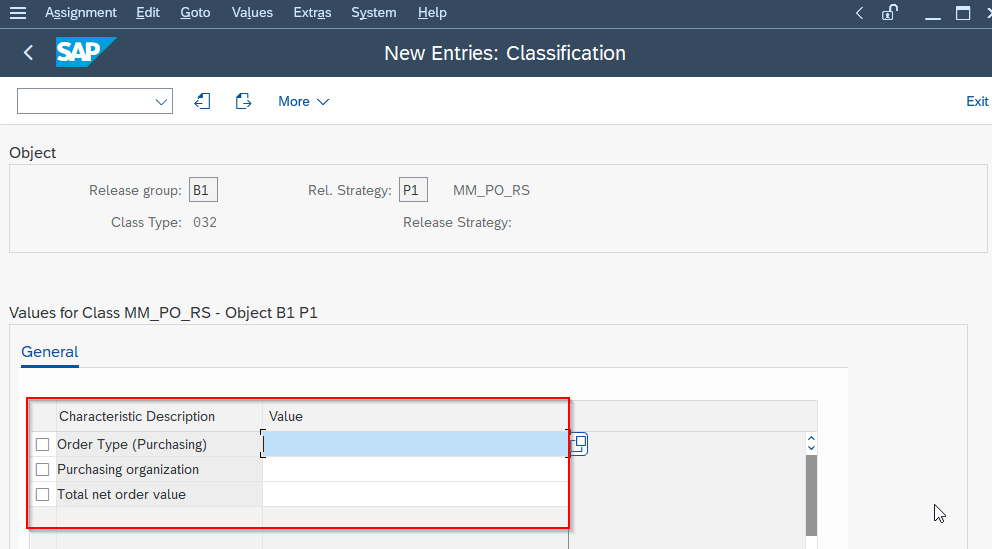
Select the values which you want to involve in the release strategy.
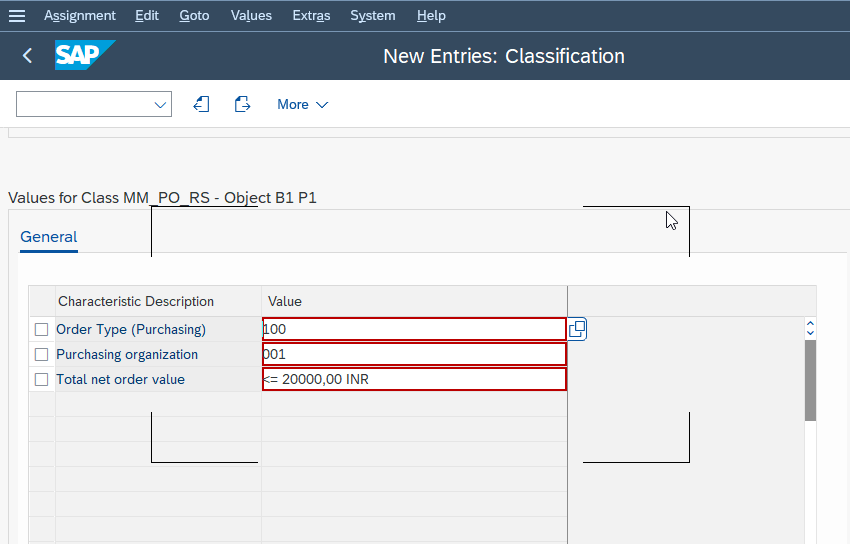
and press the Save button.
Click on the Release Stimulation button to stimulate the release strategy.
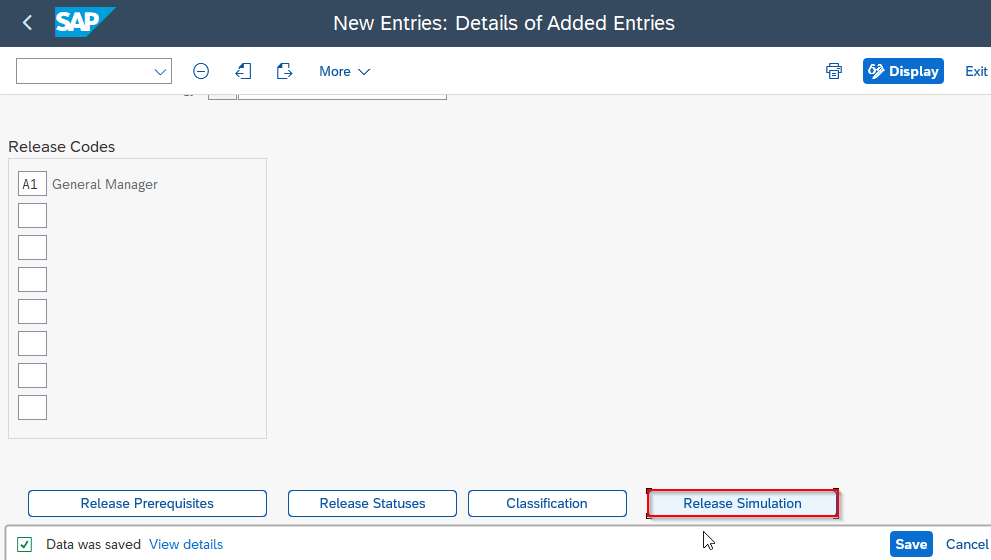
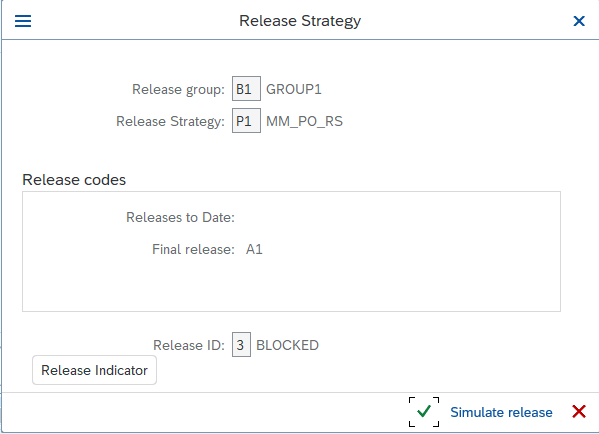
press Stimulate release button
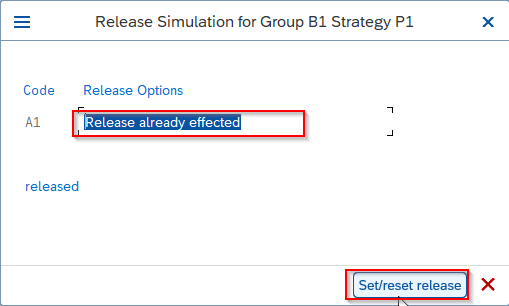
If you select Release already effected and press Set/reset release button you will find that Release is possible.
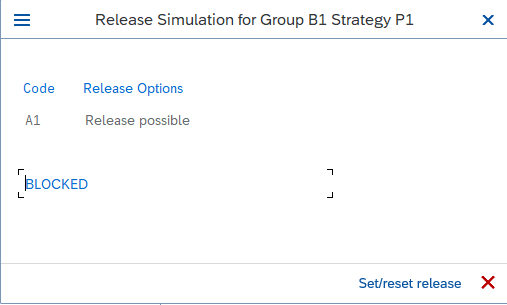
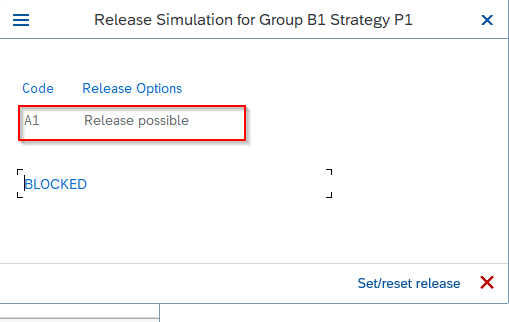
In a similar way create Release Strategies for other approvers P2 and P3.
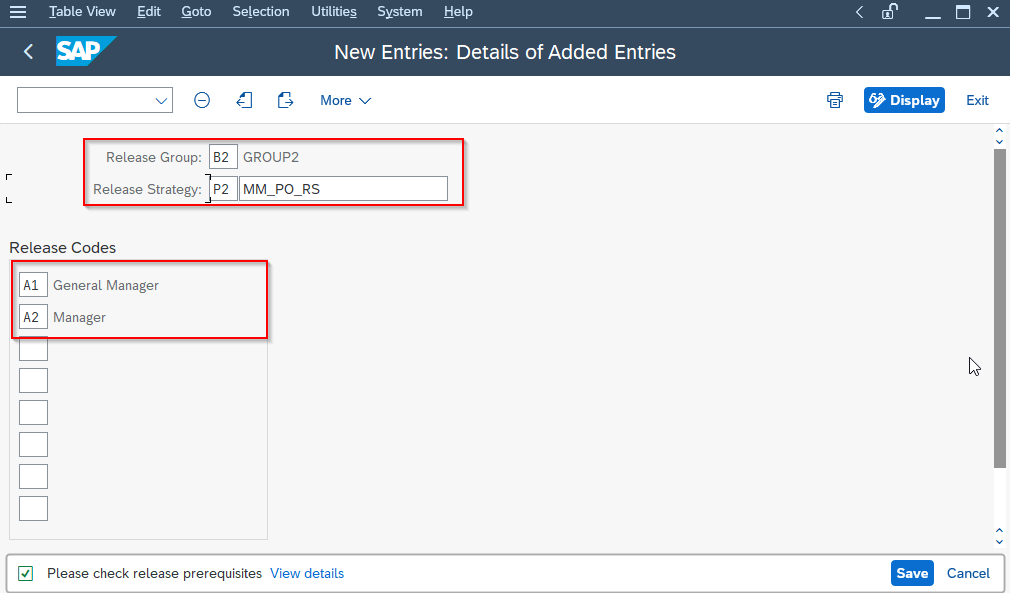
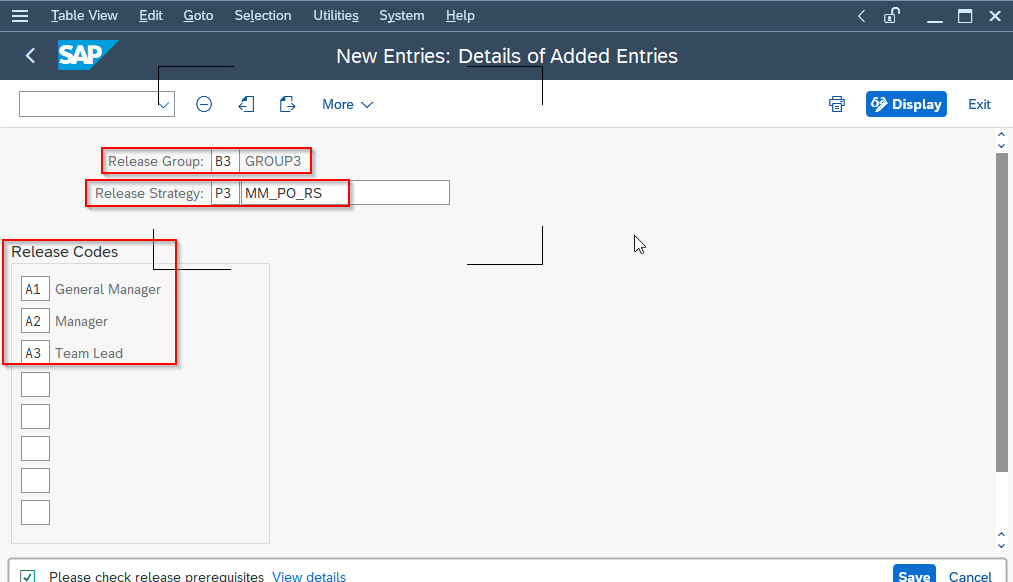
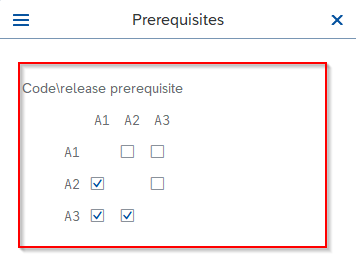
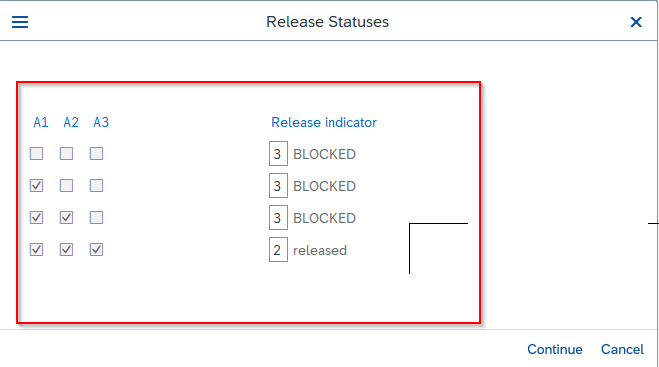
Here the Release Statues show that if all the release codes A1, A2, and A3 are approved then the Purchase Order is released.
How to Configure PO Release Strategy?
The aim of the SAP purchase order release procedure is to replace the manual written authorization procedures. An electronic signatures is used instead, maintaining the dual control principle. The person responsible for the processes of the requisition or other purchasing document in the system have to approve by marking an "electronic signature" which can give the document legal force for further processing.
Briefly, this is how the purchase order release strategy works
The release code is a two character ID allowing a person to release (clear, or approve) a requisition or an external purchasing document. The release codes is basically controlled via a system of authorizations (authorization object M_EINK_FRG).
Use SE12, structure CEKKO to check all the fields available for controlling the Purchase Order.
An example of configuring a Purchase Order Release Strategy
If the total value for the Purchase Order exceeds 10,000, release strategy 01 is assigned to the Purchase Order. There is only one characteristic created in this example.
For controlling the Purchase Order type, create characteristic for CEKKO-BSTYP and the value NB.
Steps for configuring the PO release strategy
Create the PO Characteristic
Transaction code: CT04 - Create Characteristic e.g. NETVALUE
Create the Class of the PO Release Strategy
Transaction code: CL02 - Class
Define the Release Procedure
OMGS - Define Release Procedure for Purchase Order Type
Release Group - New entries
Release codes - New entries
Release indicators - New entries
Release Strategy - New entries
1 - Release
Check your PO release configuration
Finally, check your PO Release Strategy configuration to make sure that there are no errors.
OMGSCK - Check Release Strategies (make sure there are no error messages)
Once the Purchase Order is not released, buyers will not be able to print the Purchase Order.
Goods Receipts will be shown with Message no. ME 390 - Purchasing document XXXXXXX not yet released.
In 4.6c, Purchase Order with Release Strategy has a tab at the end of the Header. This allowed the buyers to check the release status of the Purchase Order.
The person with the release authorization has to use ME28 to release the Purchase Order.