Be it Amazon or Netflix, nobody likes to type in their username and password every time they log in. After all you have some crucial online shopping and binge-watching to do right? So, Google Chrome’s in-built password manager saves the credentials for you, so you can log-in in a jiffy.
But sometimes, this feature does not work properly and Chrome does not ask or save your passwords. As a result, you are not able to auto-fill your login credentials in your next session.
In this tutorial, we will learn the different ways to solve this issue. But first, let us learn the main causes of this error.
Why did Google Chrome stop saving my passwords?
The possible reasons for Google Chrome to not save your login credentials are –
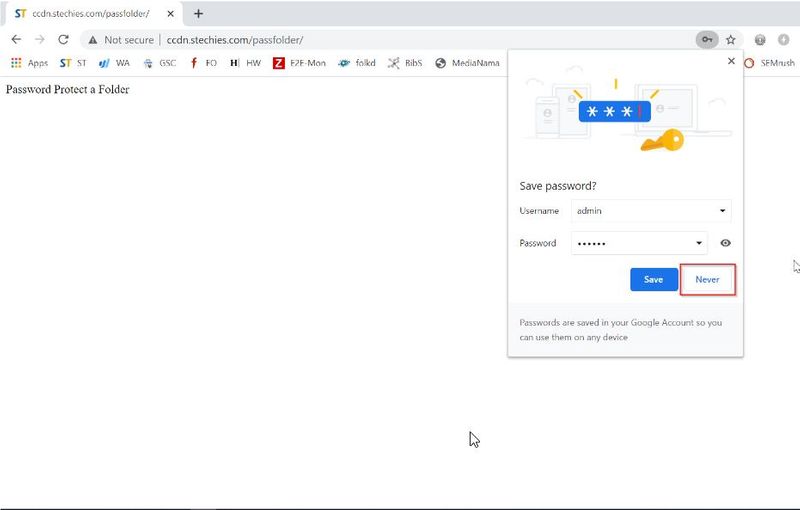
Never Saved Password Enabled
If while logging in, you clicked on the “Never save password” option when it prompted you, the credentials will not be saved. So, just avoid clicking on the option.
Outdated Google Chrome
The issue is popular in Chrome browsers that are not updated and have a bug. So, update your browser as quickly as possible to save your passwords properly.
Corrupted Chrome Account Profile
This error can pop up if your Chrome account profile folder has been corrupted. In this case, it is recommended that you create a new user account.
Chrome Cannot Save Local Data
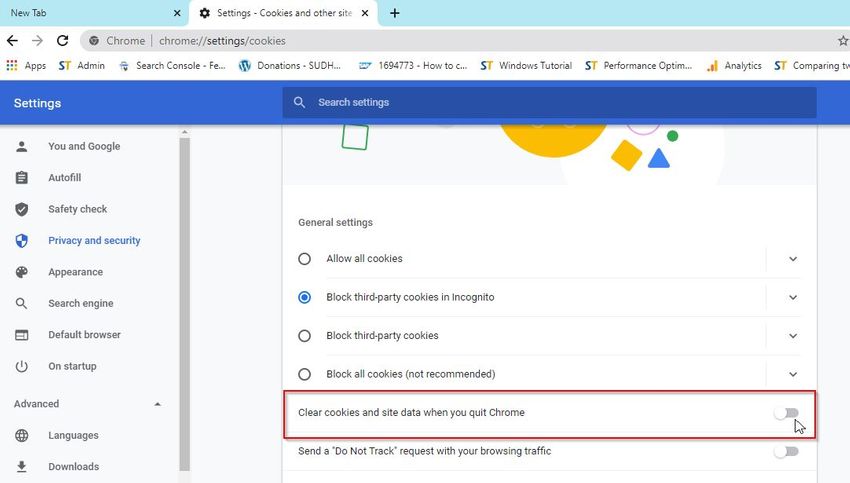
In Chrome’s Site Settings, there is a section called “Cookies and other site data”. Here, if you enable the setting “Clear cookies and site data when you quit Chrome”, Google will not save any local data including cookies and passwords when you quit Chrome.
So, it is best that you do not enable this feature and let Chrome store local data such as cookies.
Old Cache & Cookies
If you have not cleared your cookies and cache files in a while, it might be hampering your passwords. Make sure to clear these files once a month to save yourself from hassles.
Corrupted cache folder (for MAC users only)
If you are a MAC user, corrupted cache files can prevent your browser from saving your passwords. You can delete these series of cache folders manually to avoid this issue.
Problematic Chrome Extensions
Certain extensions and plugins may be hindering your password storage. Go to the browser settings and disable the extensions that you don’t need.
How to fix this situation?
Here in this article we will dicuss the following methods to resolve this issue:
- Disable Never Save Password
- Update Your Google Chrome
- Enable “Save Password” Setting
- Allow Chrome to Save Local Data
- Reset Chrome to its Default Settings
- Clear Cache & Cookies
- Create a New Google Chrome Account
- Disable Buggy Chrome Extensions
- Using a Third-Party Password Manager
- Delete Harmful Software from your System
- Re-Install Chrome
- Delete Corrupted Cache Folders (Mac Users Only)
Method 1: Disable Never Save Password
Google Chrome is likely to never save your login credentials for a specific site if you don’t allow it. You have to disable the “Never save password” option.
Please follow the steps below to disable this setting -
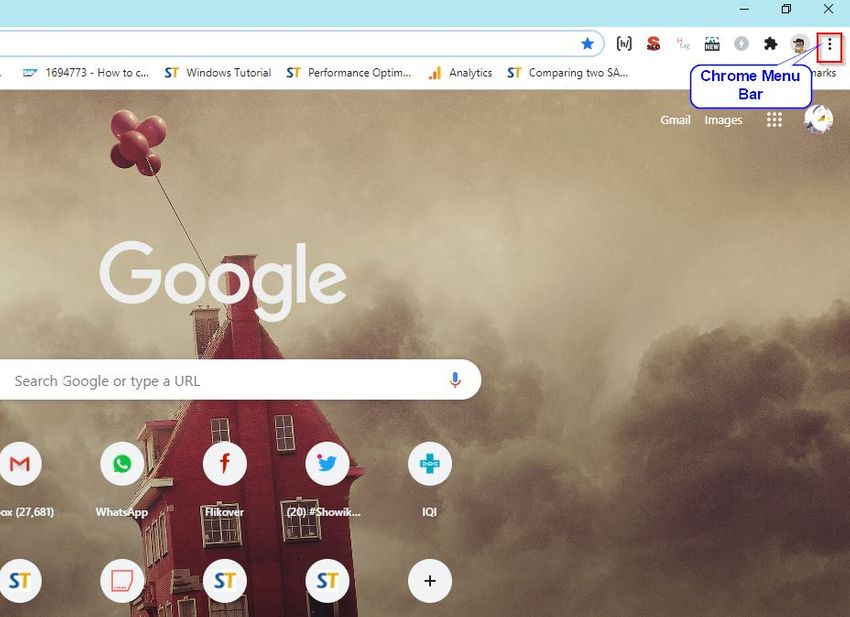
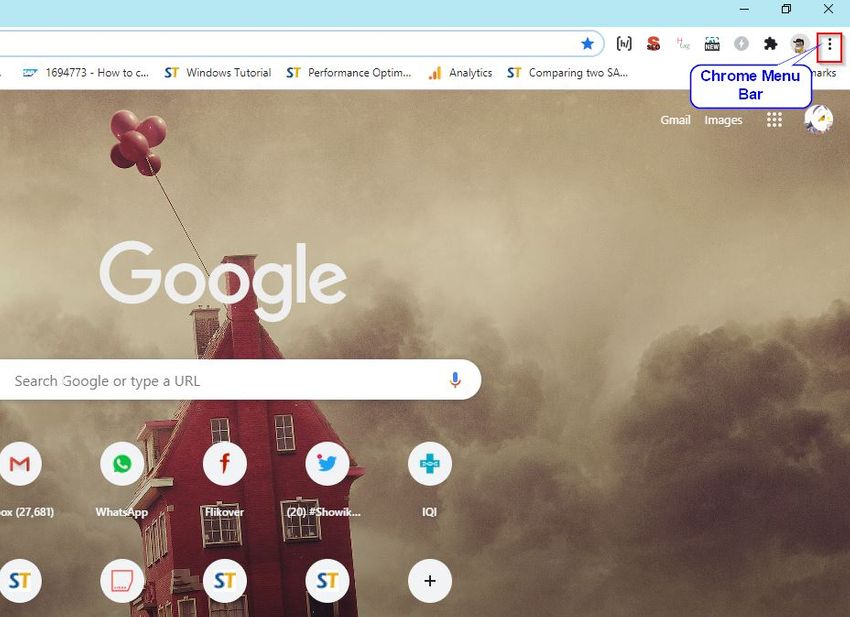
- Open the Chrome browser and click on the menu bar (three vertical dots) located on the top-right corner of the window
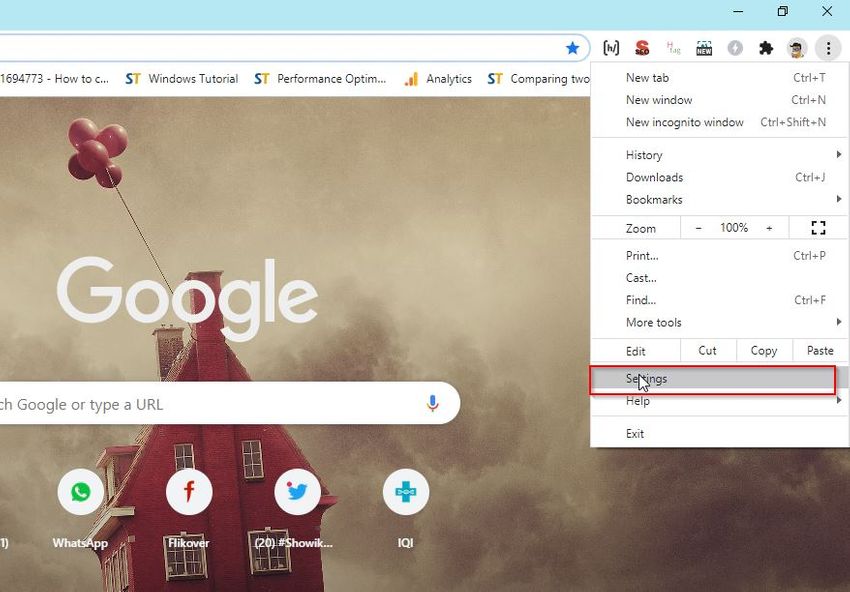
- Next in the menu bar click on Settings
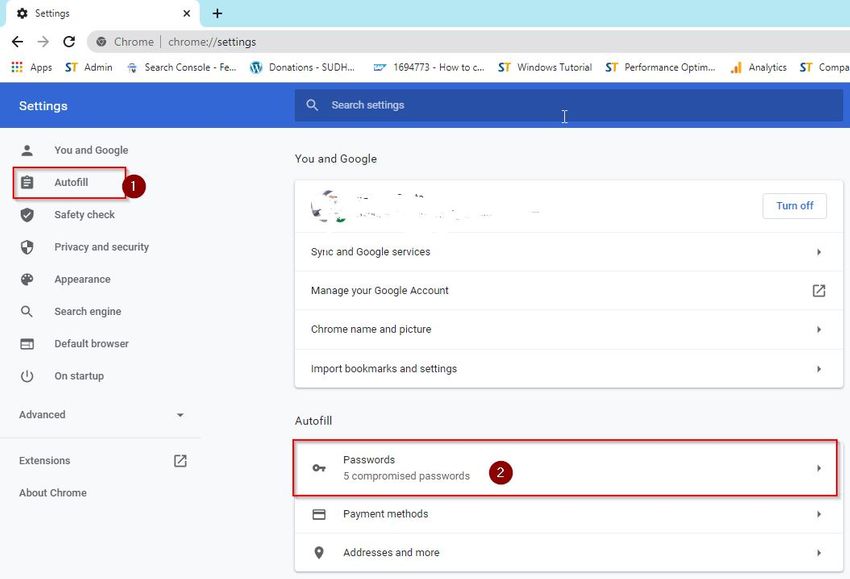
- Now in Setting window navigate to Autofill > Password
- Next scroll down to Never Saved setting
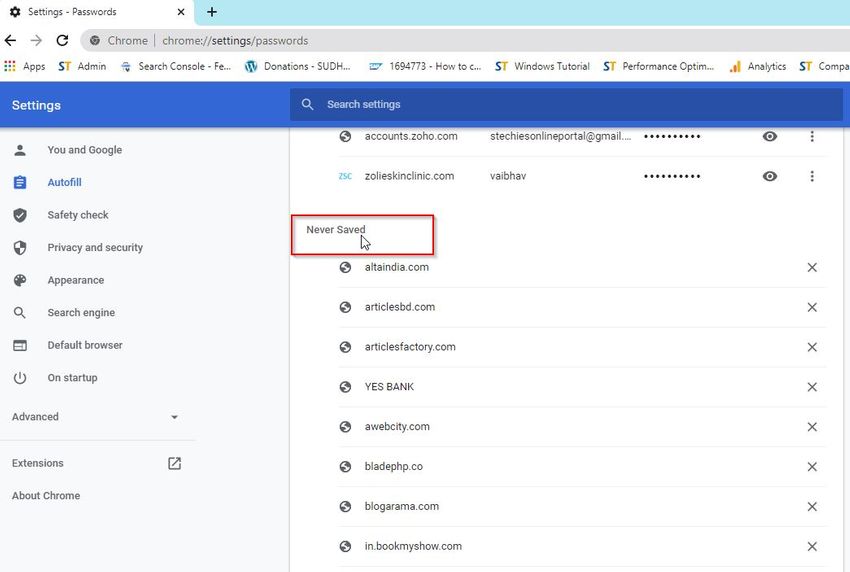
- Click the cross sign next to the website you want chrome save the password for
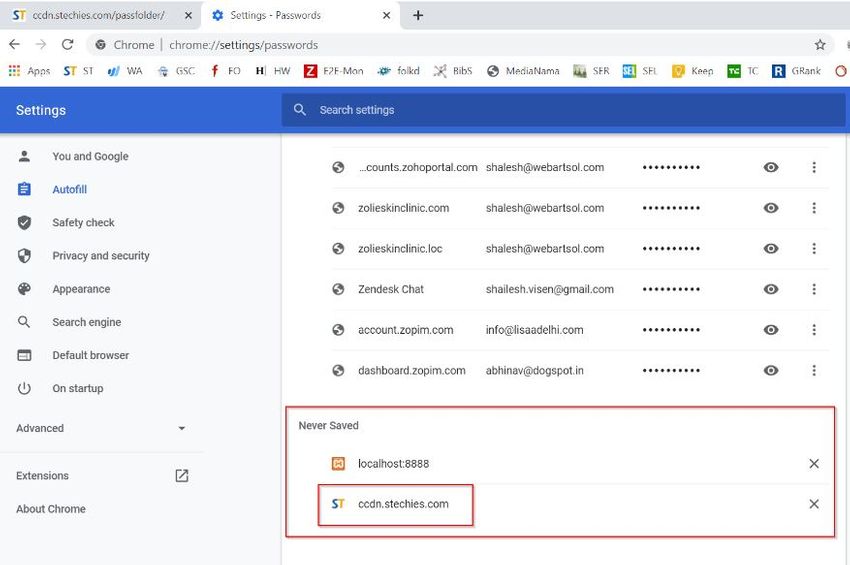
Now chrome will save your password for that specific website.
Method 2: Update Your Google Chrome
It is always recommended that you use an updated version of Chrome while browsing the web. Although it is updated automatically, if it fails, you must do it manually. This is important as many Chrome updates have patches that will fix these bugs.
Please follow the steps below –
- Open the Chrome browser and click on the menu bar (three vertical dots) located on the top-right corner of the window
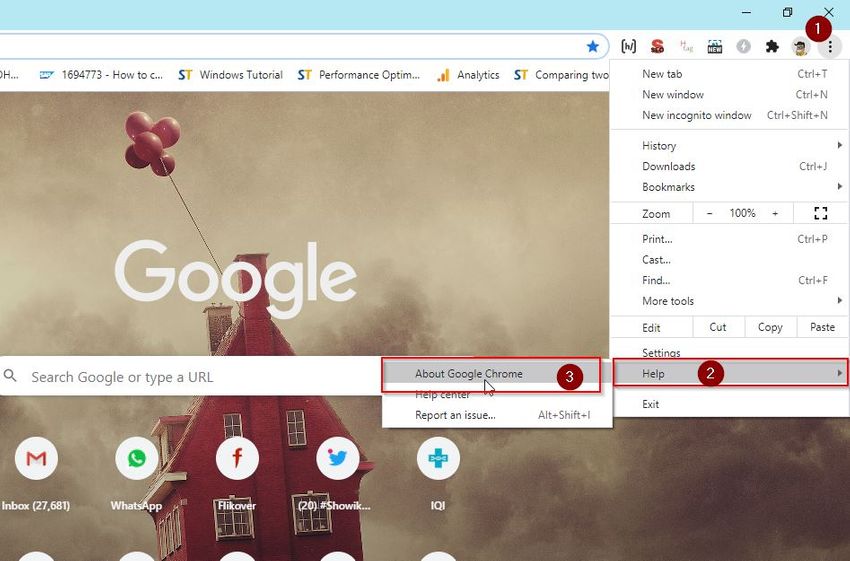
- Next in the Menu bar, click on Help > About Google Chrome
- Now click on the Chrome Version to update your browser
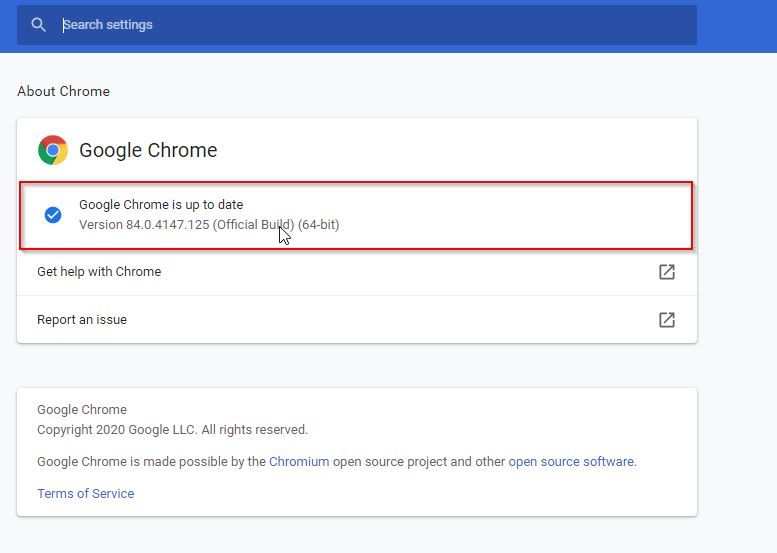
After updating the chrome browser please check if the issue has been resolved or not.
Method 3: Enable “Save Password” Setting
Incorrect password settings may cause your browser to not store your passwords. You might have disabled the Auto-fill feature and forgot to enable it. Go to the browser settings to check it out.
Please follow the steps below –
- Open Chrome browser and click on the three vertical dots (menu bar) located on the top-right corner of the window
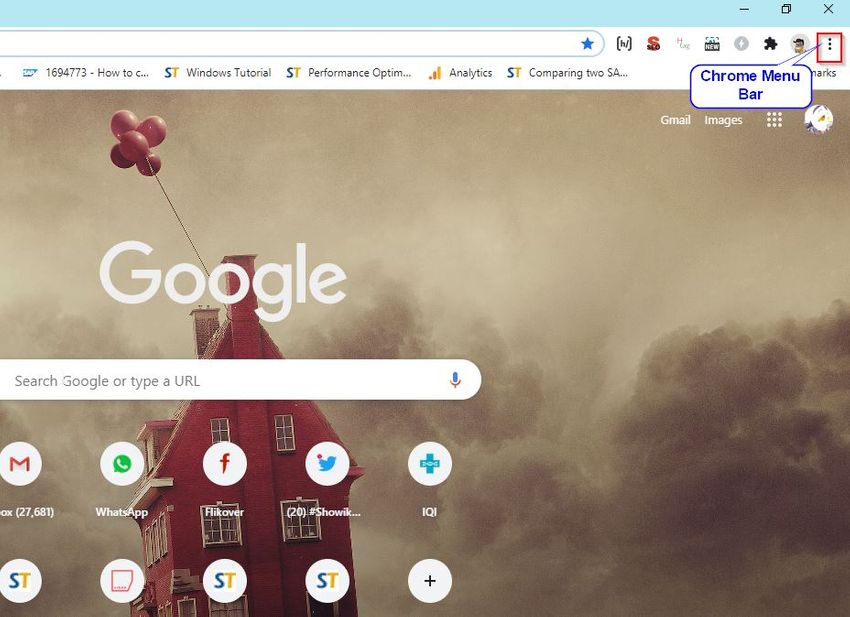
- Next click on Settings in the Menu bar
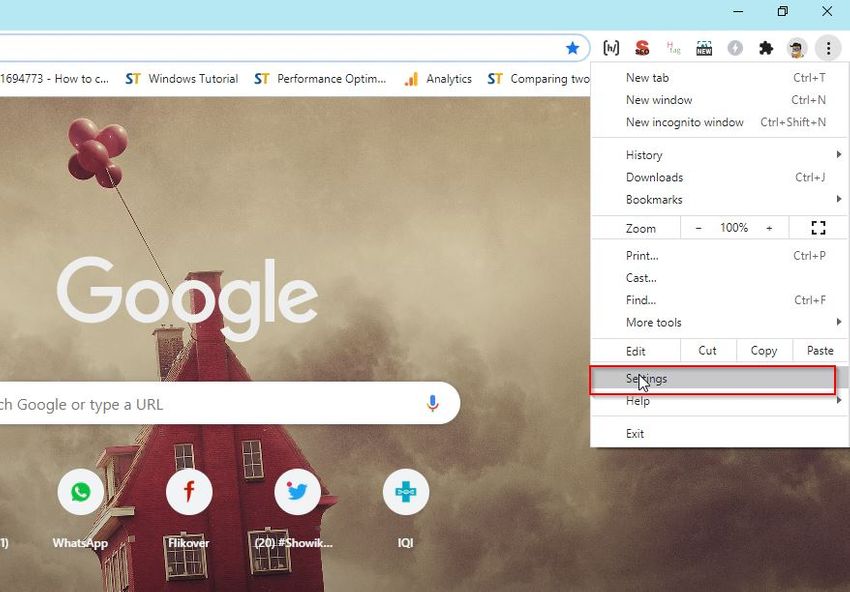
- Now navigate to Autofill > Password
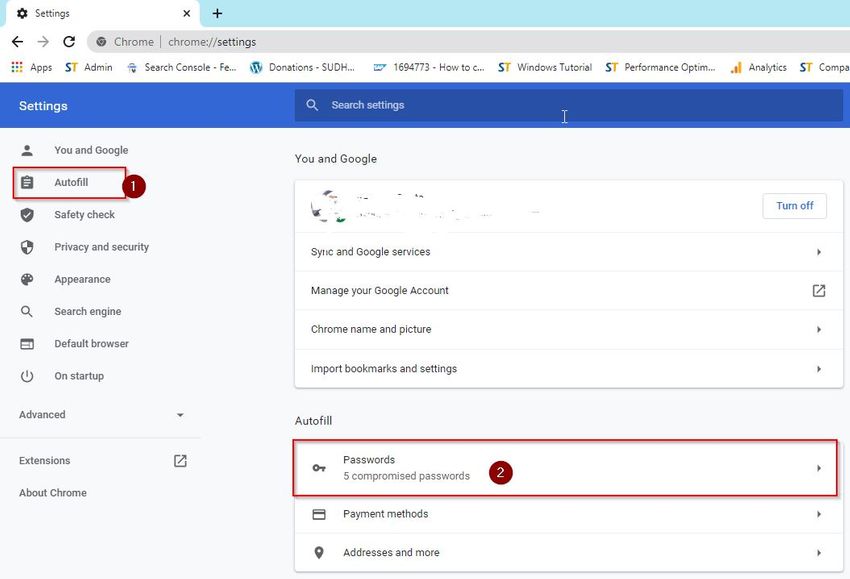
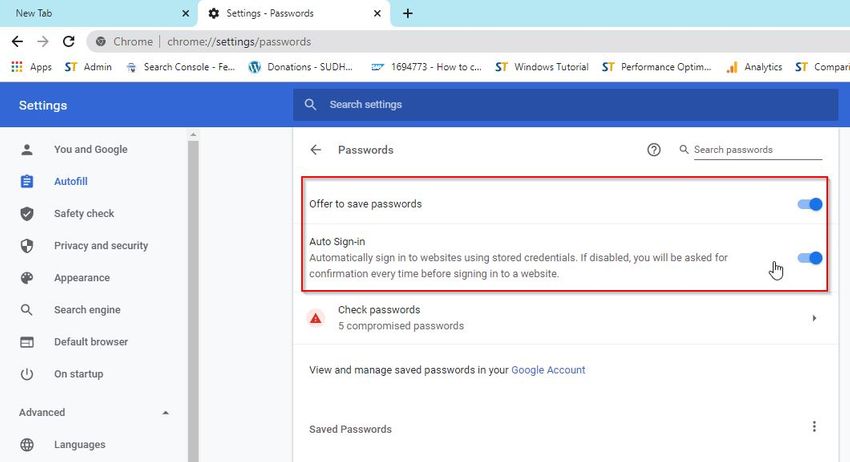
- Make sure you turn on the two toggles Offer to save passwords and Auto Sign-in
Method 4: Allow Chrome to Save Local Data
Make sure Chrome is saving local data even after it is closed. If you have disabled this feature, storing passwords will not be possible.
Follow the steps below to fix this –
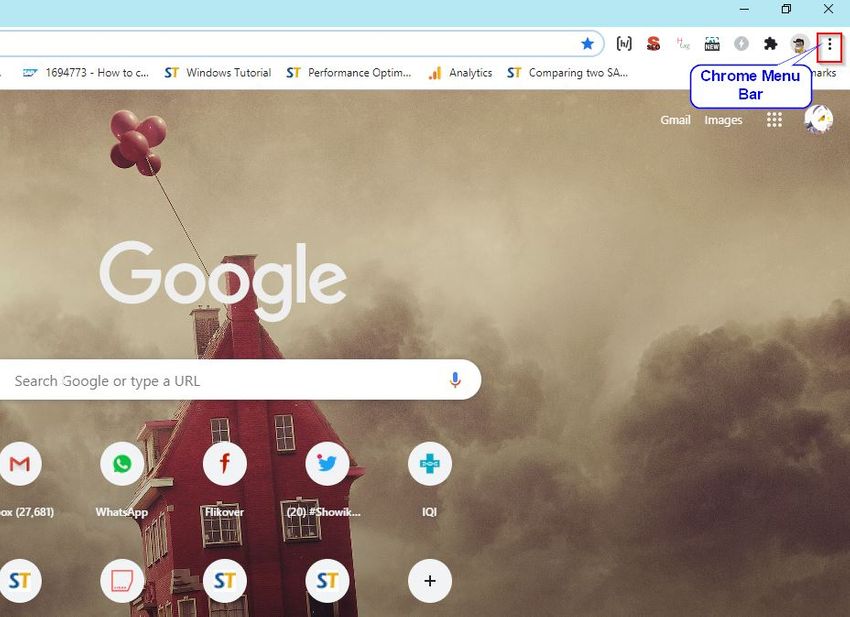
- Open your Chrome browser and click on the Menu bar at top-right corner
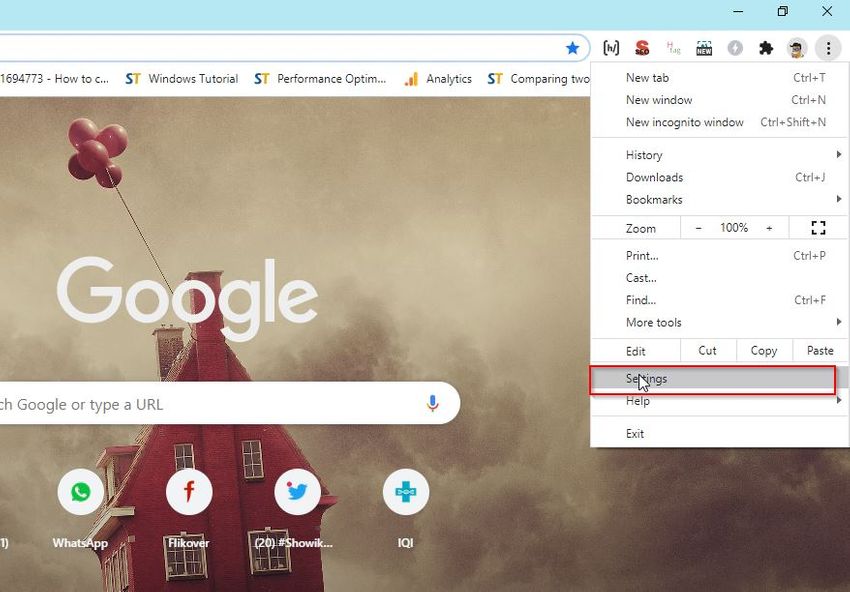
- Next, click on Settings in the Menu bar
- Now scroll down to the Privacy & Security tab and then click on Site Settings

- Next click on the Cookies and other site data option

- Next under General settings, toggle off the option Clear cookies and site data when you quit
- Restart your browser and try saving passwords for a site. It should work just fine!
Method 5: Reset Chrome to its Default Settings
It is possible that you might have made some changes in your browser settings which is in turn preventing it from saving passwords. Restoring Chrome to its original settings is likely to solve this issue.
But before you do it, back up your important data, already saved passwords, bookmarks or import them to the cloud. Then follow the steps given below –
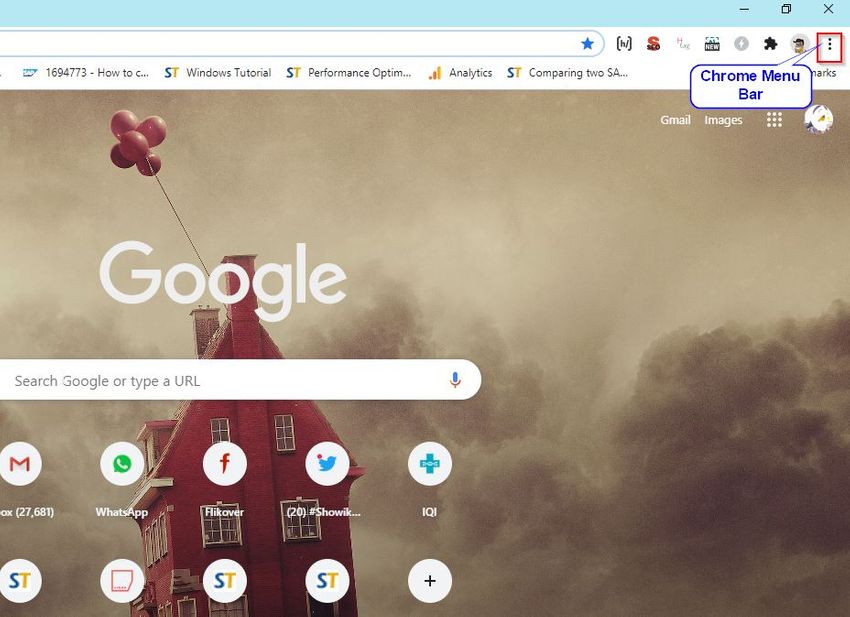
- Click on 3 vertical dots on the top left corner of Chrome to open the Menu bar
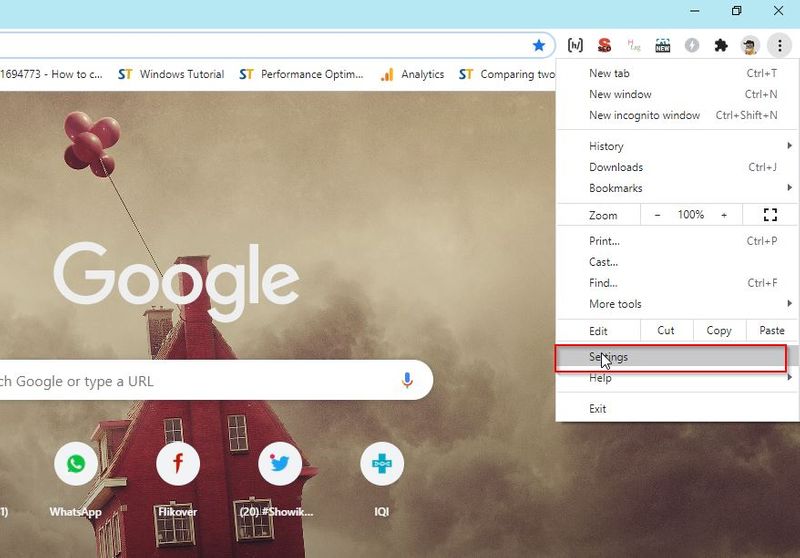
- Then, click on the Settings option
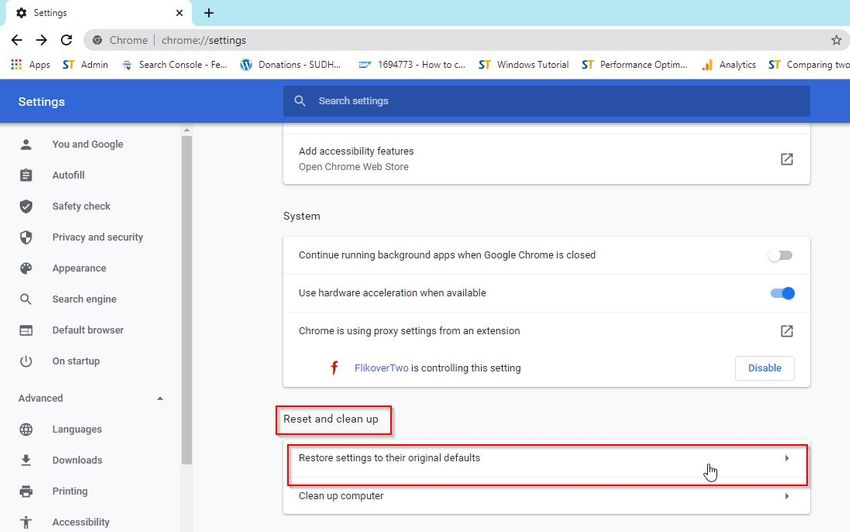
- Next Scroll down to Advance Setting and click on the dropdown

- Next scroll down to Reset and clean upand select Restore settings to their original defaults
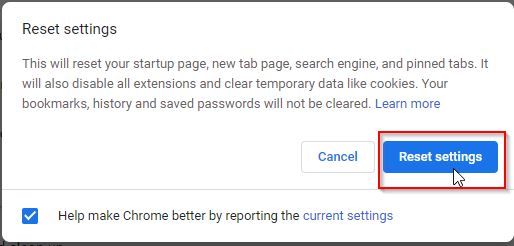
- Next, click on Reset settings in the dialog box that pops up
After Chrome has been restored to its default settings, check to see if it is saving your passwords.
Method 6: Clear Cache & Cookies
To clear out cache files and cookies that might cause the problem, please follow the steps below –
- Open the menu bar of your browser
.jpg)
- Next navigate to More tools -> Clear Browsing data
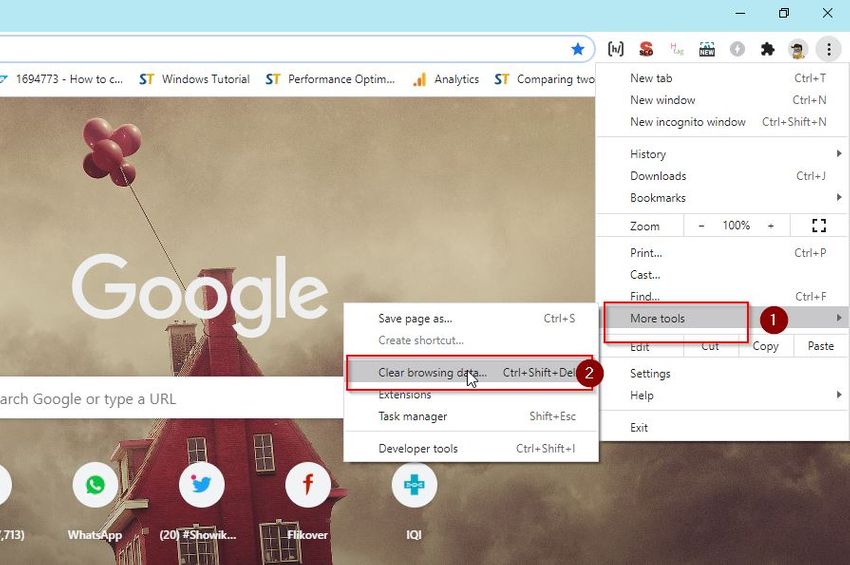
Now under 'Advance' tab select following checkboxes
- Browsing History
- Download History
- Cookies and other site data
- Cached images and files
Next select Time Range to “All Time” and then click Clear Data
.jpg)
It will take a few moments to clear out the cache and cookies. Restart your browser and check whether you are being able to save passwords.
Method 7: Create a New Google Chrome Account
Another way to fix this password issue is to create a new Chrome Account, as your current one may be corrupted.
Note: This is not an ideal solution because you will lose your previously saved user preferences and passwords.
However, if you still wish to do it, follow the steps below –
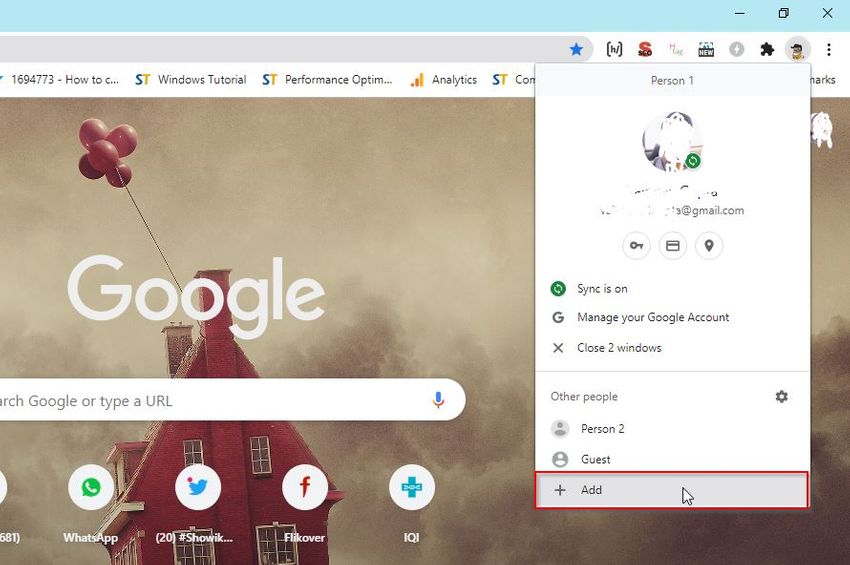
- Open the Chrome browser and click on the User icon on the top-right corner of the window
- Next, click on Add
- Now, choose a name and avatar and click on Add
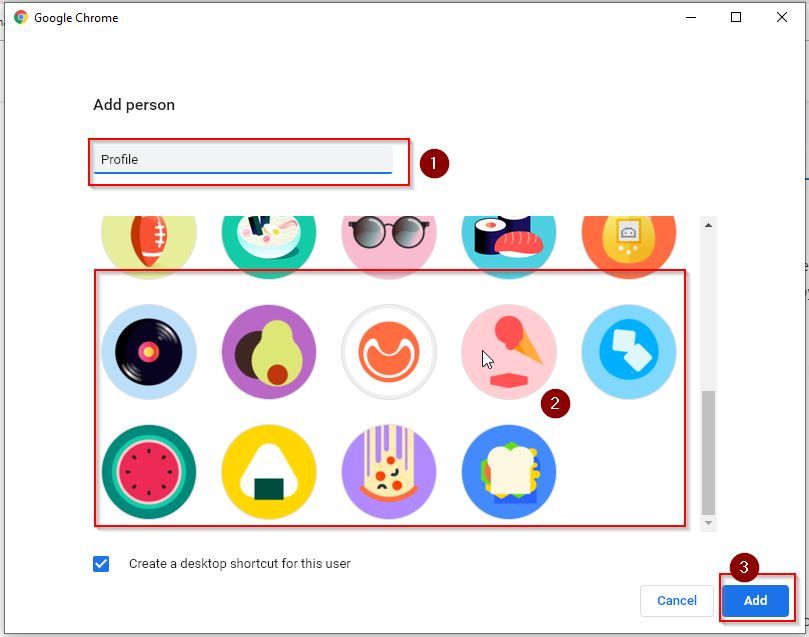
Your new Chrome account will have been created. Login into this account. Try saving passwords for any website to check whether the problem persists.
Method 8: Disable Buggy Chrome Extensions
You can disable unwanted Chrome extensions one by one to see which one is causing the password problem.
Please follow the steps below -
- Open your Chrome browser and click on the Menu bar
.jpg)
- Next, navigate to More tools -> Extension
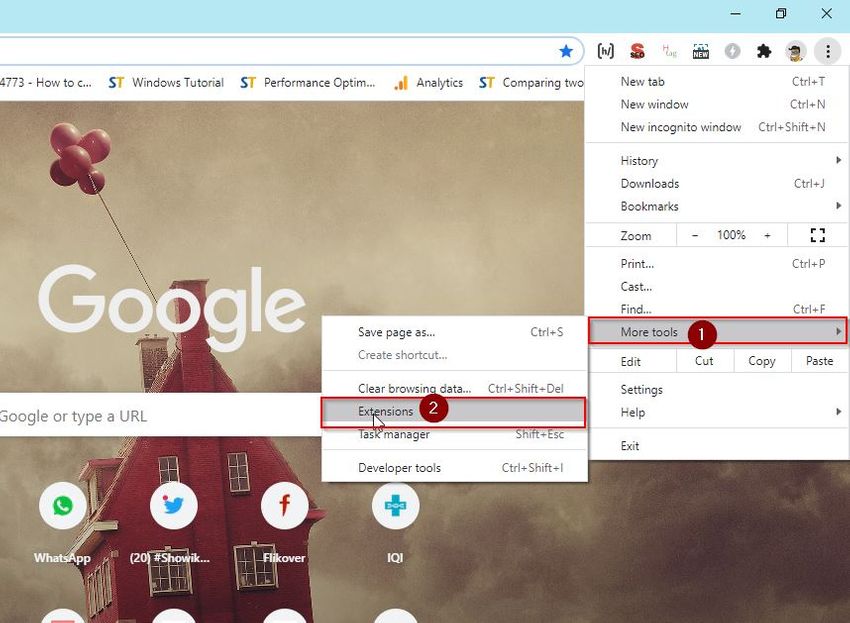
- A window will open which will present all the extensions installed on your browser
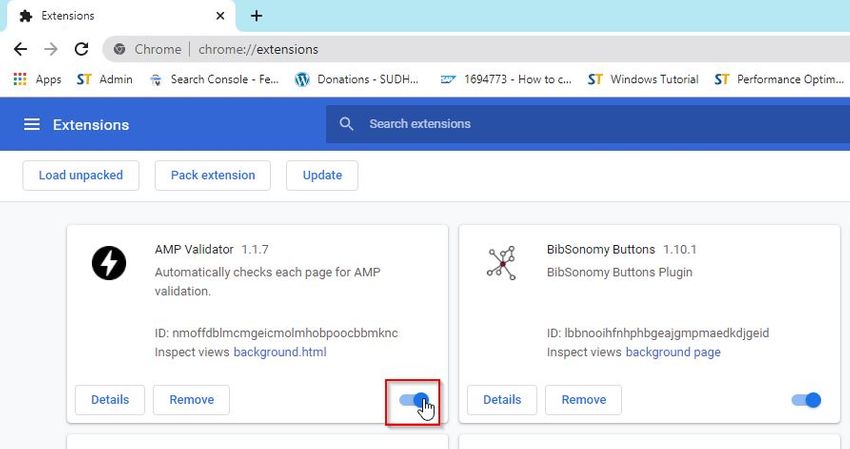
- Disable each extension one by one and check if the issue has been resolved
Method 9: Using a Third-Party Password Manager
You can also try installing third-party password managers to handle your passwords. Dashlane and Keeper are popular ones that you can try out. Chrome extensions are also available for these tools.
Be sure to have a powerful antivirus software in place if you are downloading any unknown third-party software.
Method 10: Delete Harmful Software from your System
Some harmful programs in your PC may be hampering Chrome’s ability to save your passwords. You can use Chrome’s in-built tool to get rid of these programs.
Here are the steps you have to follow –
- Launch Chrome and visit the Menu section and Select Settings

- In Settings, scroll down and find the Advanced dropdown and click to expand it
- Scroll down and find “Reset and clean up”. Under that click on “Clean up computer”
- Click on the Report Details checkbox and click on “Find harmful software”
- Then after the software scan takes place, click on “Remove if requested”
- All suspicious software will be deleted from your system
Method 11: Re-Install Chrome
If you tried all the methods described above and failed, there is one final option – reinstalling Google Chrome. Uninstalling the current version and installing the latest version may fix the password issue once and for all.
Here are the steps you must follow ton uninstall Chrome –
- Go to the Windows search bar and type Control Panel. Then, press Enter
.jpg)
- Next, in the Control Panel select “Programs & Features”
.jpg)
- Now in the ‘Programs & Features’ window, locate Chrome, right click on it and select Uninstall
.jpg)
Re-Installing Chrome
Now after uninstalling the Google Chrome from your computer you need to re-install it again. For this, go to the Chrome Official website using any other browser, and then download & Install Google Chrome.
Method 12: Delete Corrupted Cache Folders in MAC systems
If you are not able to save Chrome passwords in a Mac OS, then you need to delete the corrupted cache folders to resolve it.
Please follow the steps below –
- Go to the ~/<username>/Library folder.
- Next delete the main Google folder from ~/Library/Application Support and also all associated folders from ~/Library/Caches.
- Now restart the browser and check if the problem is fixed
Conclusion
We hope that any one of the methods mentioned above will solve the problem of Google Chrome not being able to save passwords. You can also try logging out of your Chrome and logging back in to fix the problem. Let us know in the comment section about your experience.