Users often encounter a ‘Windows can’t communicate with the device or resource’ error these days while trying to access the web. Error 'Windows Can't Communicate with Device or Resource' Fixed The problem is that, there is no specific solution for this error – it can be due to a faulty driver, junk files on your PC, incorrect internet settings or malicious software. Therefore, we have gathered a list of all the proven ways to fix this error on your Windows 10 system.
But before you start adopting these strategies, please do the following whenever you face any issues with your network –
- Restart your PC or laptop and the network devices such as router, modem or switch. This might resolve a temporary glitch
- Disable your antivirus or VPN if installed and configured
- Perform a clean boot up of the device to make sure that there is no third party conflictions are the root cause of the error
- Run a software such as CCleaner to clean any junk files, cached images, temporary files, broken Windows Registry entries and cookies
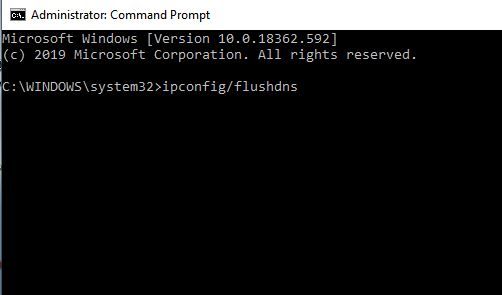
- Run the command prompt as administrator. Type ipconfig /flushdns and press the Enter key. Restart the system to check whether your internet is working properly
Here in this tutotorial we will discuss the following methods to resolve this issue:
- Change Adapter Setting
- Update Your Network Driver
- Re-install Network Adapter
- Clear Your Host File
- Move to Google Public DNS
- Clear DNS Cache
- Rollback Network Drivers
- Reset Winsock and TCP/IP Configuration
- Scan Your System For Viruses
Solution 1: Change Adapter Setting
First thing you can try to resolve this is changing the adapter settings. Please follow the steps below:
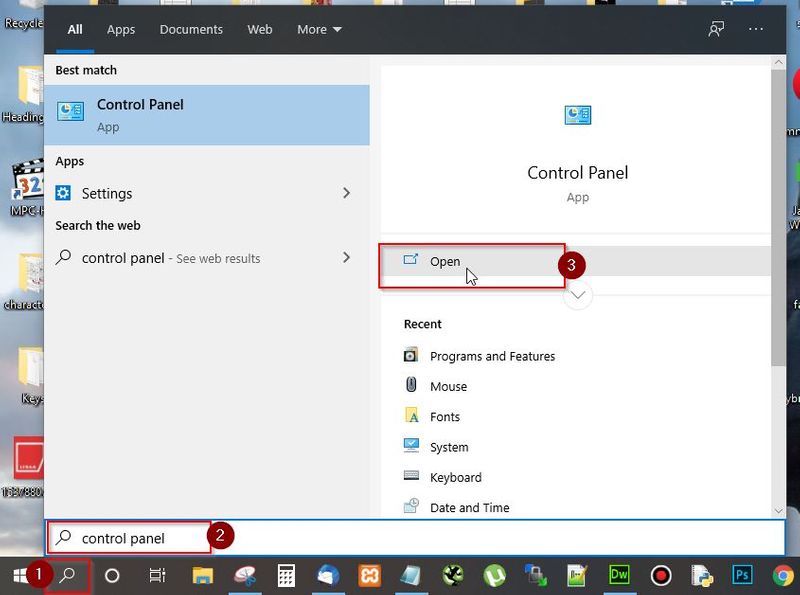
- Open Window search bar and type Control Panel and Press Enter
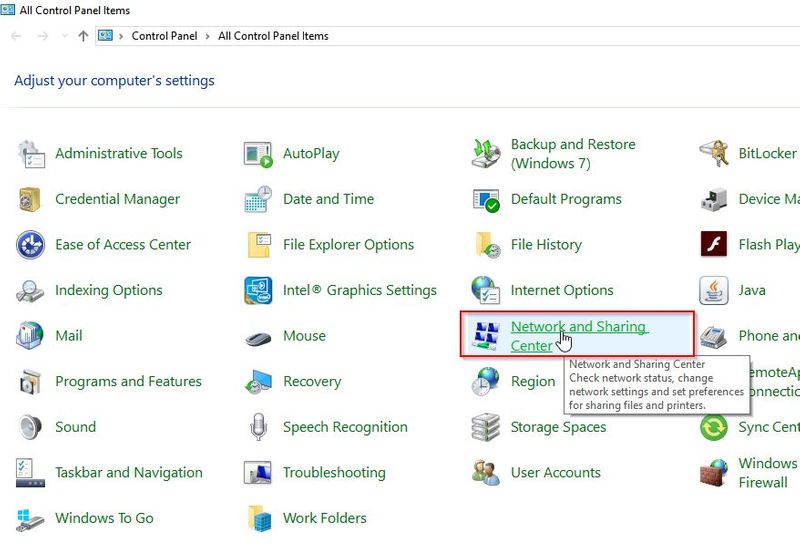
- Now go to Network and Sharing Center and open it
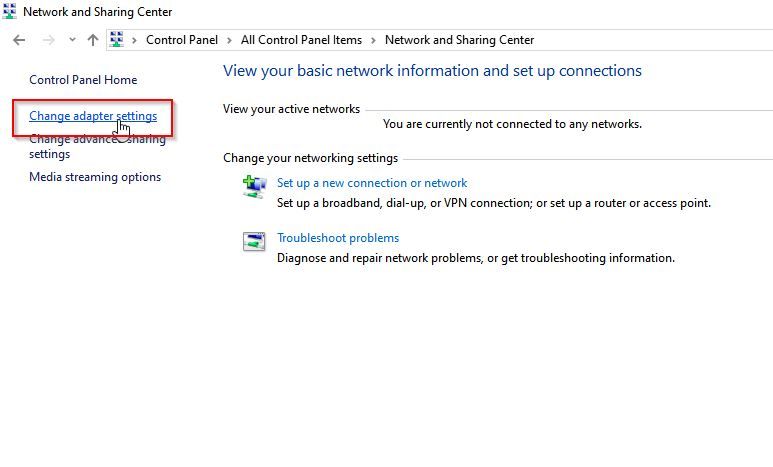
Next click on ‘Change adapter setting' option present on the left pane of the window
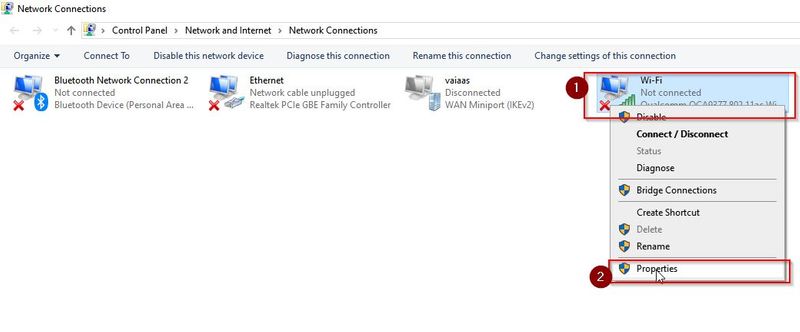
- A Network Connection window will be opened

- Choose your current network connection, right click on it and select Properties
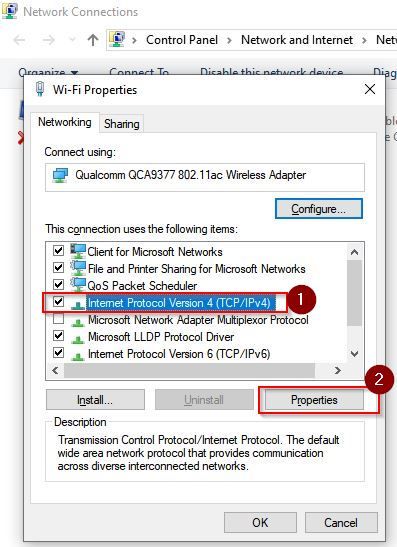
Next click on Internet Protocol Version 4 (TCP/IPv4) and then click on Properties button
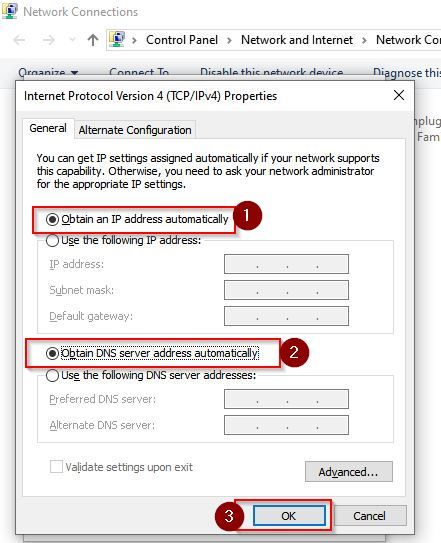
Now under General tab, choose the following options:
- Obtain an IP address automatically
- Obtain DNS server address automatically
And click OK
Now restart your computer and check if the error has been resolved
Solution 2: Update Your Network Driver
Another reason for your network problems is outdated network drivers. So, to fix this, you need to update of the installed drivers.
You can update your driver in two ways
- Manually Update via Official Vendor's Website
- Using In-built Device Manager Tool
Manually Update Your Network Driver
Please follow the steps below
- First, go to the official vendor's website of your network
- Next search for the latest drive supported by your computer
- Download it and install it on your computer
Note: To update your network driver manually you must know the exact model of your network card
Update Your Network Driver using In-built Device Manager Tool
Please follow the steps below
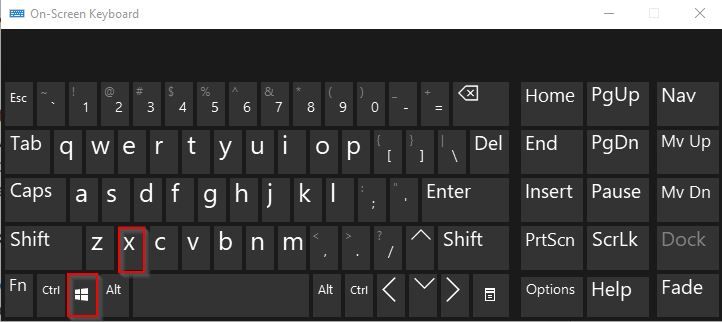
- Press Windows + X on your keyboard
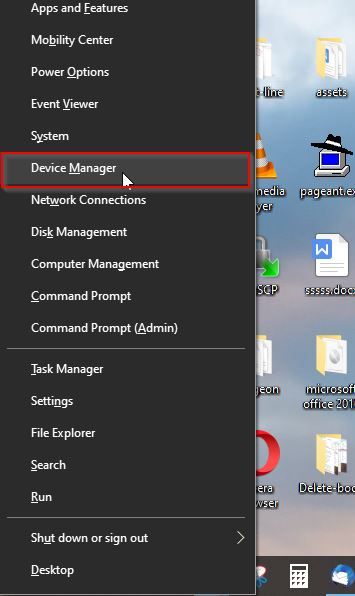
- Next click on Device Manager
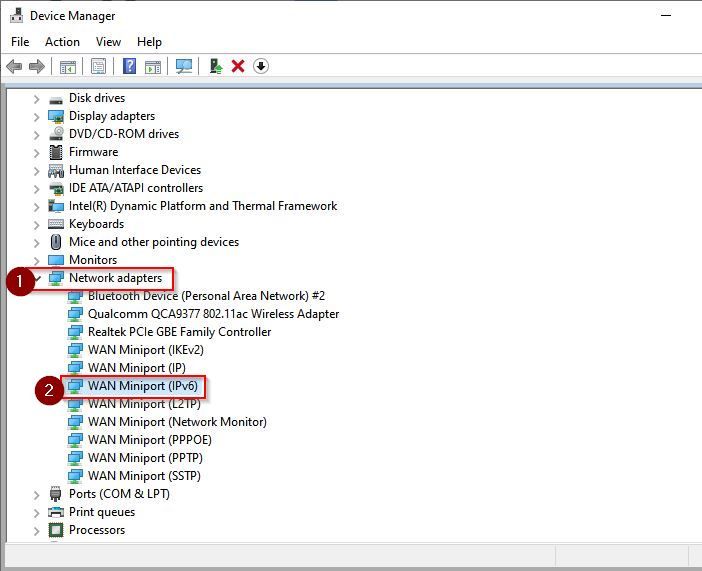
- Now in the device manager menu, expand Network Adaptors and select your network device
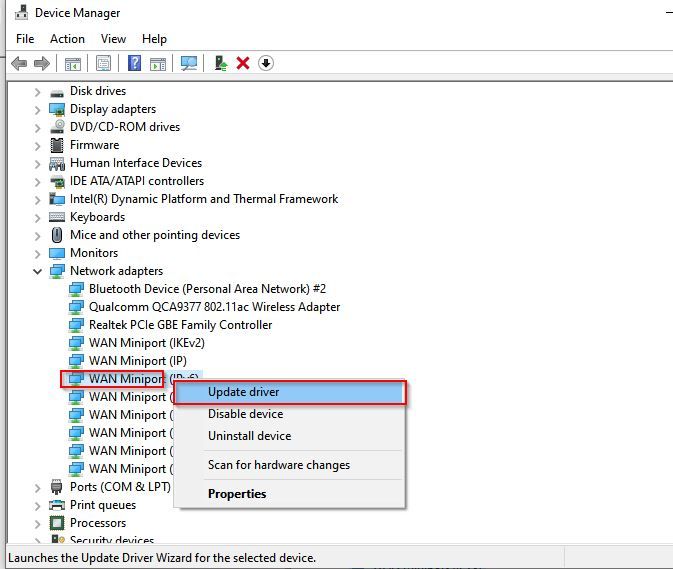
- Right click on the network device and select Update Drive
- Next, let the device manager automatically search for updated driver or latest software for your device online.
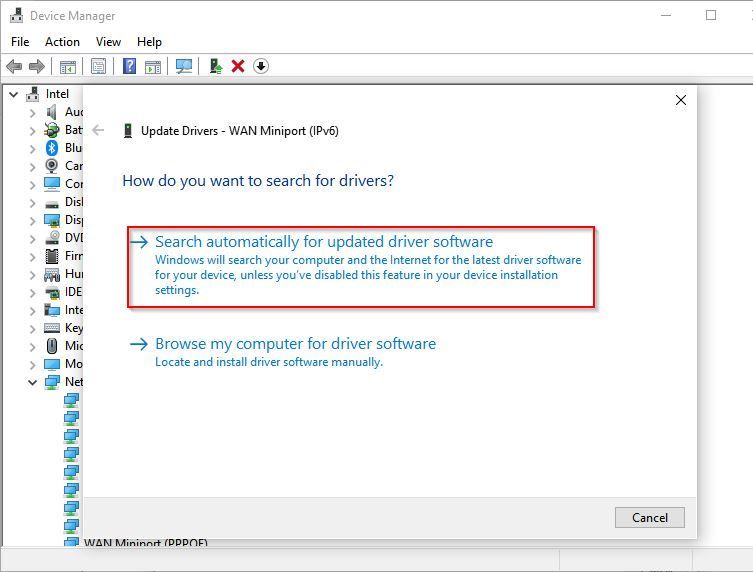
At last, install the updated driver on your system
Solution 3: Re-install Network Adapter
Outdated, incompatible network adapter driver also causes the problem and fails to communicate with the device or resource. Therefore, another solution to resolve this issue to Re-install the network driver with the latest version.
Please follow the steps below:
- Press Windows + X on your keyboard
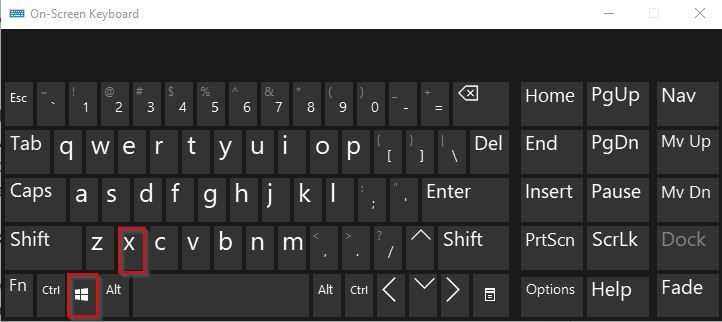
- Next click on Device Manager
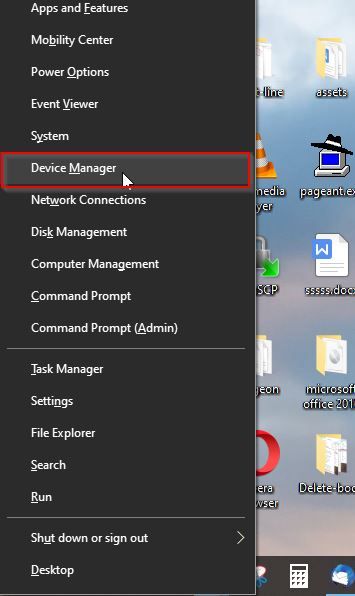
- Now in Device Manager window expand Network Adapter
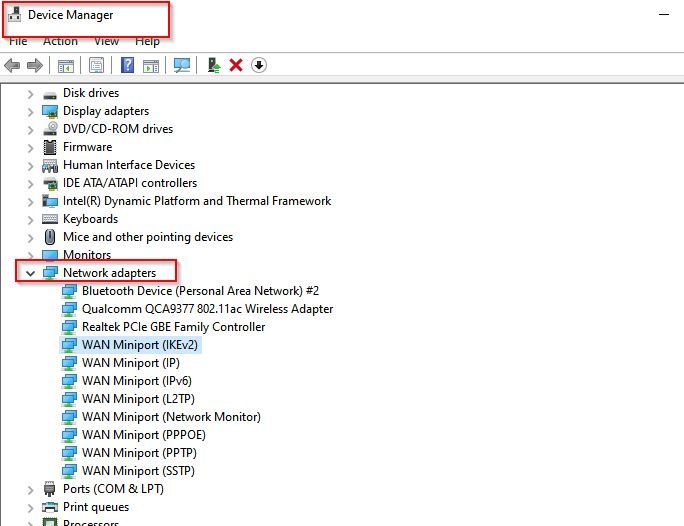
- Next right click on the installed driver and choose Uninstall
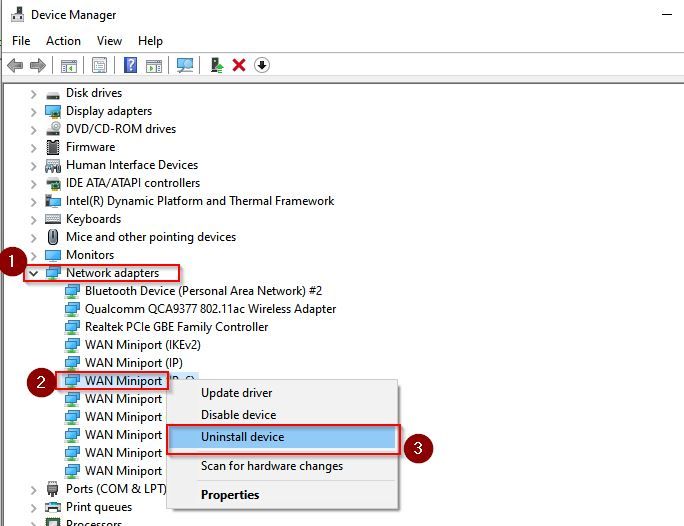
- Then, restart Windows to uninstall the driver completely. When you restart your window it will automatically install the build in Network driver.
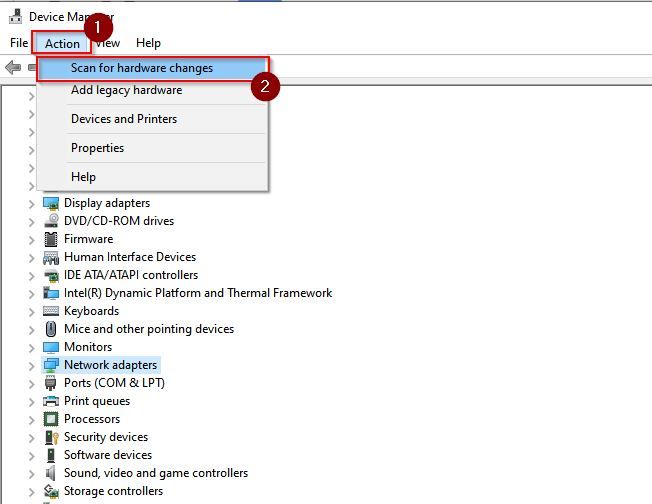
- In case if it doesn’t then go Device manager again and under Action tab choose Scan for hardware changes.
Solution 4: Clear Your Host File
Host file can also cause this “Windows can’t communicate with the device”. Therefore, you need to clear your host file.
Please follow the steps below
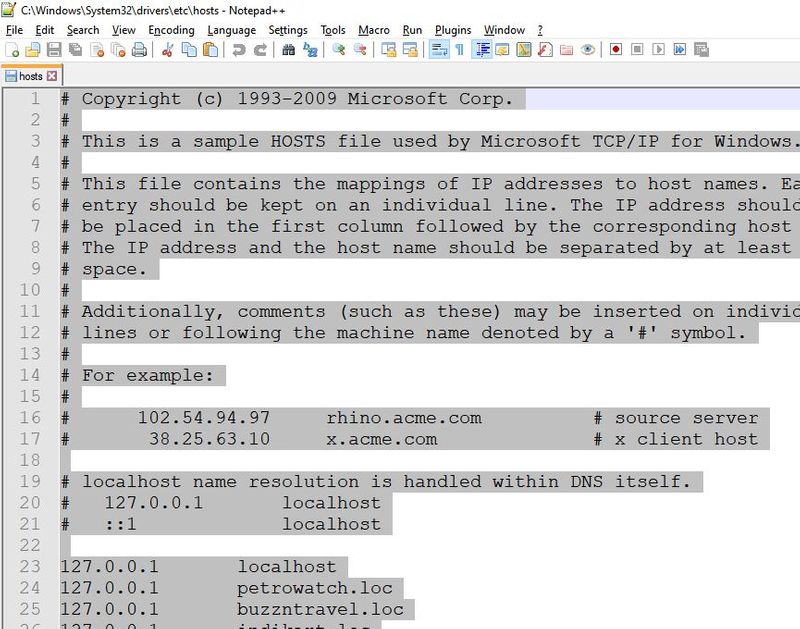
- In your system folder, go to Windows (C:) > Windows > System32 > drivers > etc and locate your host file
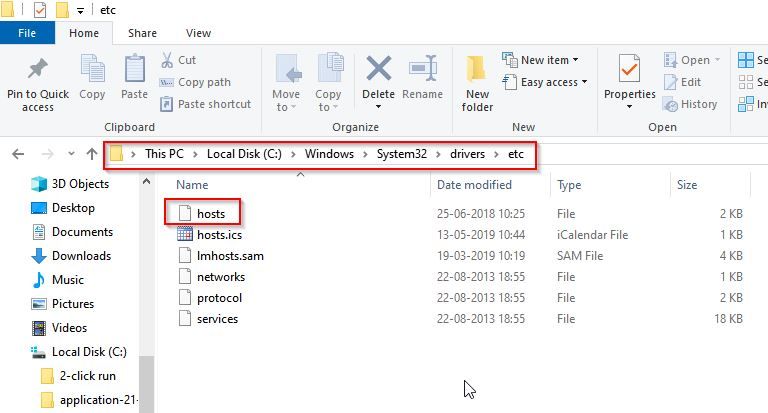
- Next right click on 'hosts' file and select Edit with Notepad
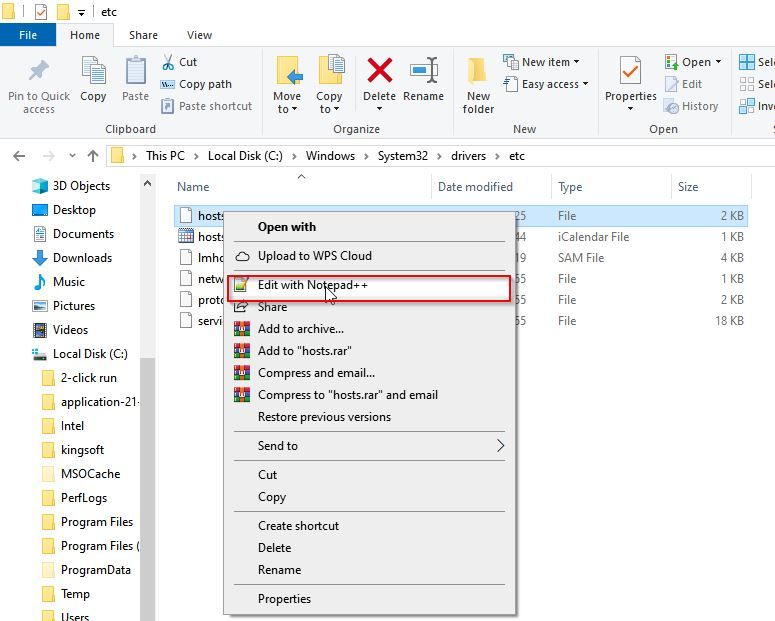
- Now select (Ctrl+A) and delete everything in the host file
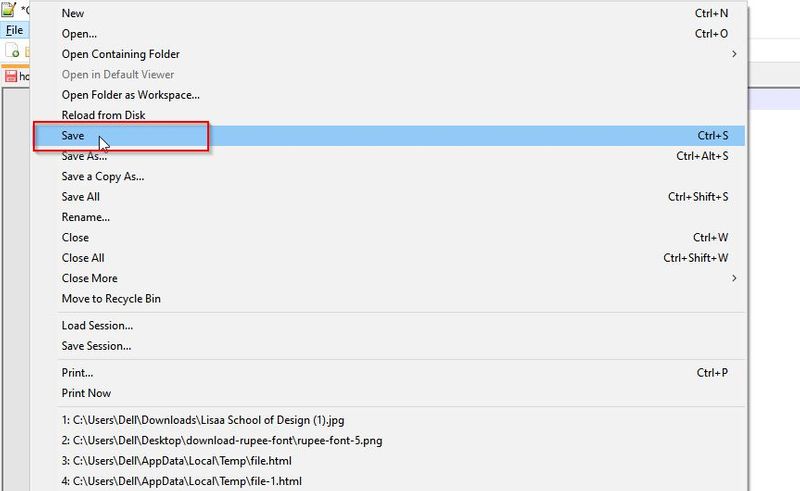
- Next Save the empty host file.
Solution 5: Move to Google Public DNS
If the solution described earlier does not fix your problem, there might be a problem with your DNS. In that case, you can switch to Google’s Public DNS.
Please follow the steps below to switch to google public DNS:
- Open the Windows search bar and type Control Panel. Then, press Enter
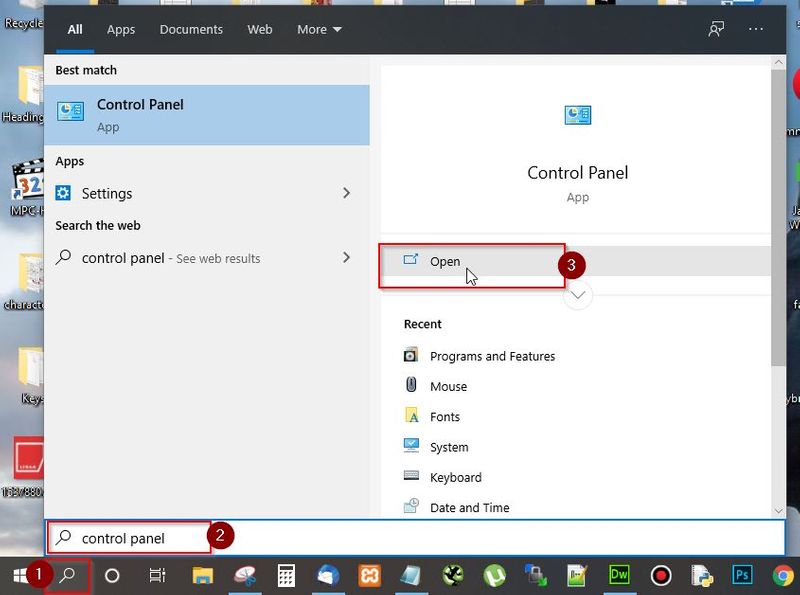
- Now select Network and Sharing Center and open it
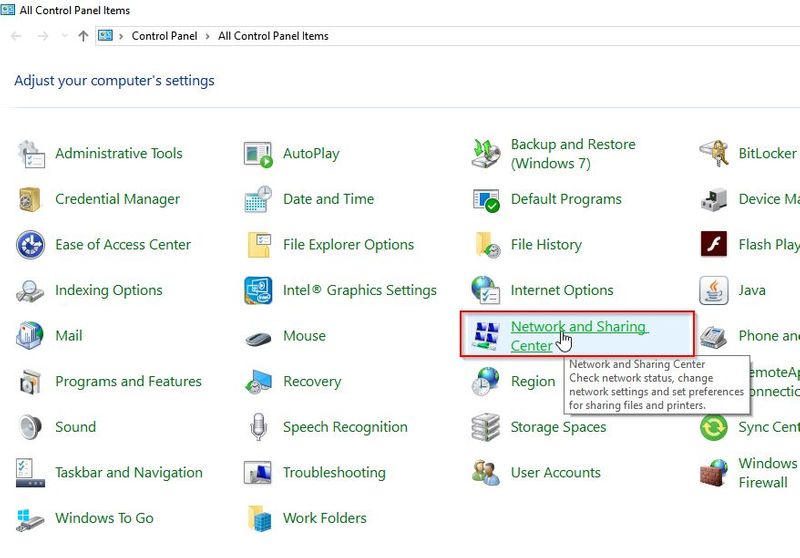
- Next click on ‘Change adapter settings' option
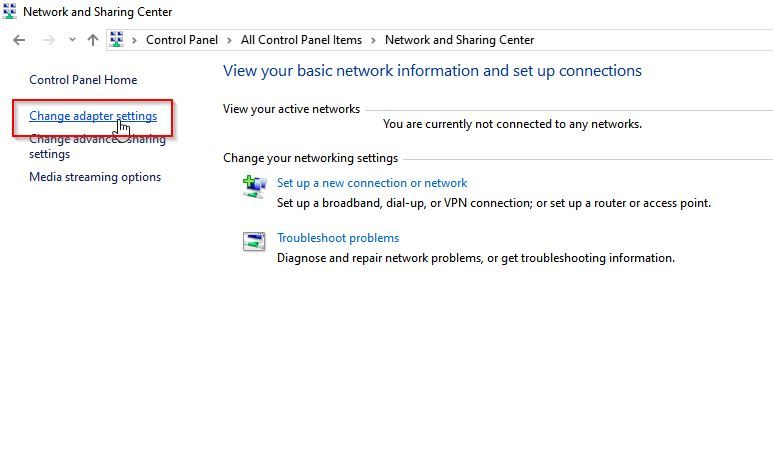
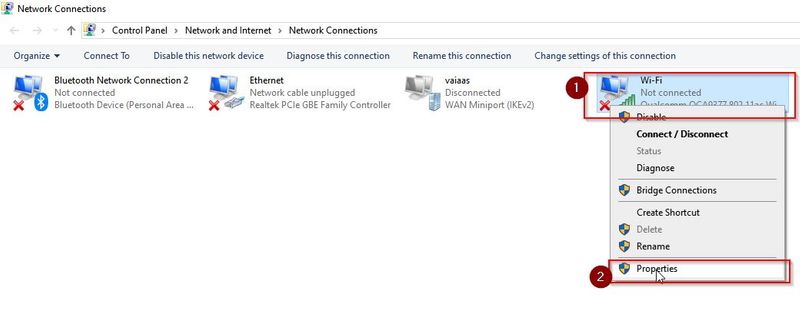
- Choose your current network connection, right click on it and select Properties
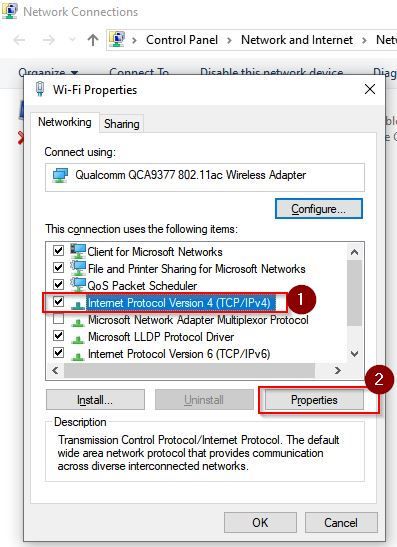
- Next click on Internet Protocol Version 4 (TCP/IPv4) and then click on the Properties button
Next under General tab, choose Use the following DNS server addresses and Set
- Preferred DNS server to 8.8.8.8.
- Alternet DNS server to 8.8.4.4 and Click OK
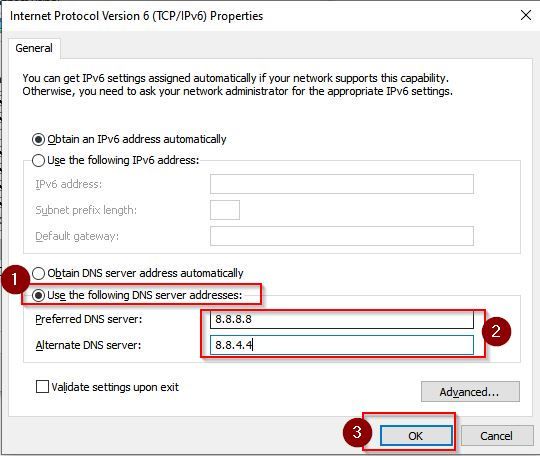
Now restart your System.
Solution 6: Clear DNS Cache
If switching to the Google Public DNS did not solve the error, you can choose to flush the DNS. This will remove any old cache data that might be causing the issue.
Please follow the steps below:
- Open the Windows search bar and type CMD (Command Prompt)
.jpg)
- Right click on the result and open the Command Prompt with the option Run as Administrator.
.jpg)
- Next type ipconfig/flushdns command and press enter.
Solution 7: Rollback Network Drivers
If the error still appears on your computer after an update, you can try the Rollback feature. This rolls back and restores the drivers to their previous versions, when everything was fine.
Please follow the steps below to use this feature:
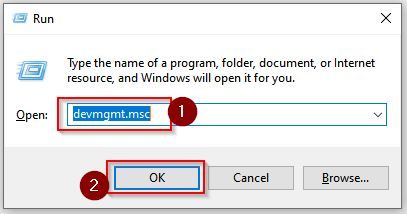
- Press Window + R to open Run command

- Next type devmgmt.msc in run command and Press Enter
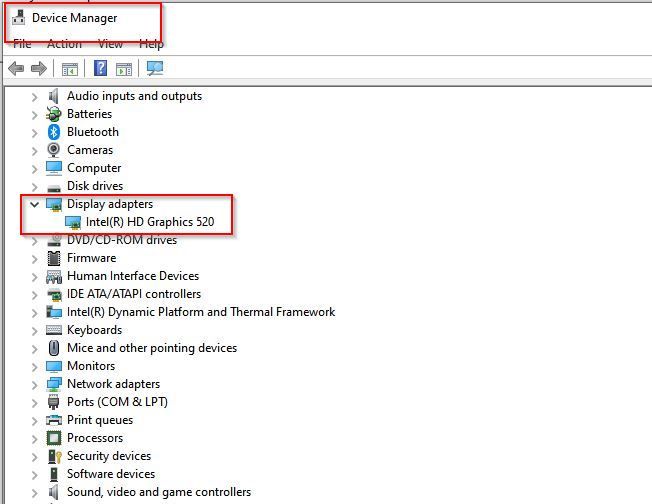
- Now in Device Manager window expand Display Adapter
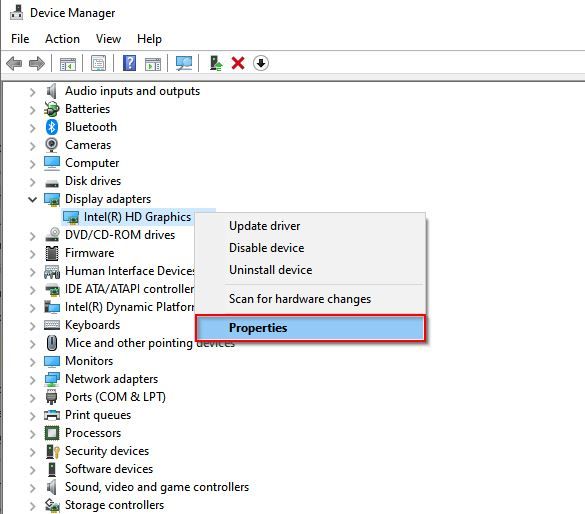
- Next right click on your network adapter and select Properties
- Now under Driver Tab click the Roll Back Driver option
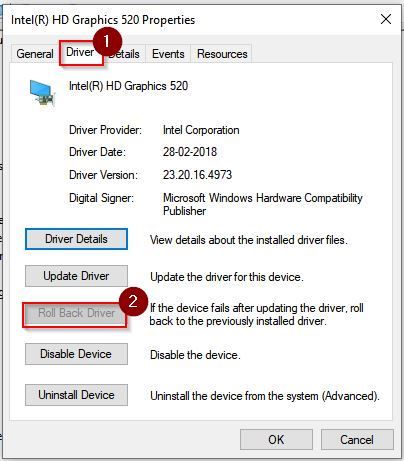
Next select an option click OK
At last re-connect your internet connection and check if the issue has been fixed
Solution 8: Reset Winsock and TCP/IP Configuration
Another solution to resolve this error is to reset Winsock and TCP/IP Configuration
Please follow the steps below:
- Open Window search bar and type CMD (Command Prompt)
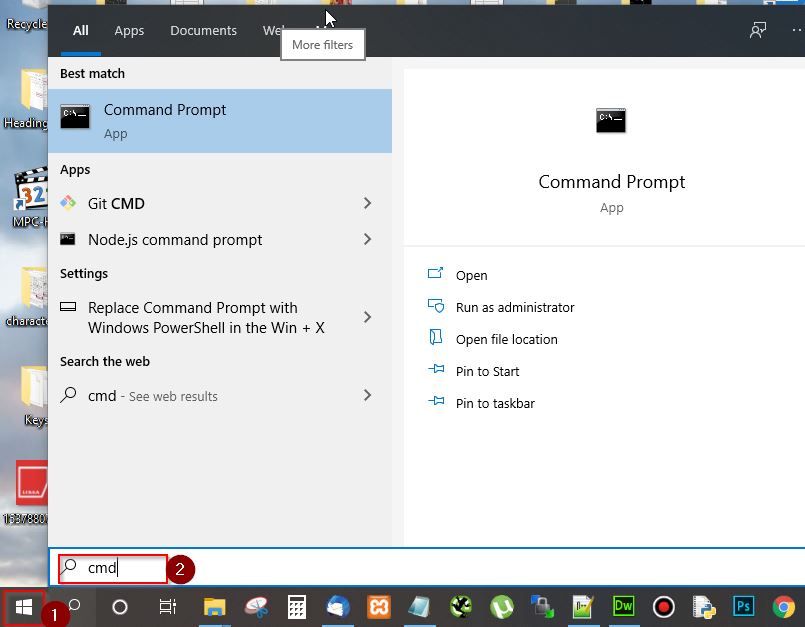
- Right click on the result that appears and choose the option to Run as Administrator
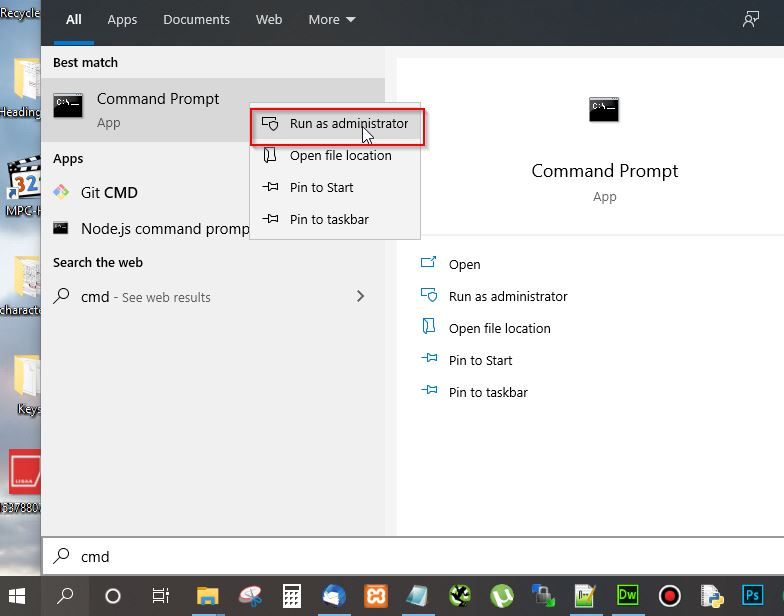
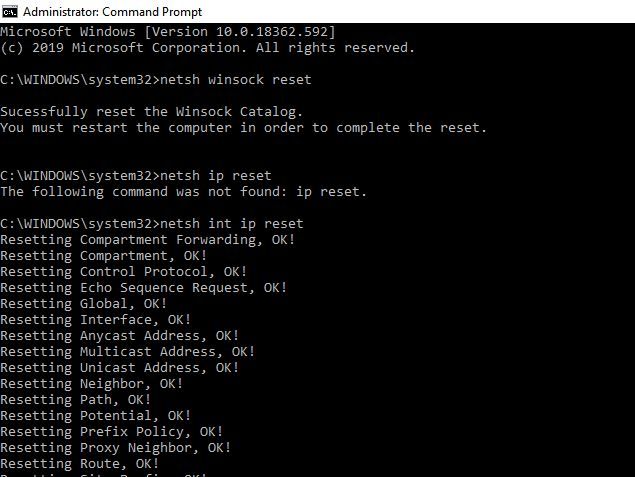
Then, type in the commands given below –
- Type netsh winsock reset and press Enter.
- Type netsh int ip reset and press Enter.
- Type ipconfig /release and press Enter.
- Type ipconfig /renew and press Enter.
- Type ipconfig /flushdns and press Enter.
Next Exit the CMD and restart your Window.
Solution 9: Scan Your System For Viruses
If the problem still persists after you are done trying all the solutions mentioned above, it might mean that the system is infected with a malwares or viruses. So, you have to run a virus scan on your system using Windows Defender.
Please follow the steps below –
- Open Window Search Bar, type Virus & thread Protection and press Enter
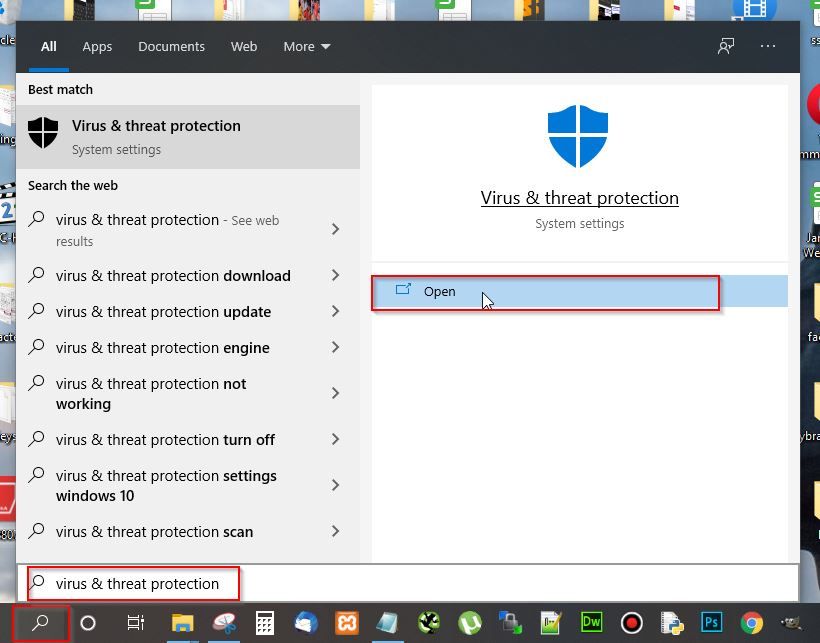
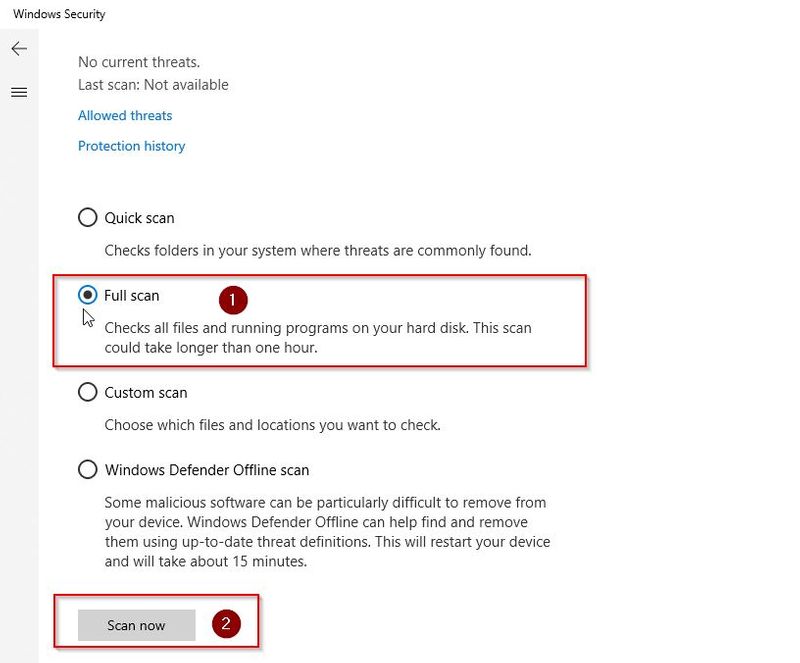
- Next click on Scan Option
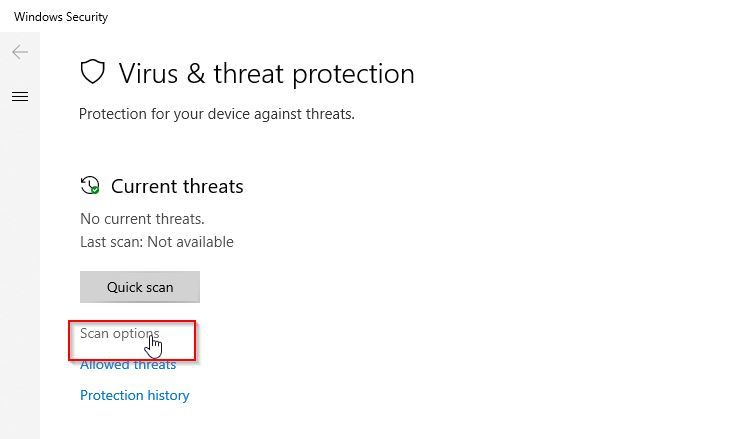
- Next select Full Scan and then click Scan Now
Now restart your computer and check if ‘Windows can’t communicate with the device or resource’ error have been resolved.
Conclusion
Anyone of the solutions mentioned above will surely solve the ‘Windows can’t communicate with the device or resource’ error. If you are still facing problems, let us know in the Comments section below.
