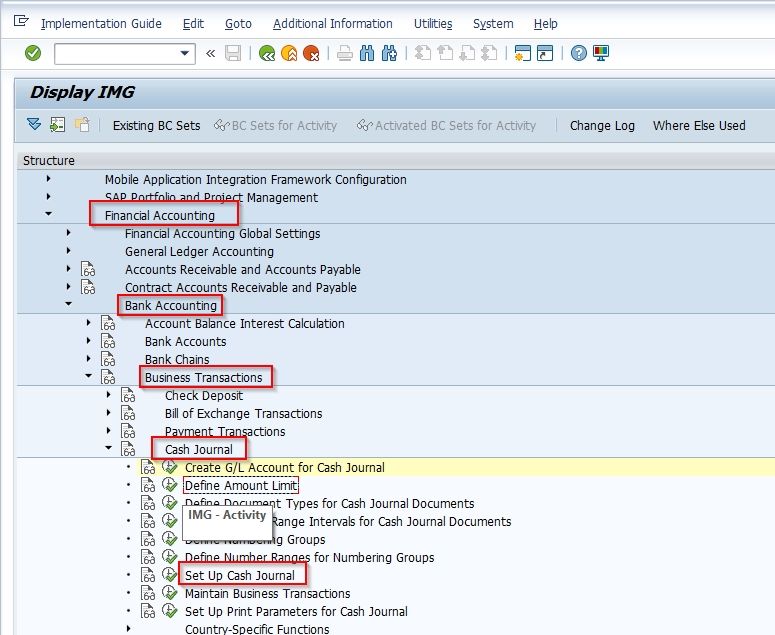
In the SAP SAP tutorial, we will learn the step-by-step procedures to configure SAP Cash Journal with proper screenshots of every configuration step.
What is SAP Cash Journal?
The SAP cash journal is a sub-ledger of Bank Accounting that is used to manage a business's cash transactions. The Cash Journal system calculates and displays the opening and closing balances, and the receipts and payments totals.
In order to configure SAP Cash Journal we do the following configuration:
- Create GL Account for Cash Journal
- Setup Amount Limit
- Define Document Types for Cash Journal
- Define Number Range Interval for Cash Journal Document
- Set up cash Journal
- Maintain Business Transaction
- Set up Print Parameter for cash journal
Create GL Account for Cash Journal
To create GL Account for Cash Journal do the following
Execute t-code FS00 in the SAP Command field
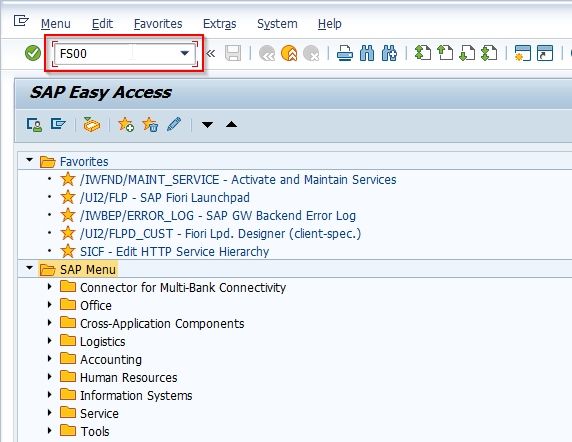
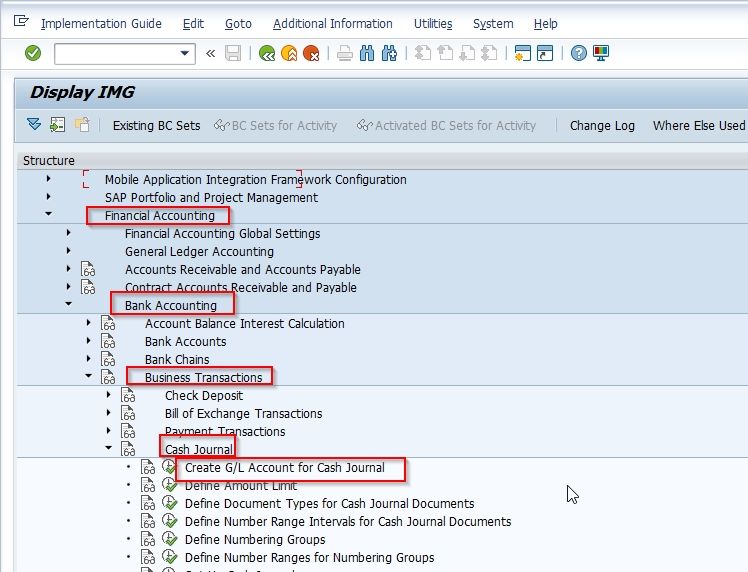
OR follow the below SAP IMG Path:
SPRO > Reference IMG > Financial Accounting > General Ledger Accounting > Bank Accounting >Business Transactions > Cash Journal > Create GL Account for Cash Journal
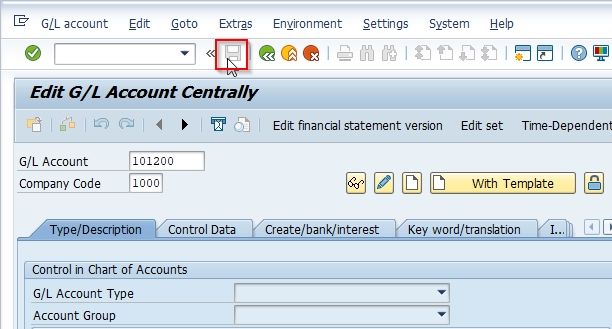
On the next screen enter the details of the account
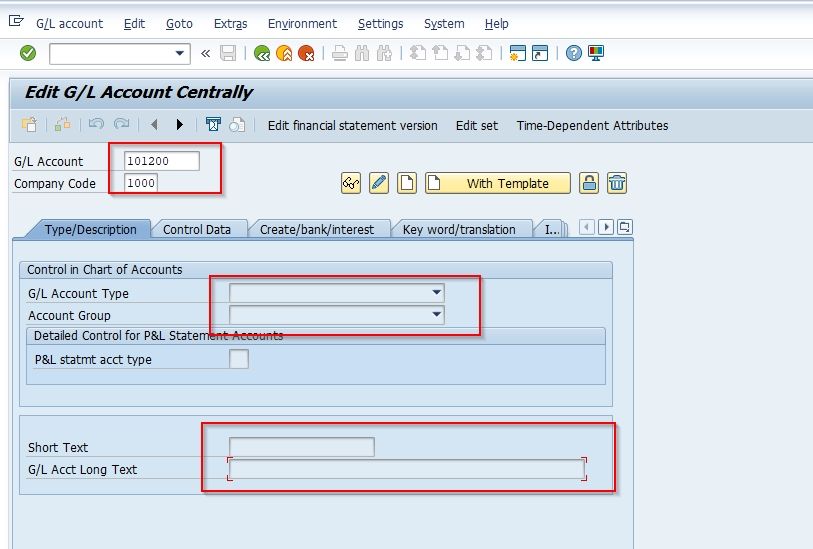
Note: Make this account capable of automatic posting
Once all the details are entered click on the SAVE button to save the new account
Setup Amount Limit
The next configuration step is to set the amount limit for the cash journals. To set the amount limit follow the steps below:
Navigate to the following IMG path:
SPRO > Reference IMG > Financial Accounting > Bank Accounting >Business Transactions > Cash Journal > Define Amount Limit
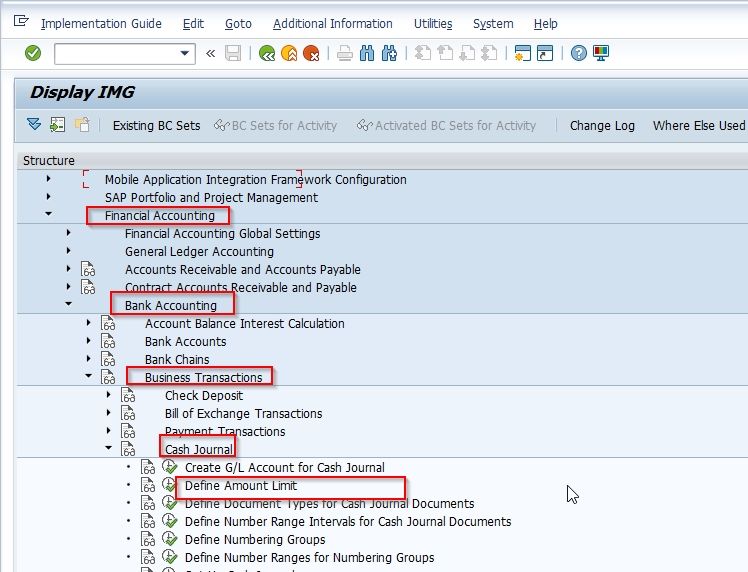
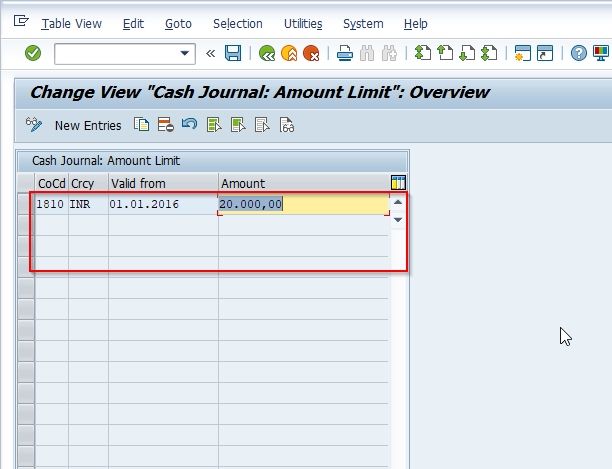
Next on the Change View "Cash Journal: Amount Limit": Overview screen you will see the list of previously defined Amount Limits
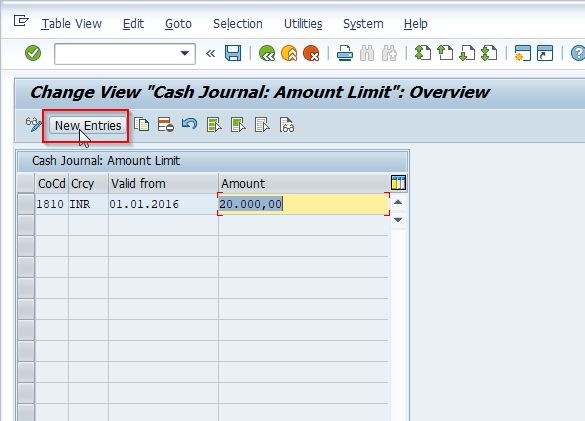
Now click on the New Entries button to create a new Amount Limit.
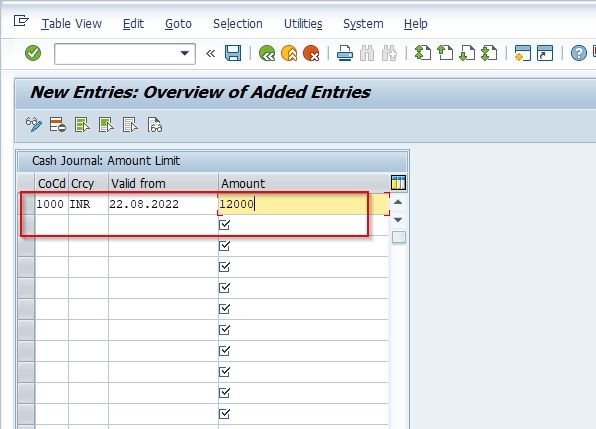
On the next screen enter the details of the Company code, valid from date, and the maximum amount that a cash journal should hold.
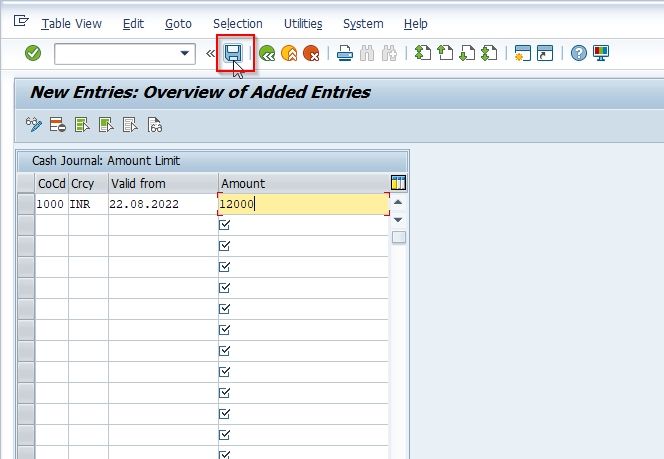
Now click the Save button to save the new amount limit.
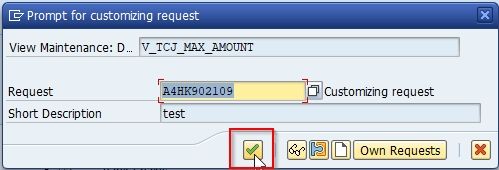
Select your Customizing Request id and press enter to save the new amount limit in your system.
Define Document Types for Cash Journal
Next, you have to define the document types configuration activity. Most of the time the user doesn’t need to define new document types because the standard document types can be used.
Please follow the steps below to define document types:
First, go to the following SAP IMG Path:
SPRO > Reference IMG > Financial Accounting > Bank Accounting >Business Transactions > Cash Journal > Define Document Types for Cash Journal
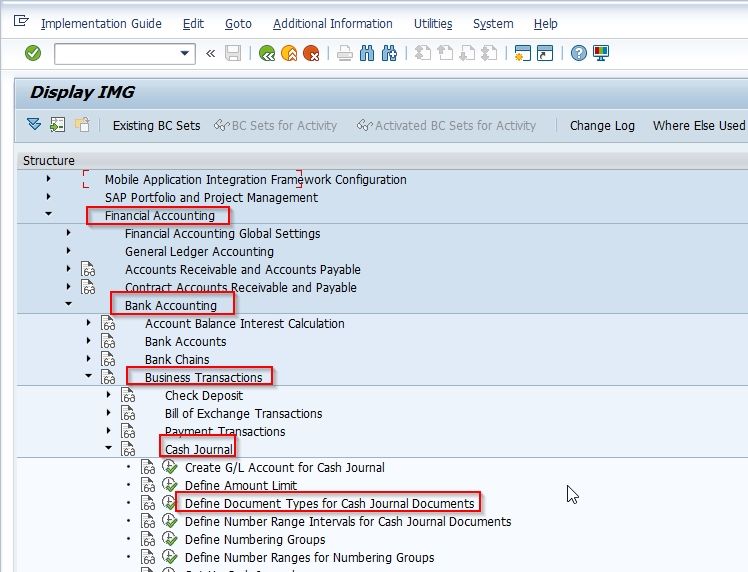
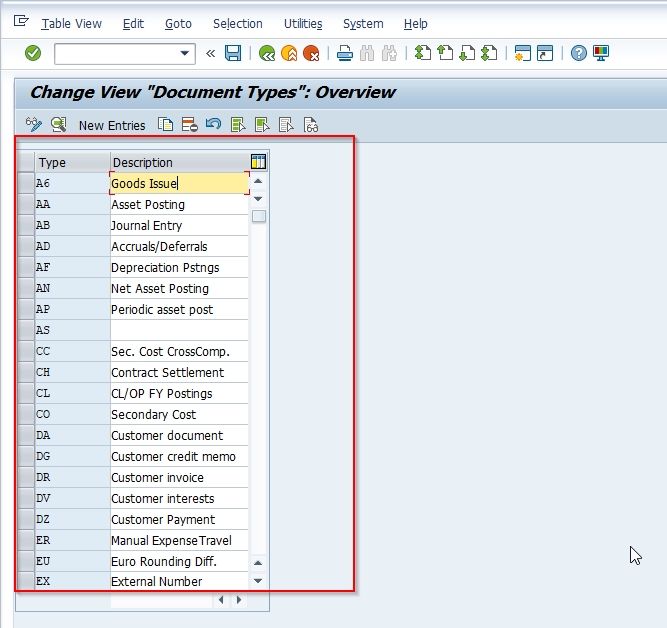
Next on the Change View "Document Types": Overview screen you will see the list of previously defined document types
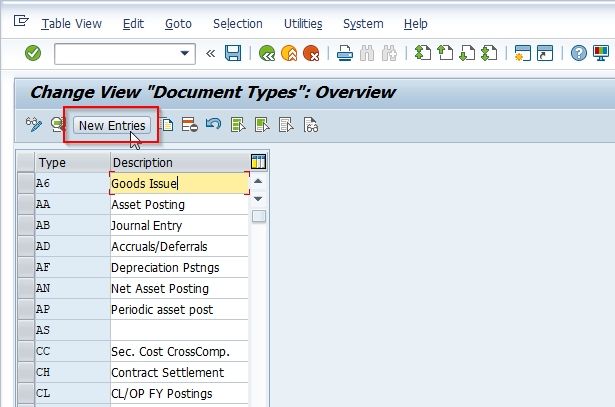
Click on the New Entries button to create a new Document Types.
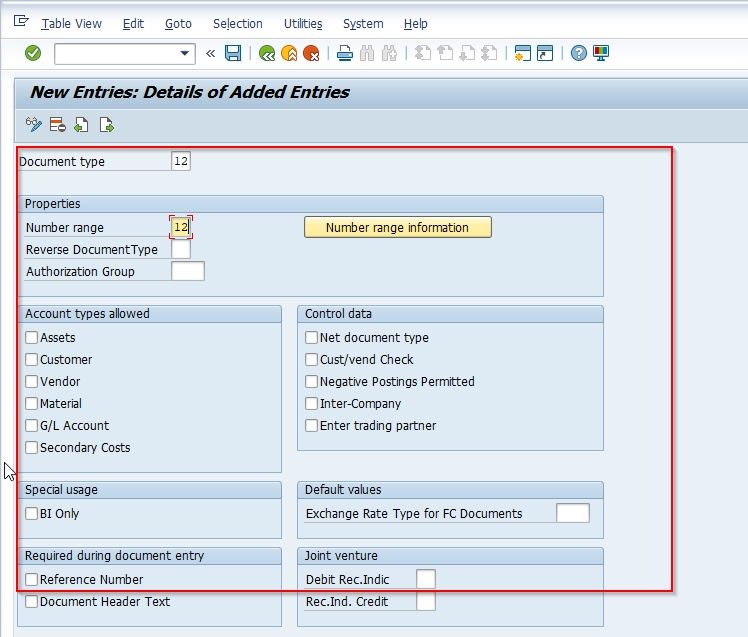
On the next entries enter all the details according to your requirement
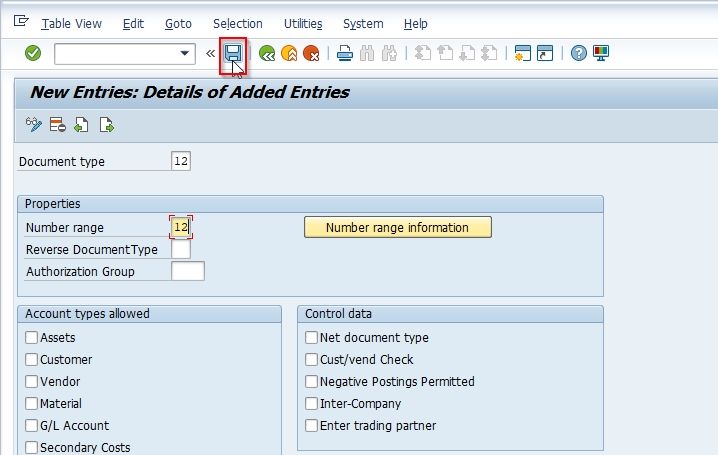
Now click the Save button to save new Document Types
Define Number Range Interval for Cash Journal Document
The next step in SAP cash journal configuration is to define of number range interval for the cash journal document. To define number ranges for cash journal documents please follow the steps below:
Go to the following SAP IMG Path
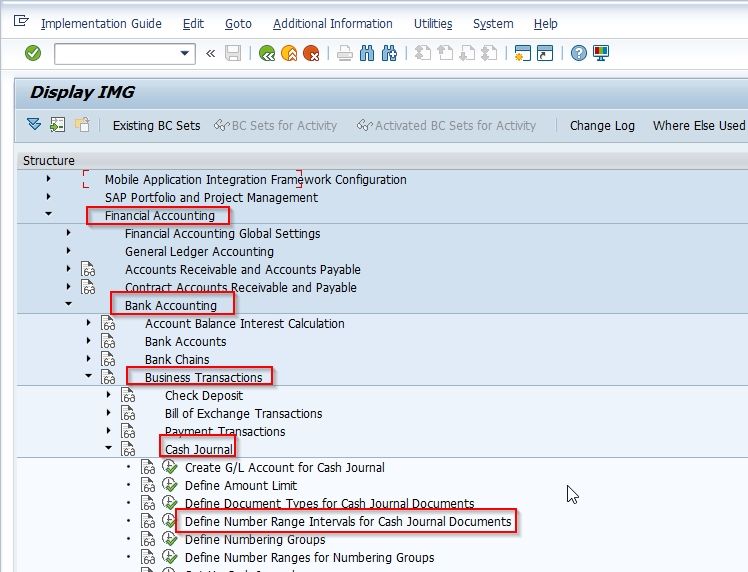
SPRO > Reference IMG > Financial Accounting > Bank Accounting >Business Transactions > Cash Journal > Define Number Range Interval for Cash Journal Document
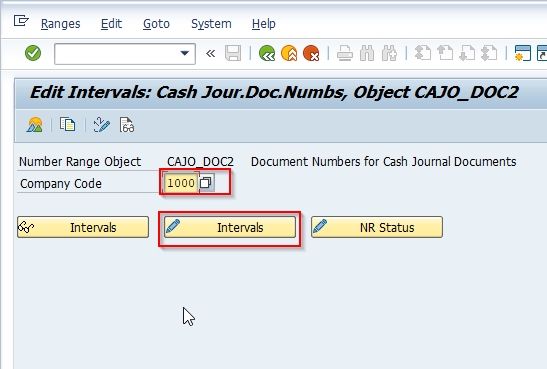
Next, click on the Company Code and click on the Change Intervals icon.
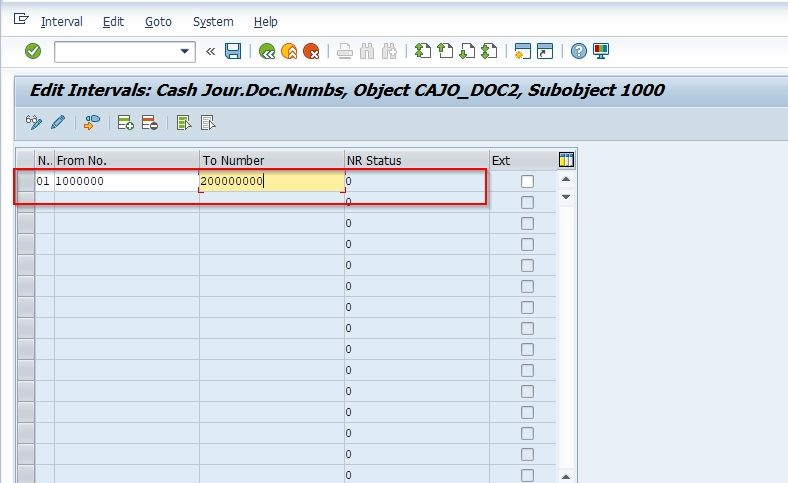
Determine whether the number range interval 01 has already been predefined by the system.
If number range interval 01 has not been predefined, define the interval in the company code required.
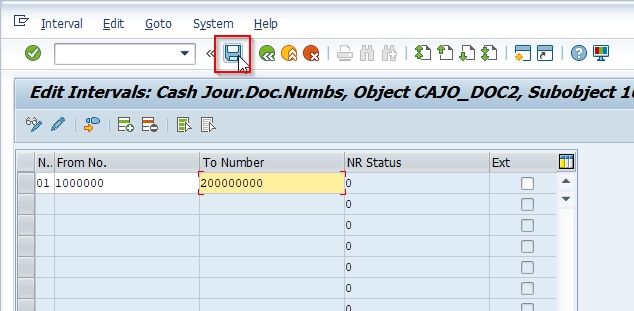
Click the Save button to save the new configuration of number ranges
Setup Cash Journal
The next step is to set up the cash journal while setting up a new cash journal for a company code, for that you must enter details like company code, cash journal number, a general ledger account, currency, document types, numbering groups, description, text, and authorization groups.
Please follow the steps below to set up a cash journal:
Navigate to the following SAP IMG Path
SPRO > Reference IMG > Financial Accounting > Bank Accounting >Business Transactions > Cash Journal > Set up cash Journal
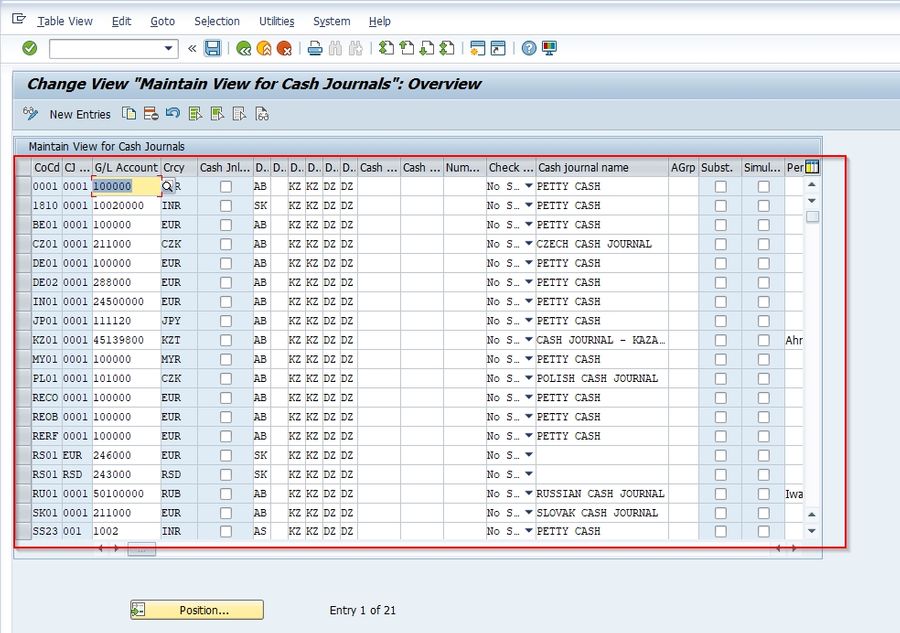
Next on the Change View "Maintain View for Cash Journals": Overview screen you will see the list of previously cash journals
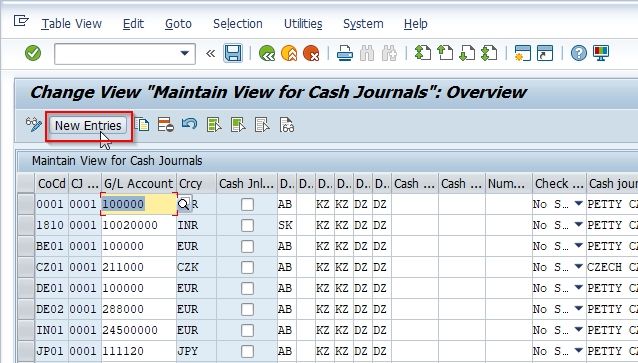
Click on the New Entries button to set up a new Cash Journal.
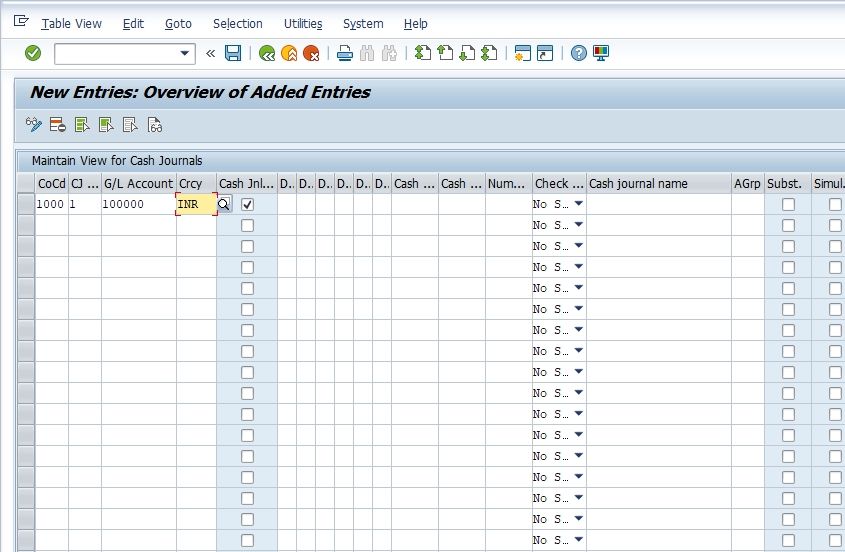
On the next screen enter the company code and the general ledger account for the cash journal. Also specify the document types that will be allowed.
Create, Change, Delete Business Transaction
Now the next configuration step is to define the business transactions for the cash journal. A user can also create business transactions online using the cash journal document entry.
Please follow the steps below o define business transaction:
Follow the below SAP IMG menu path:
SPRO > Reference IMG > Financial Accounting > Bank Accounting >Business Transactions > Cash Journal > Maintain Business Transaction
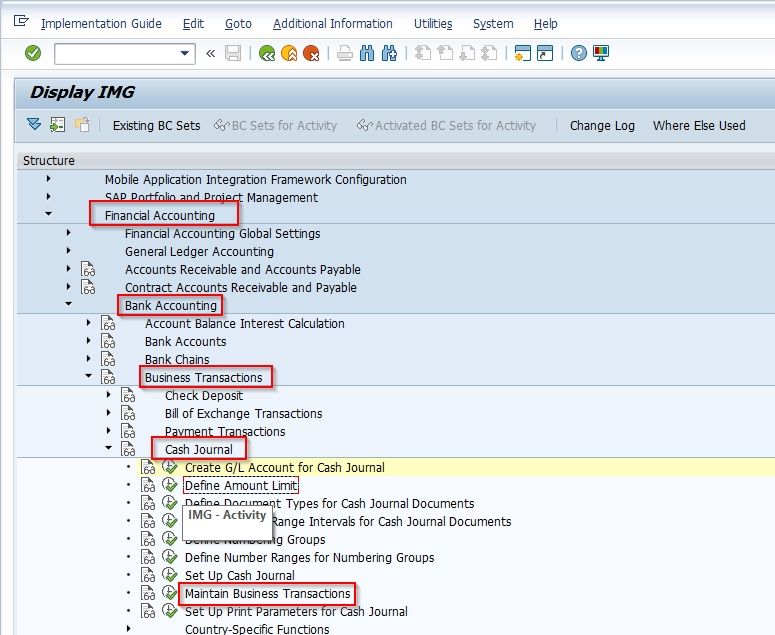
Click on the New Entries button to maintain Business Transaction.
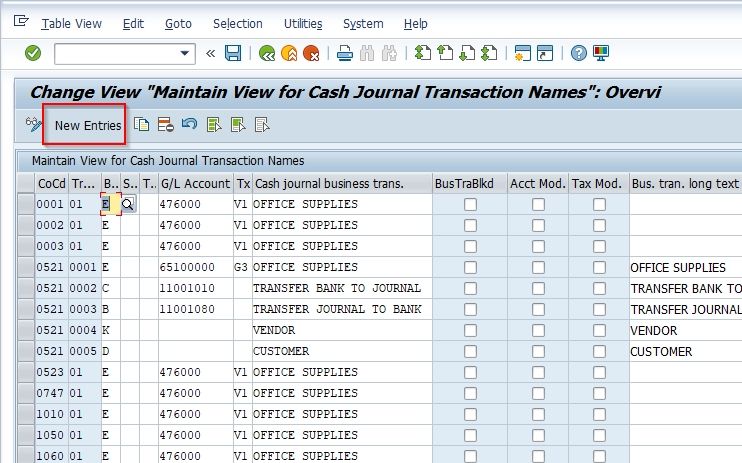
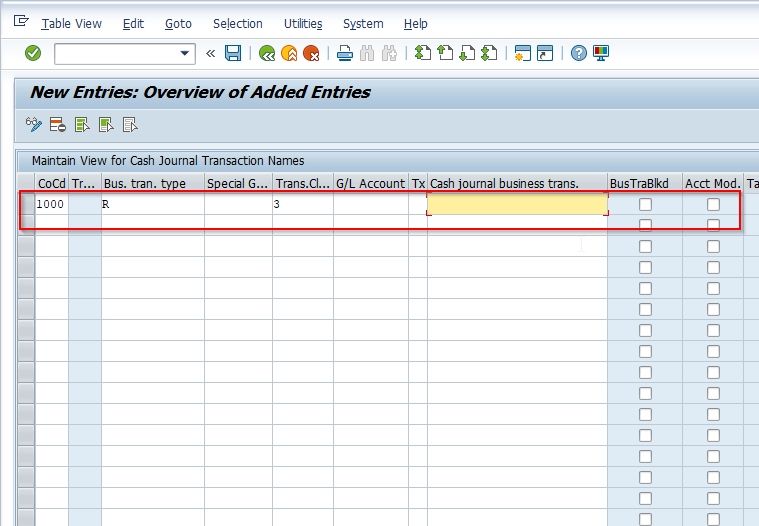
On the next screen enter the details like company code, business transaction number, business transaction type, general ledger account, tax code and cash journal business transaction as shown in the image below.
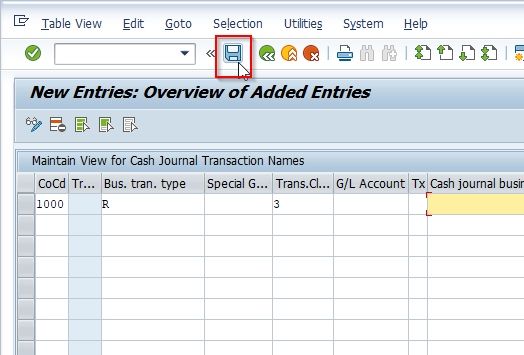
Now click the Save button to save the new configuration
Set up Print Parameter for Cash Journal
The last step to configuring the SAP cash journal is setting up printing parameters. In order to print the cash journal and the cash journal receipts, you have to set up the corresponding print program parameters per company code.
Please follow the steps below:
Navigate to the following SAP IMG path:
SPRO > Reference IMG > Financial Accounting > Bank Accounting >Business Transactions > Cash Journal > Set up Print Parameter for cash journal
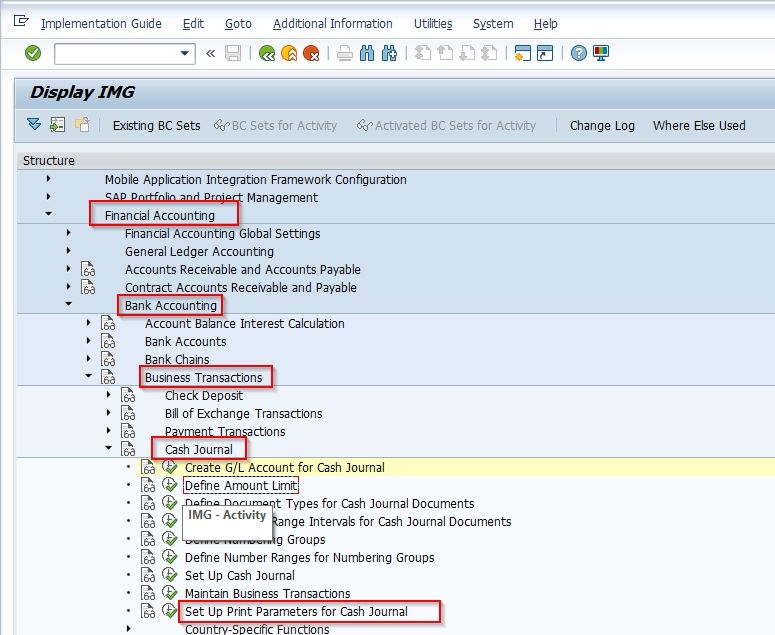
Click on the New Entries button to set up print parameters.
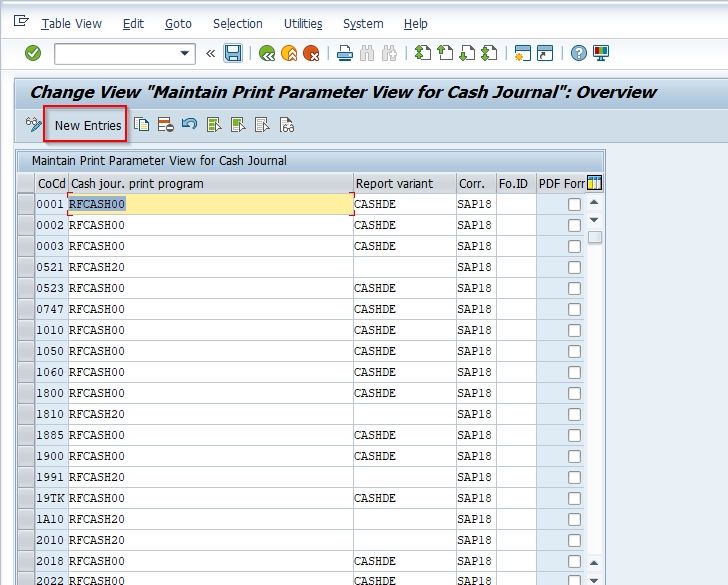
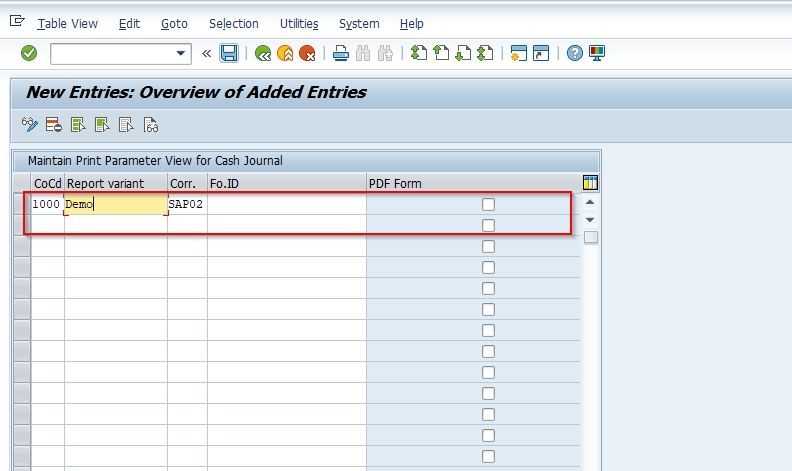
On the next screen enter the appropriate company code and specify the print program parameters according to the company code as shown in the image below.
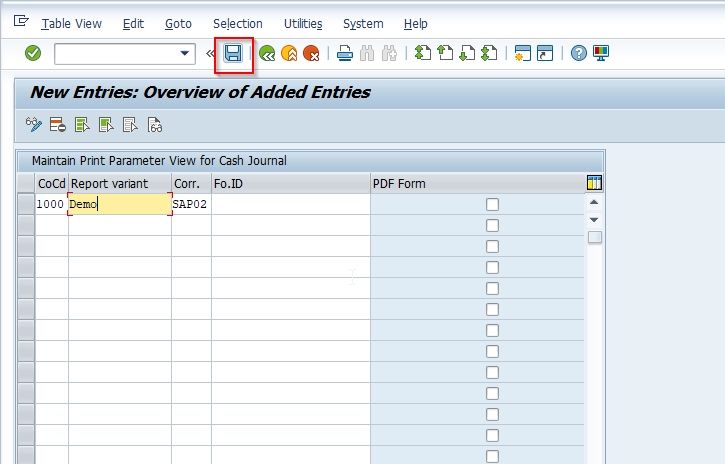
Click the Save icon to save the new configuration
You have successfully configured cash journal. Now as all these settings are maintained, the business users are ready to do your cash transactions in the cash journal in the front end.
