This tutorial contains the Complete list of SAP FICO Training Material with Screen Shorts
Create a Company Code (OX02)
T-code (OX02)
Path
Enterprise Structure
Definition
Financial Accounting
Edit, Delete, Define Company Code
Edit Company Code Data
.jpg)
Select: Edit Company Code Data.jpg)
Select TAB New Entries from the task bar
Fill the Data
.jpg)
Select Address Tab from the task bar
Fill the data
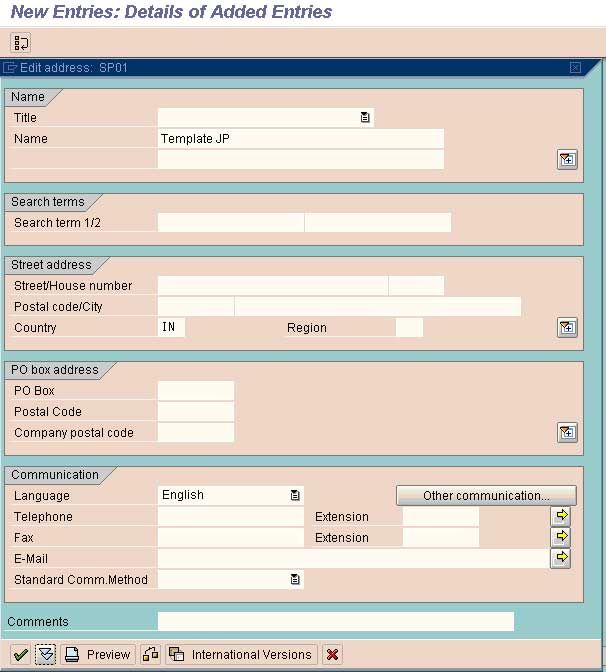
Save the data under a request
CREATION OF A COMPANY CODE IS COMPLETED
Define Business Area (at client level and not to be assigned to any co code) (OX03)
T-code (OX03)
A business area is an organizational unit within accounting that represents a separate area of operations or responsibilities in a business organization.
When defining a business area, you enter a four-character alphanumeric key and the name of the business area.
In a client, you can set up several business areas to which the system can assign the postings made in all company codes defined in this client. To ensure consistency in document entry, you should give business areas the same name in all company codes.
Path
Enterprise Structure
Definition
Financial Accounting
Define Business Area
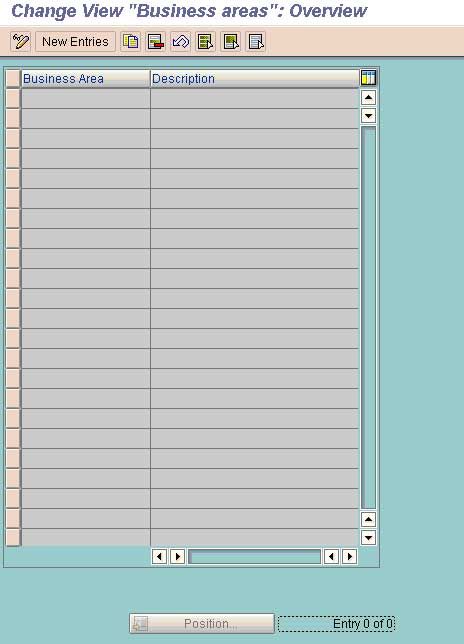
Select Tab New Entries
Define Business Areas as per the Business Requirement
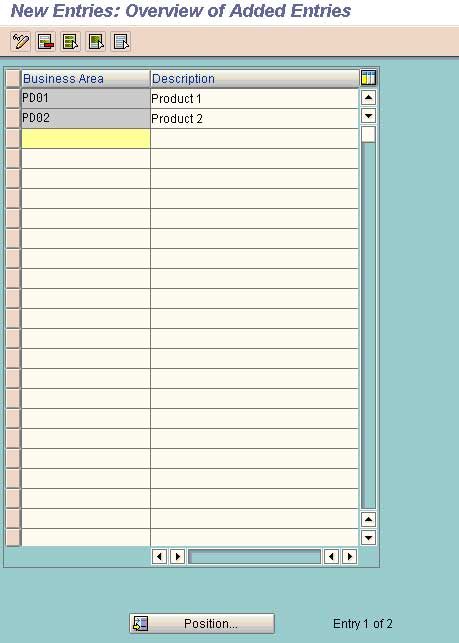
Business Area:
A unit in an enterprise that groups product and market combinations as homogeneously as possible for the purpose of developing unified business policy. An organizational unit of financial accounting that represents a separate area of operations or responsibilities within an organization and to which value changes recorded in Financial Accounting can be allocated You can create financial statements for business areas, and you can use these statements for various internal reporting purposes.
Complete the data and save.
Define the fiscal year variant & Assign the Fiscal year Variant to a co code (OB29)
T-code (OB29)
A period of usually 12 months, for which the company produces financial statements and takes inventory.
A fiscal year need not correspond to the calendar year.
Under certain circumstances, fiscal years containing fewer than 12 months are also permitted (short fiscal year
When defining your fiscal year, you have the following options:
Your fiscal year is the calendar year
In this case, you must only select the Calendar year field.
Your fiscal year is not the same as the calendar year and is not year-dependent
Your fiscal year is not the same as the calendar year and is year-dependent
Path
Financial Accounting
Financial Accounting Global Setting
Fiscal year
Maintain fiscal year variant
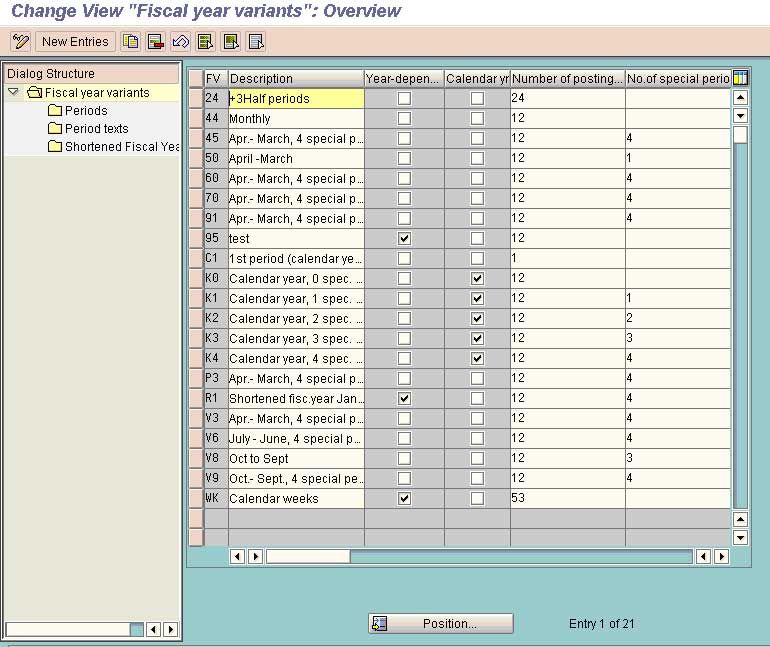
Either a fiscal year variant can be copied from the existing one or a new fiscal year variant for a company specific can be created.
To copy from an existing fiscal year variant select that variant by clicking at the extreme left of that variant and select the option copy from the task bar and choose the copy all option. By doing this all the sub entries such as periods, period texts and shortened fiscal year under the selected variant will be copied to another variant for which a new variant name is to be given. Following Entries will get copied
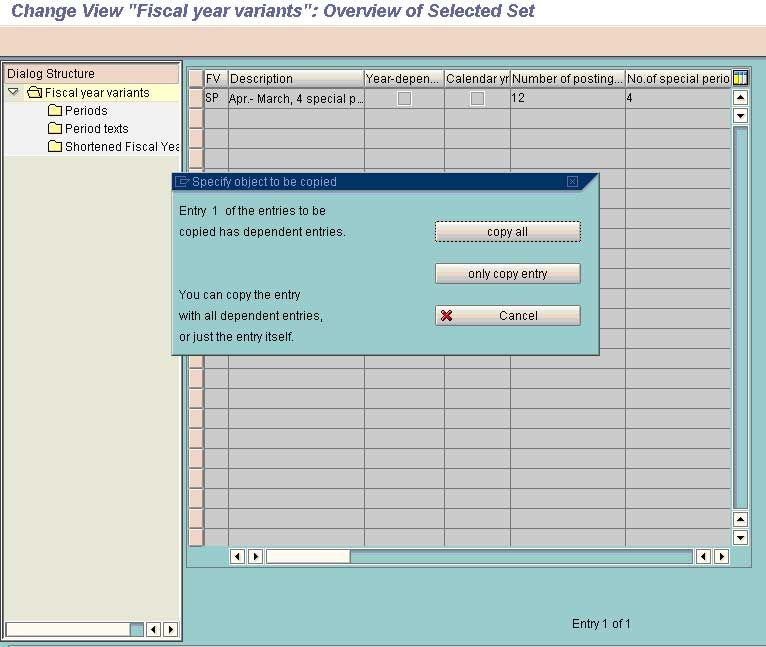
Number of posting periods
The fiscal year can be subdivided into up to 16 periods. These are divided into normal posting periods and special periods for closing purposes. This field contains the number of normal posting periods.
Number of special periods
Special periods represent an extension of the last normal posting period. When the posting date falls within the last normal posting period, then during document entry you can specify that the transaction figures be updated separately in one of the special periods.
In this case, you can select as many special periods as you have specified here.
Select the option copy all and save
Go to the next option i.e. Periods
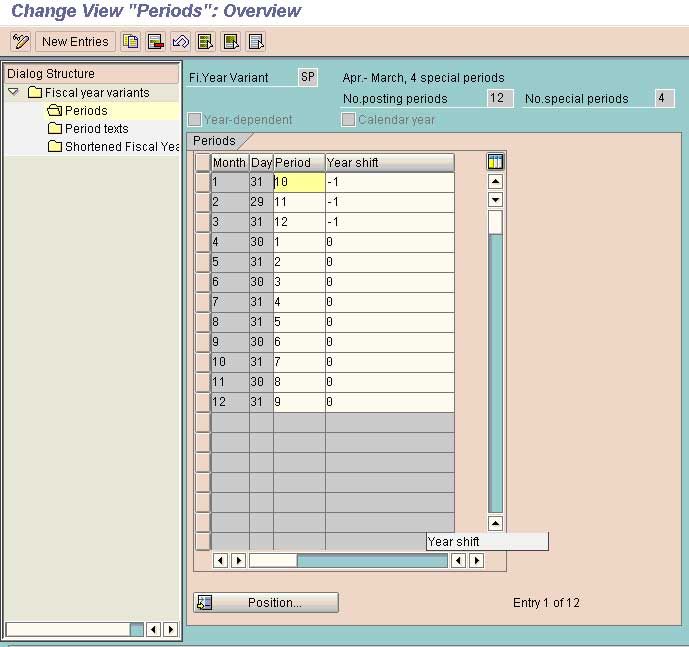
Month
This field contains the month as part of the calendar Year.
Day
The last valid calendar date of the Month.
Year Shift:
SAP does not understand the system of the broken fiscal year e.g. April to March and take a calendar year only as a fiscal year. If for any business the fiscal year is not a calendar year but combination of the different months of two different calendar year then one of the calendar year has to be specified as fiscal year for SAP and the months falling in the other calendar year has to be adjusted into the calendar year defined as fiscal year by shifting the year by using the sign – or + 1
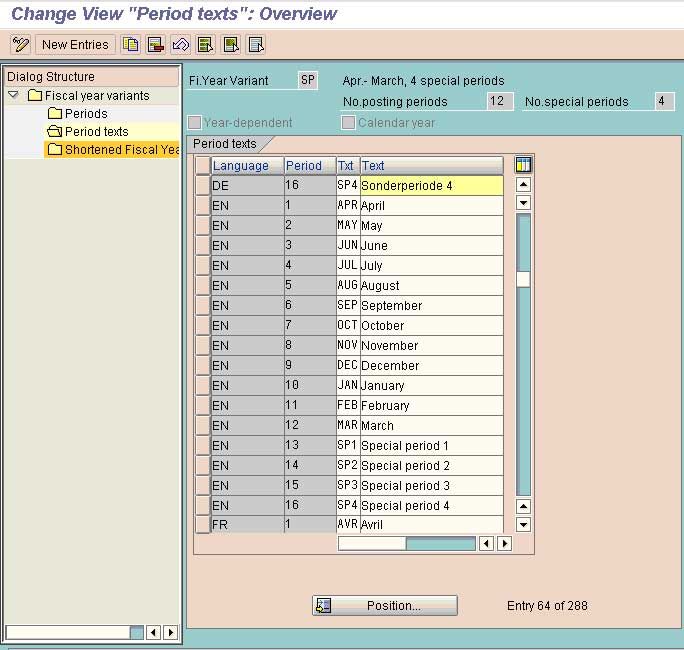
Period Texts: Describing the month for the period e.g. April for Period 1, March for period 12 for the fiscal year of April-March.
Assign the fiscal year variant to a co code (OB37)
T-code (OB37)
Path
Financial Accounting
Financial Accounting Global Setting
Fiscal year
Assign the fiscal year variant to a co code
For every company code, you must specify which fiscal year variant is to be used
Assign a fiscal year variant to each company code.
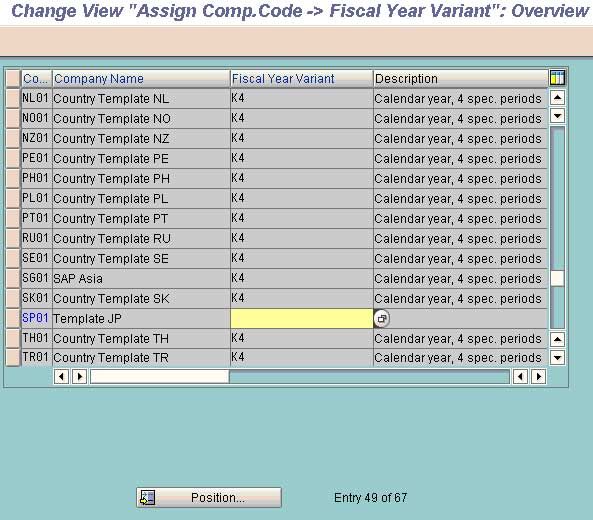
Assign the variant created using step 3 to the company code.
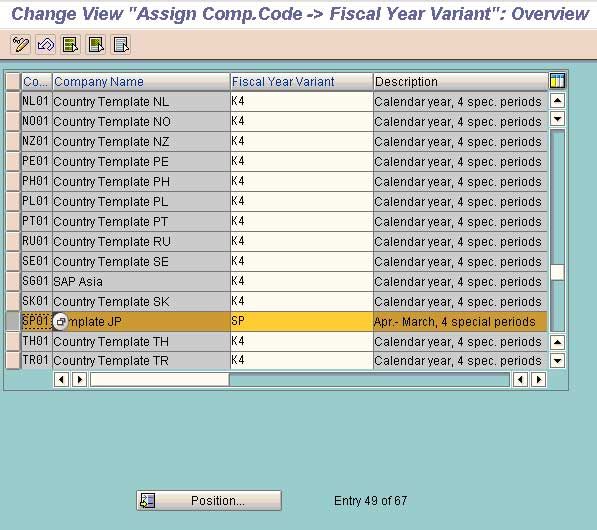
Save the data and exit.
Define Variants for open posting Periods (OBBO)
T-code (OBBO)
Path
Financial Accounting
Financial Accounting Global Setting
Documents
Posting Periods
Define Variants for open posting Periods
Here we define a variant name for a posting period for a company code. For easy identification purpose it is advisable to have the company code name as the variant name.
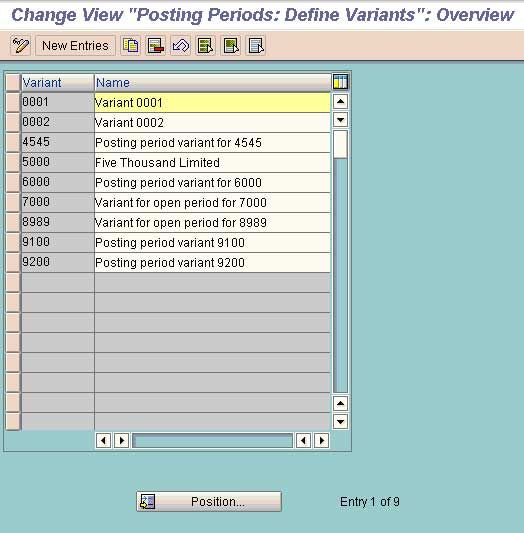
Select New Entries
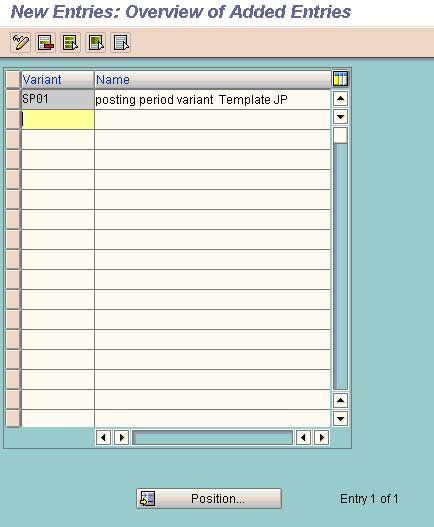
Save and go back
How to Open and Close posting Periods (OB52) in SAP FICO
Assign variants to company code (OBBP)
T-code ( OBBP)
Path
Financial Accounting
Financial Accounting Global Setting
Documents
Posting Periods
Assign variants to company code
(Assign)
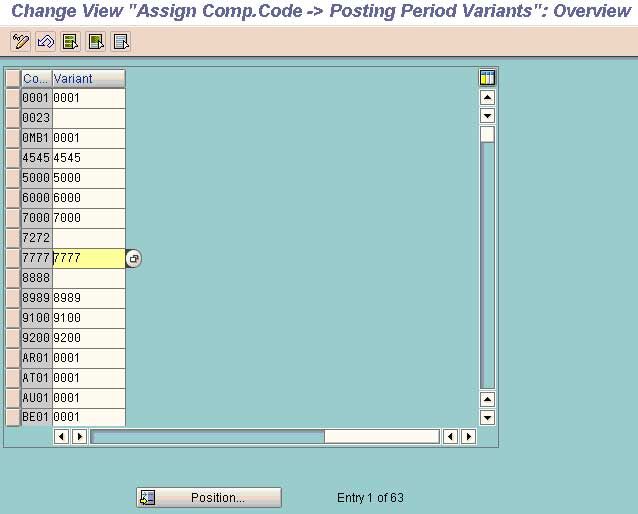
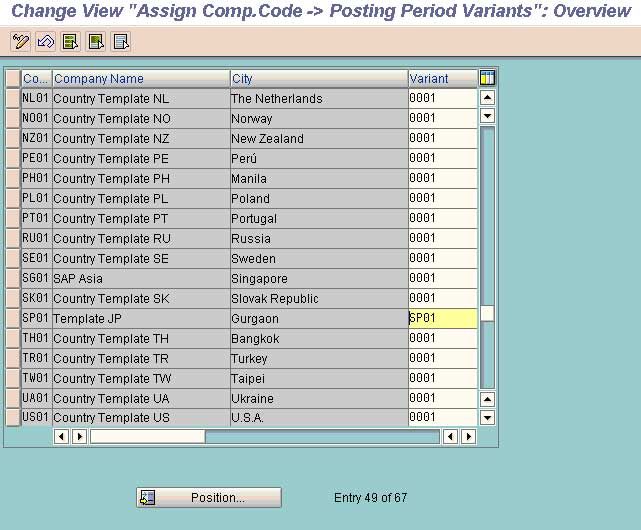
Save and Exit
Maintain Field Status Variants (For controlling the Transaction Screen Fields) (OBC4)
T-code (OBC4)
Path: Financial Accounting---.Financial Accounting Global Setting-->Documents-->Line Items-->Controls-->Maintain Field Status Variants
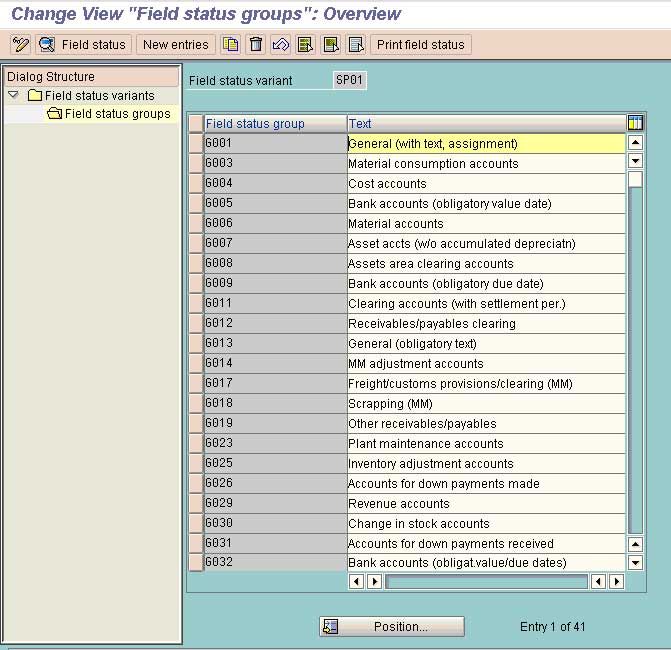
In this activity you can define and edit field status variants and groups. You group several field status groups together in one field status variant. You assign the field status variants to a company code.
You must define a field status group in the company code-specific area of each G/L account. The field status group determines which fields are ready for input, which are required entry fields, and which are hidden during document entry. Bear in mind that additional account assignments (i.e. cost centers or orders) are only possible if data can be entered in the corresponding fields.
Field status variant 0001 is entered for company code 0001 in the standard SAP software. Field status groups are already defined for this variant.
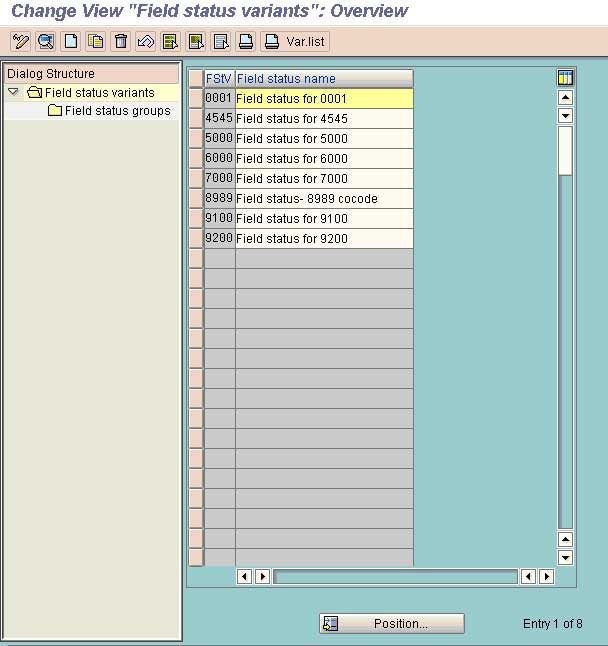
Task: Copy or Create New
To Copy: Select the variant to be copied and choose the option copy from the task bar. While copying change the name of the variant to be used for a company specific.
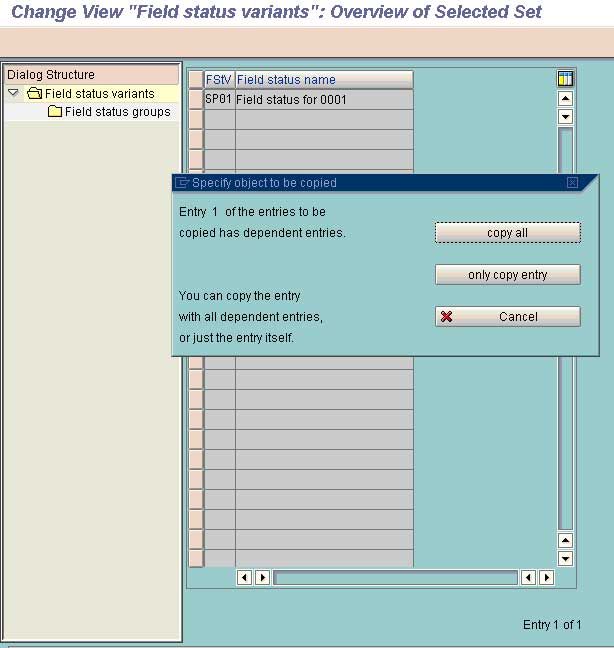
Task: Choose the option copy all if copying from the existing field status variants.
Assign Field Status Variants to co code (OBC5)
T-code (OBC5)
Path
Financial Accounting
Financial Accounting Global Setting
Documents
Line Items
Controls
Assign Field Status Variants to co code
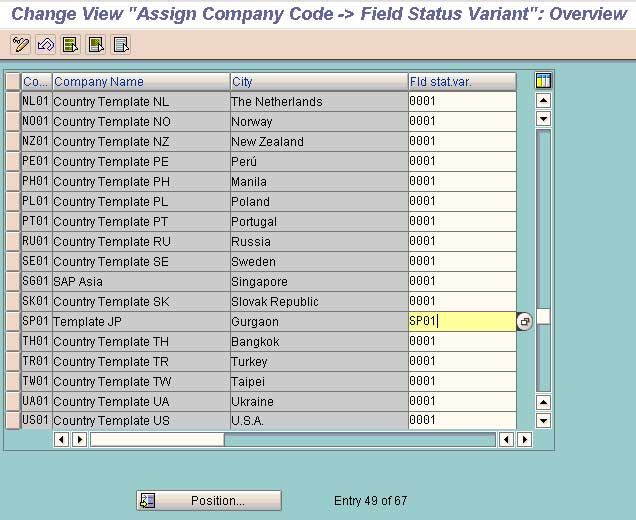
Assign the Co code and name to the field status variant created for the company.
Save and Exit
How to Define Document Types (OBA7) in SAP FICO
How to Define Document Number Range (FBN1) in SAP FICO
How to Define Chart of Accounts (Ob13) in SAP FICO
Assign Company Code to Chart of Accounts (OB62)
T-code (OB62)
Path
Financial Accounting
General Ledger Accounting
GL Accounts
Master Records
Preparations
Assign Company Code to Chart of Accounts
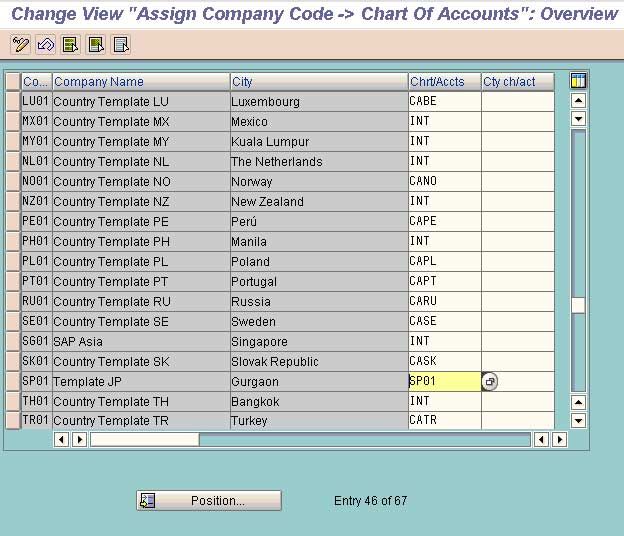
Complete the required data and save the work.
How to Define Account Group (OBD4) in SAP FICO
How to Define Posting Keys (OB41) in SAP FICO
Define Tolerance Group for Employees (OBA4)
T-code (OBA4)
Path
Financial Accounting
Financial Accounting global Setting
Document
Line Items
Define Tolerance Group for Employees
In this activity, you predefine various amount limits for your employees with which you determine:
• the maximum document amount the employee is authorized to post
• the maximum amount the employee can enter as a line item in a customer or vendor account
• the maximum cash discount percentage the employee can grant in a line item
• the maximum acceptable tolerance for payment differences for the employee.
You can also define tolerances without specifying a tolerance group. Leave the field Grp empty in this case. The stored tolerances are then valid for all employees who are not allocated to a group. There must be at least one entry for every company code.
You can also specify tolerances for clearing procedures depending on your customers or vendors.
In the system, sample tolerances are defined for the standard company codes.
If you have defined differing tolerance groups, you then have to assign your employees to a certain tolerance group. To do this, select the activity "Assign users to tolerance groups" . This is where you enter your employees under the relevant groups.
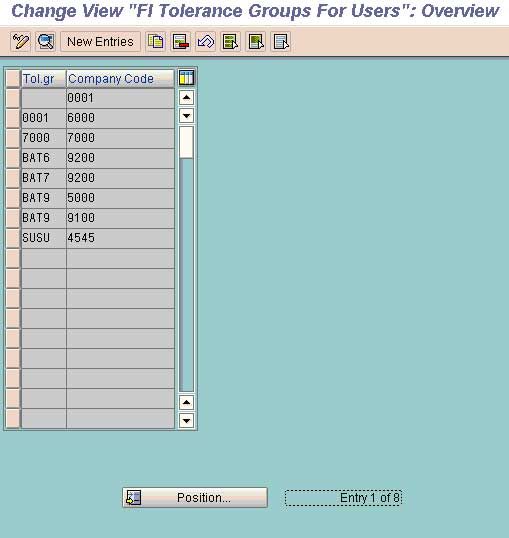
The Tolerance Group is the used for defining the upper limit for a particular employee user for allowing him to post a transaction within the limit assigned to the user using this option. An employee cannot post any transaction which falls beyond the tolerance limits/amount fixed for him under this option.
Select the option New Entries
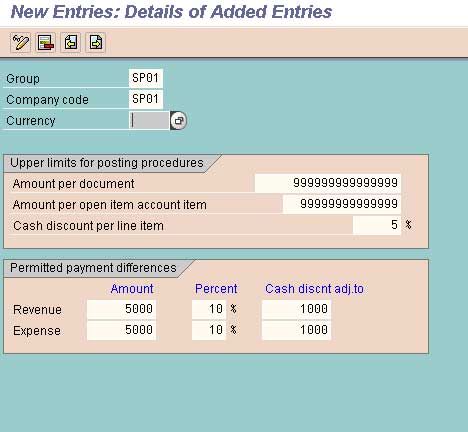
Define the Limits for a particular group by assigning the values in the various fields. Once limit are assigned the employees will be able to post the transaction within that limit only.
Assign User/Tolerance Groups (OB57)
T-code (OB57)
Path
Financial Accounting
Financial Accounting global Setting
Document
Line Items
Assign User/Tolerance Groups
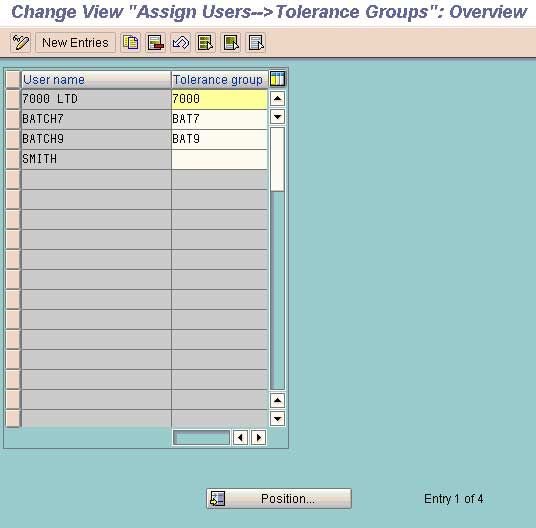
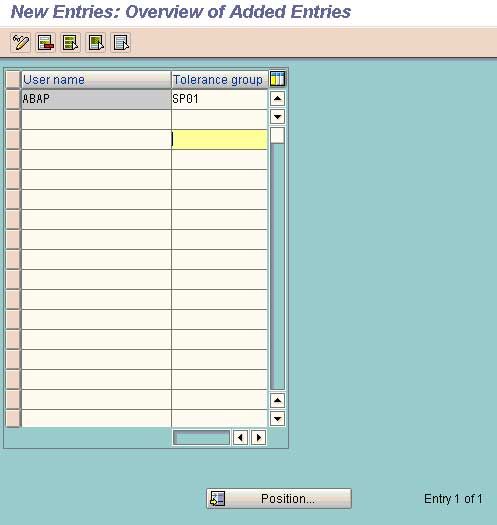
Assign the Tolerance Group to a particular user by using the Tolerance Group Name that is created by using step 16. by doing this that particular user will be allowed to post the transaction within the limits that is specified under that tolerance group for a particular company code.
GL Accounts Creation and processing
Path
Financial Accounting
General Ledger Accounting
GL Accounts
Master Records
GL Accounts Creation and Processing
Edit GL Accounts(Individual Processing)
(Centrally/`/Co Code)
(FS00 /FSP0/ FSS0)
The GL accounts can either be created centrally or for a company specific or for a chart of account specific. By creating the GL Account centrally the GL account will get created in the company code as well as in a centralized COA and the GL accounts so crated in the COA can also be extended to other Company Codes. When GL accounts are created under a COA the same has to be extended to a company code for which the GL Account to be used.
Creation of GL account using FS00 (Centrally)
In this activity, you can edit the master record of a G/L account centrally in both the chart of accounts and company code specific areas.
You can process G/L account master records as follows:
• Edit
• Change
• Create
• Create with reference
• Block
• Delete, that is, set the deletion indicator
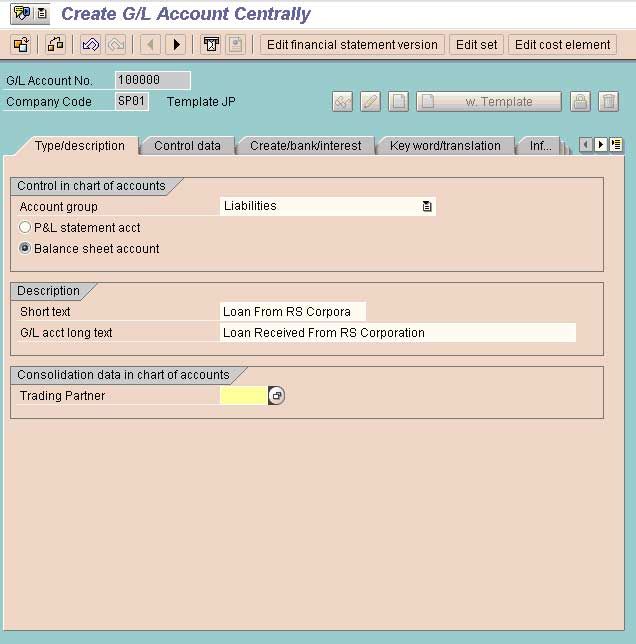
The account group determines the fields for the entry screens if you create or change a master record in the company code.
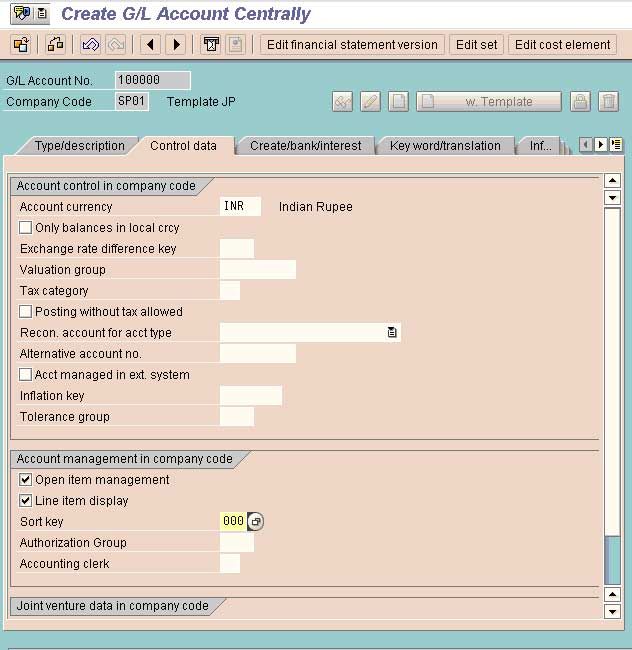
Open item management
Determines that open items are managed for this account.
Set up accounts with open item management if offsetting entries are to be assigned to the postings made to these accounts. Postings to these accounts represent incomplete transactions.
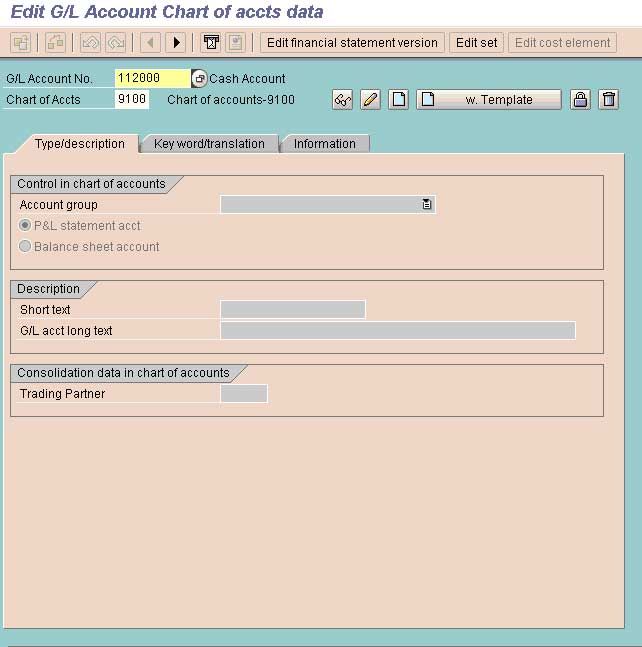
Creation of GL account using FSP0
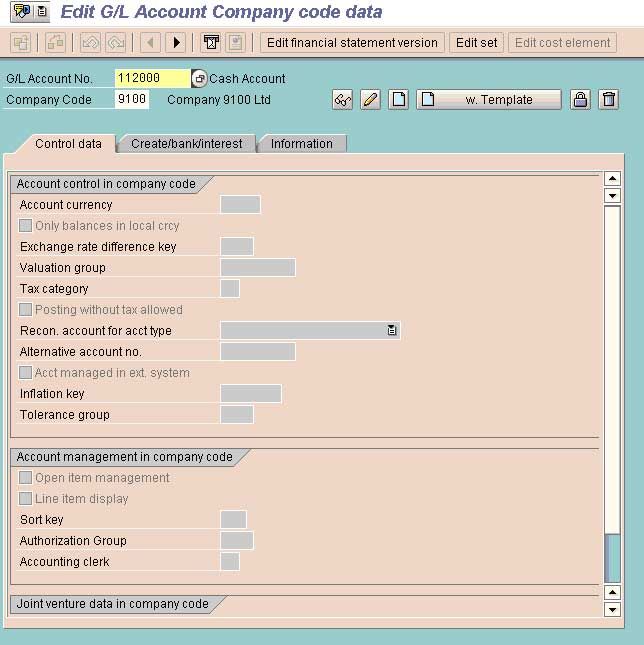
Creation of GL account using FSS0
In case the option of copy Chart of Account is used (OBY7) is used then the GL accounts of source COA will be copied to the target COA.
Define Account Groups with Screen Layout (Customers) (OBD2)
T-code (OBD2)
Path
Financial Accounting
Account Receivables & Payables
Customer Accounts
Master Data
Preparation for creating Customer Master Data
Define Account Groups with Screen Layout (Customers)
In this step, you determine the account groups for customers.
You can also define reference account groups for one-time accounts. You can use these to control the fields of the one-time account screen so that, for example, certain fields are displayed as required fields or are hidden.
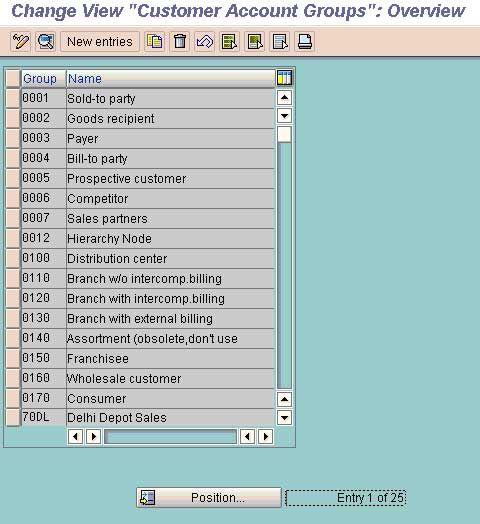
Select the option New Entries
Account Groups
The account group determines:
• The data that is relevant for the master record
• A number range from which numbers are selected for the master records
An account group must be assigned to each master record
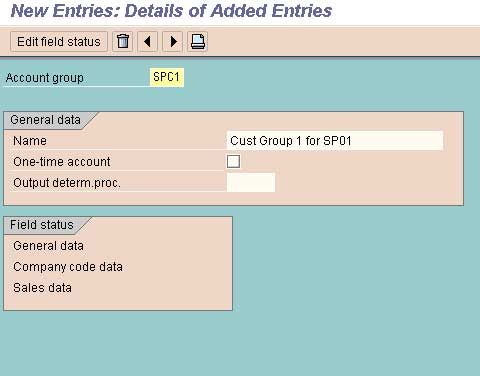
Create the Group as per Business Needs by allotting a group name.
Save the data and exit
Create Number Ranges for Customer Accounts (XDN1)
SOLUTION
Please follow the steps below in order to create number ranges for customer accounts:
Transaction Code: XDN1
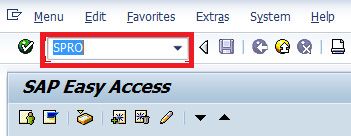
1) First, in SAP command field go to T-code SPRO and then press enter.
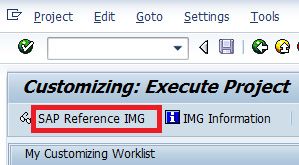
2) Now user need to select SAP Reference IMG
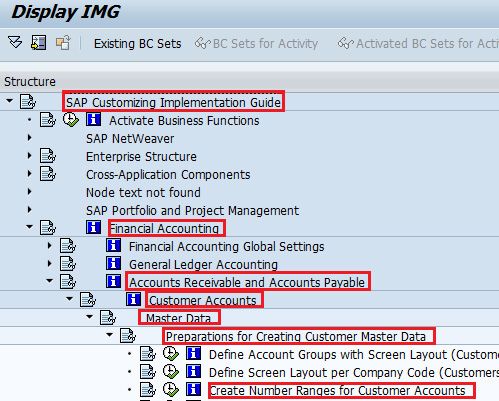
3) Now follow the IMG Menu Path as shown below
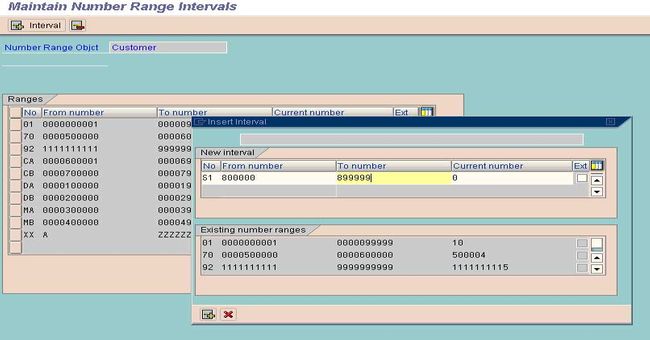
IMG Menu Path:- IMG > Finance Accounting –> Accounts Receivable and Accounts Payable –> Customer Accounts –> Master Data –> Preparation for creating customer master data –> Create Number Ranges for Customer Accounts
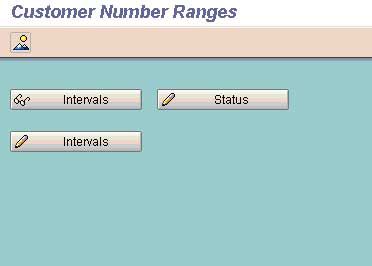
4) Now please choose select Change interval in order to create number ranges for customer accounts
5) Now click the tab 'Insert Interval'
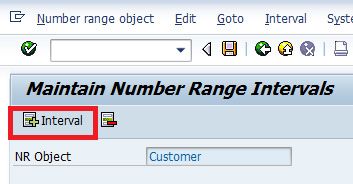
6) Now you need to update the information given and press Enter
- NO: Enter NO which you want to identify the Customer accounts number range
- From Number: Enter 'From Number' of Customer number range
- To number: In this Enter 'To Number' of Customer number range
- Ext: Choose the EXT box if you need External numbering
7) At last select Save and press enter.
![]()
Note: Please ignore the warning message
Assign Number Range to customer account groups (OBAR)
T-code (OBAR)
Path
Financial Accounting
Account Receivables & Payables
Customer Accounts
Master Data
Assign Number Range to customer account groups
(Assign)
In this step you assign the number ranges you created in the preceding step to the account groups for customers..
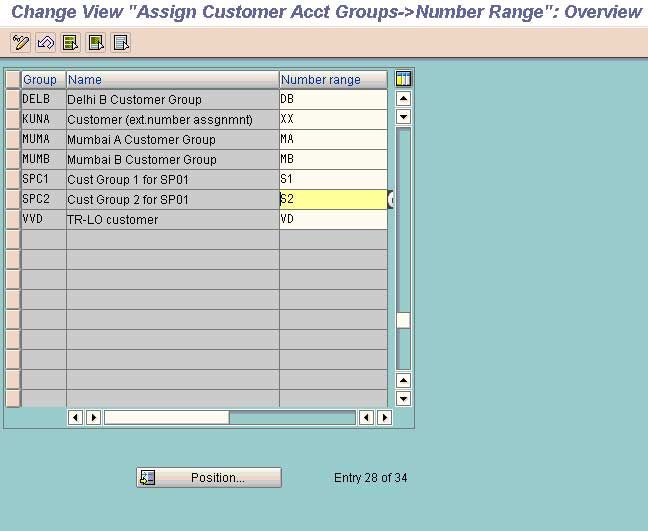
Assign the Number Range No. to a particular Customer Group. This way the Customer within a particular group will be assigned the number range allotted to that group.
How to Create Customer Reconciliation (Control) Account in GL (Must Before Creating Customer Master Records) (FS00) in SAP FICO
Create Customer Master Record (From the End user Menu Path) (FD01)
(From the End user Menu Path)
T-code (FD01)
Path
SAP Menu
Accounting
Financial Accounting
Account Receivable
Master Records
Create/Change/Display
(FD01/ FD02 /FD03
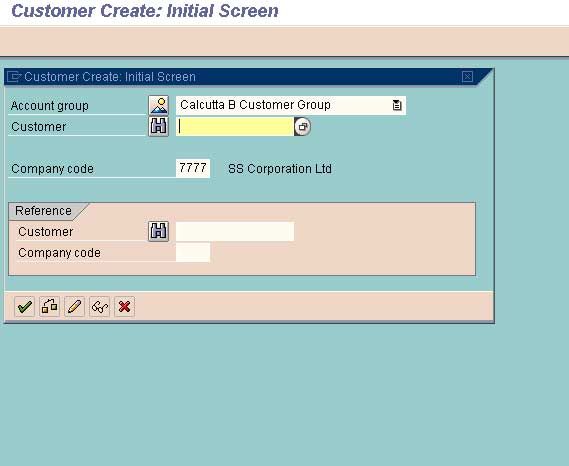
Select the Group to which the Customer will belong and press enter
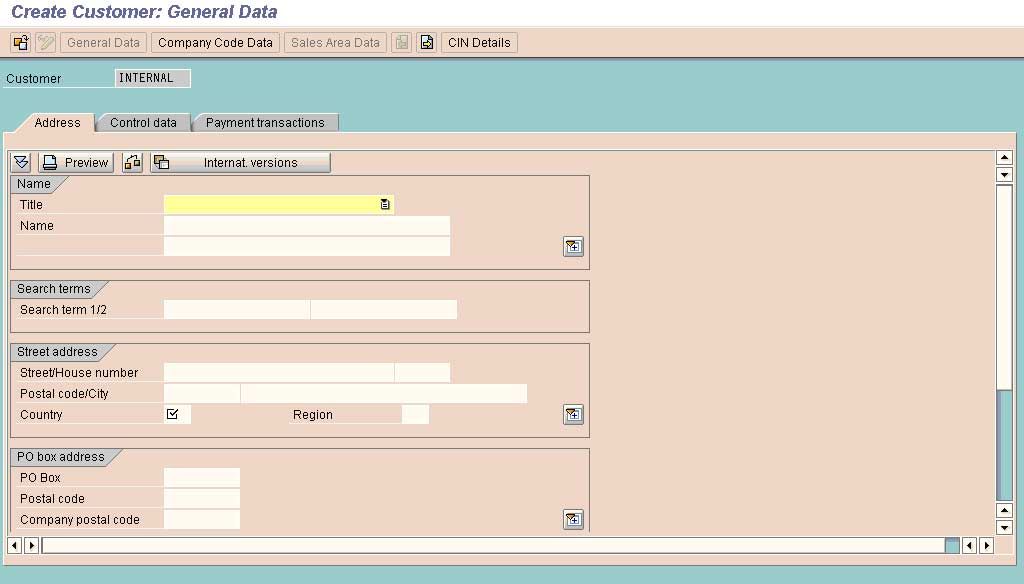
Fill the required data particularly Mandatory Data
Go to next Screen
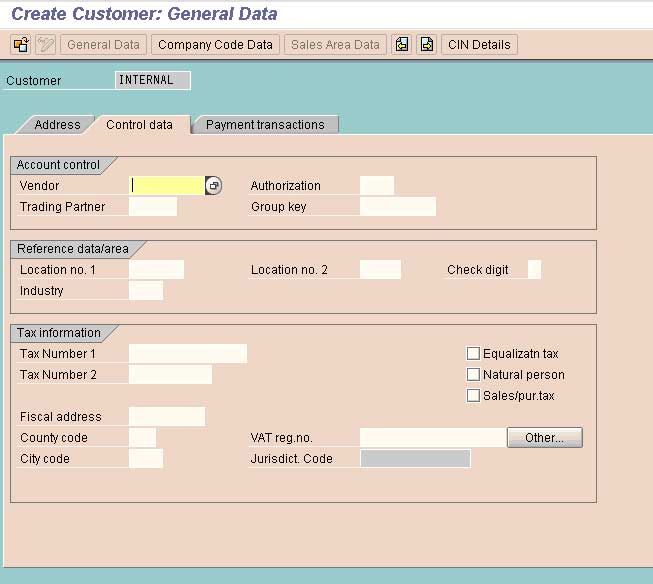
Complete the other required data and select the option Company Code Data from the Task Bar
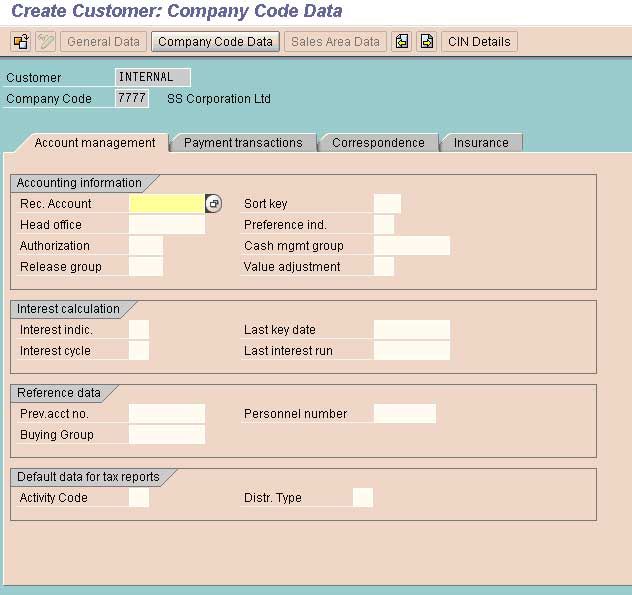
Define the Reconciliation Account No for this particular Customers. The Reconciliation Accounts are created in GL.
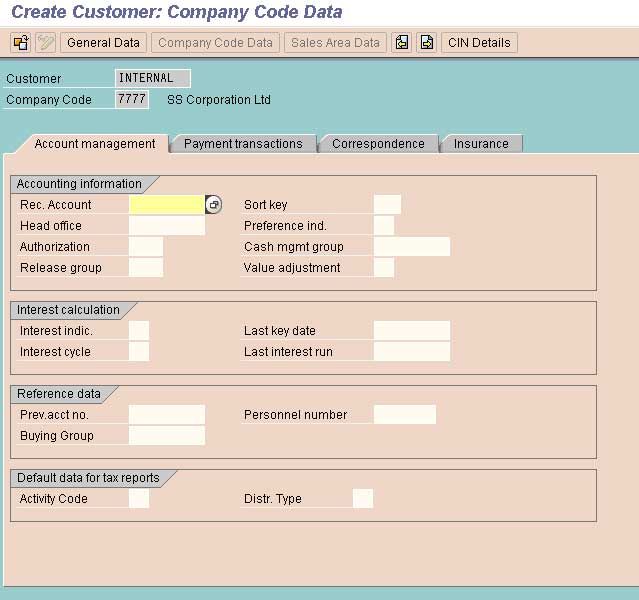
Complete the data and go to the next screen
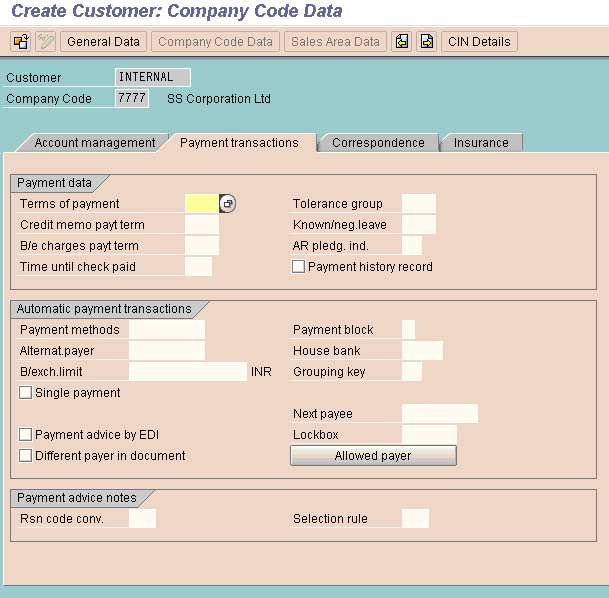
Complete the data and save.
Define Tolerances for customers and vendors (OBA3)
T-code (OBA3)
Path
Financial Accounting
Accounts Receivables & Payables
Business Transactions
Incoming Payments
Manual Incoming Payments
Clearing Differences
Define Tolerances for customers/vendors
• In this activity you define the tolerances for customers/vendors. The tolerances are used for dealing with payment differences and residual items that may arise when payment clearing is carried out.
1. Identify groups of customers/vendors to which identical tolerances apply.
2. Create the required tolerance groups for your customers/vendors.
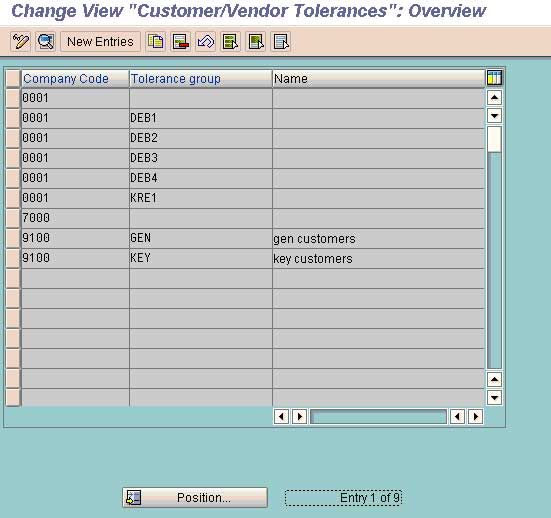
Select option new Entries
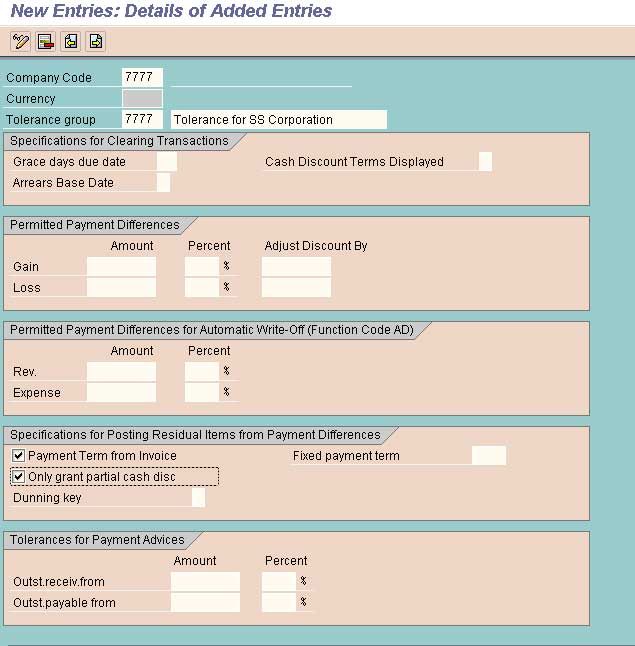
Define the Tolerance limit for the group
Save the Data
Assign Users to Tolerance Group
T-code (OB57)
Path
Financial Accounting
Financial Accounting global Setting
Document
Line Items
Assign User/Tolerance Groups

Assign the Tolerance Group to a particular user by using the Tolerance Group Name that is created by using step 16. by doing this that particular user will be allowed to post the transaction within the limits that is specified under that tolerance group for a particular company code.

Define Account for Cash Discounted Granted (OBXI)
T-code (OBXI)
(Caution: First create a Cash Discount Allowed A/C in GL)
Path
Financial Accounting
Accounts Receivables & Payables
Business Transactions
Incoming Payments Global Settings
Define Account for Cash Discounted Granted
In this step, you define the account numbers for your cash discount expense accounts. The system posts the cash discount amount to these accounts when clearing open items.
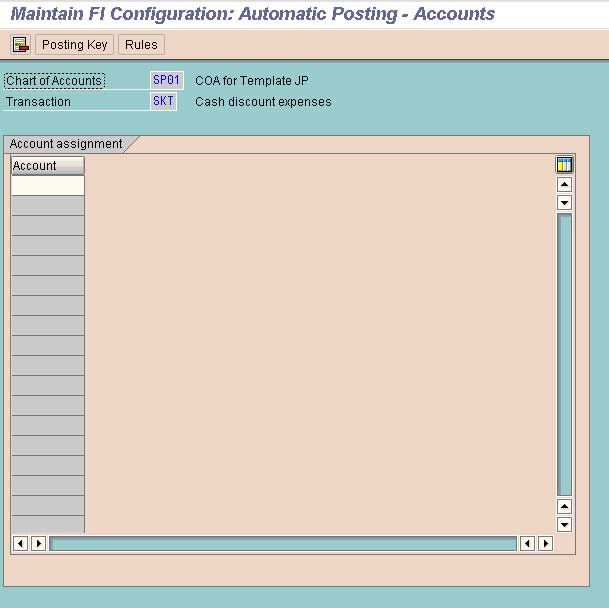
Define the GL Cash Discount Allowed/Granted/Given/Paid a/c no as created in GL. By doing this the Cash Discount allowed to the customers while receiving the payments will automatically get debited to this account.
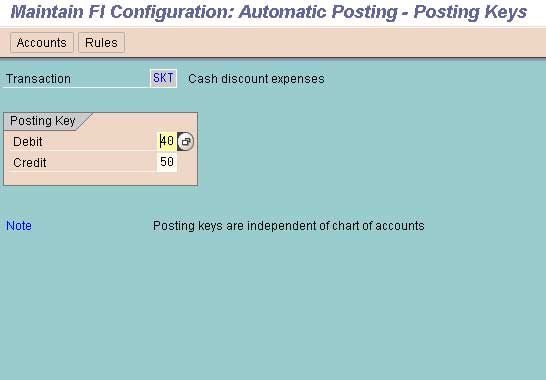
Save the data so created and exit.
Define Accounts for Underpayment/Overpayment (OBXL)
T-code (OBXL)
(Caution: First create a Under Payment & Over Payment A/C in GL)
Path
Financial Accounting
Accounts Receivables & Payables
Business Transactions
Incoming Payments Global Settings
Define Accounts for Underpayment/Overpayment
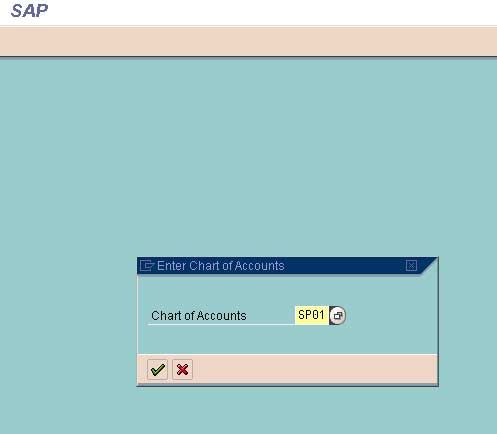
Enter the co code and enter
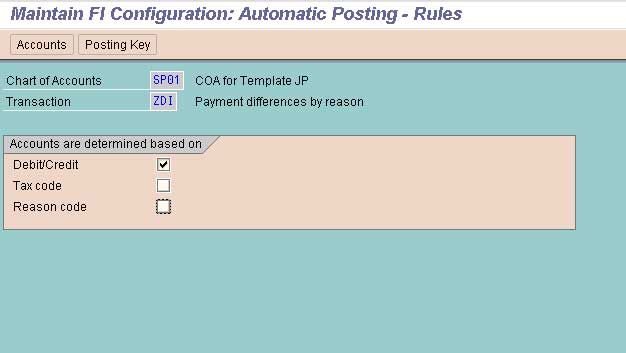
Here we define the number of Accounts required for accounting under payments and over payments.
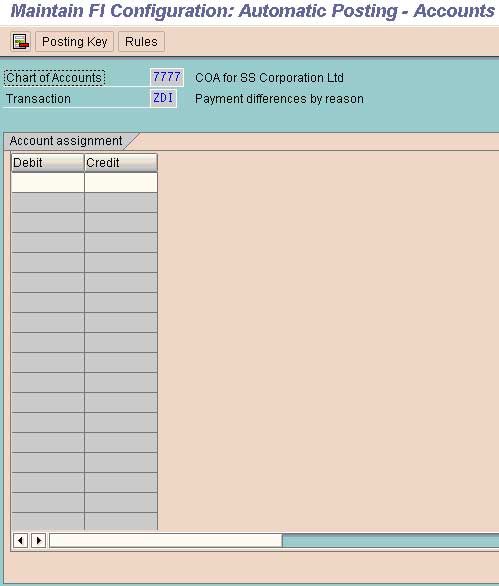
Define the Account Numbers Created for Under Payments and Over Payments from Customers as created in GL
Save the Data and Exit
Define Account Groups with Screen Layout (Vendor) (OBD3)
T-code (OBD3)
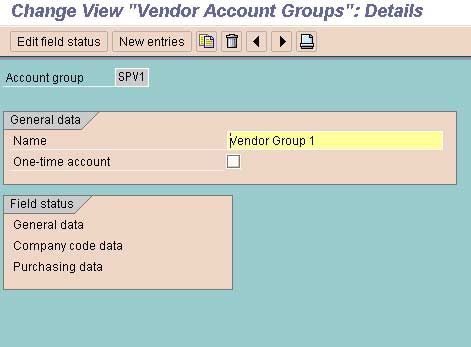
Create Number Ranges for Vendor Accounts (XKN1)
Solution
Purpose of configuration : –
In SAP FICO the user creates a number ranges for vendor accounts. When the user is creating these vendor accounts utilizing the transaction code XK01, the number is assigned to vendor accounts based on the number ranges that the user has configured. For doing this, the user is required to define the two digits alphanumeric key.
- A number interval from which the account number for the vendor accounts has to be selected.
- The type of number assignments (Internal/ External).
Navigation of Number Ranges for Vendor Accounts
Transaction Code |
XKN1 |
|
SAP IMG Menu |
SPRO > IMG > Financial Accounting > Accounts Receivable & Accounts Payable > Vendor Accounts > Master data > Create number ranges for vendor accounts |
Description and Configuration values
No |
From No. |
To Number |
NR Status |
Ext |
|
T1 |
0000005000 |
0000005999 |
|
|
|
T2 |
0000006000 |
0000006999 |
|
|
|
T3 |
0000007000 |
0000007999 |
|
|
|
T4 |
0000008000 |
0000008999 |
|
X |
Configuration steps
Step 1: User Enters the SAP T-code “XKN1” in the commend field and presses enter to continue.

Step 2: On range maintenance vendor screen, user clicks on change intervals button for creating the new number ranges for vendor accounts in the SAP system.
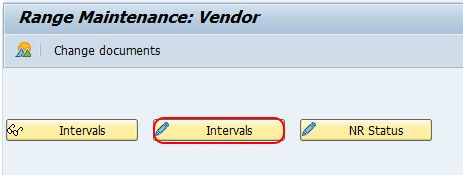
Step 3: On maintain Intervals: Vendor overview screen, user clicks on the insert line option (F6) for maintaining the new number ranges for the vendor accounts.

Step 4: On maintain interval vendor screen, user updates the following details.
- No: User Enters the 2 digits key which identifies the vendor account number range interval in SAP.
- From No: user updates the starting number of intervals, for e.g. 0000005000
- To Number: User Updates the last number of intervals, for e.g. 0000005999
- Ext: This option is checked only if the number range interval is applicable for external assignment.

Post maintaining all the required details, user clicks on the save button and saves the configured details.
How to delete created vendor number range interval?
User Selects number range interval and clicks on delete line option or presses function key F7.
The user is not allowed to delete the number ranges intervals of vendor if the vendor accounts are already made under that interval. The system reflects an error as deletion only possible incase the status is initial.
Assign Number Range to Vendor account groups (OBAS)
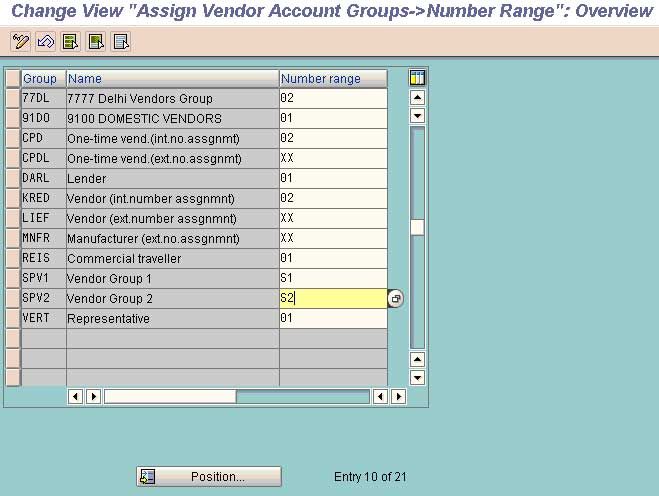
In this tutorial, we will assign a number range (already created) to Vendor Groups. One number range can be assigned to some vendor groups.
Transaction: OBAS
Navigate to IMG Path: Financial Accounting (New) -> Accounts Receivable and Accounts Payable -> Vendor Accounts -> Master Data -> Preparations for Creating Vendor Master Data -> Assign Number Ranges to Vendor Account Groups
Tables: T077K, T077Y
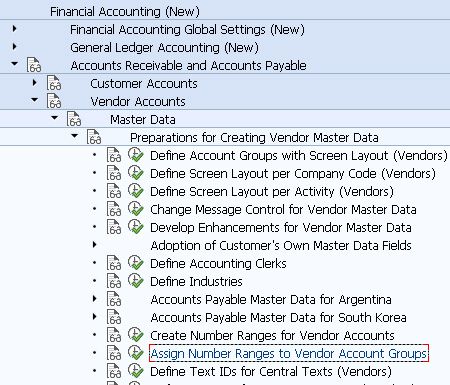
Now when you enter into the transaction, you will get a list of all vendor account groups. There you can search for the desired vendor account group and then choose the appropriate number range.
Create Vendor Master Record (From the End user Menu Path) (FK01)
(From the End-user Menu Path)
T-code (FK01)
Path
SAP Menu
Accounting
Financial Accounting
Account Payable
Master Records
Create/Change/Display
(FK01/ FK02 /FK03)
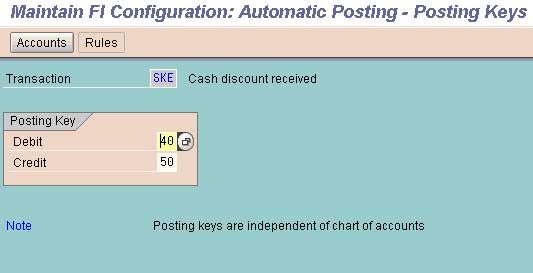
Cash Discount Received from Vendors
(OBXU)
Step 25A
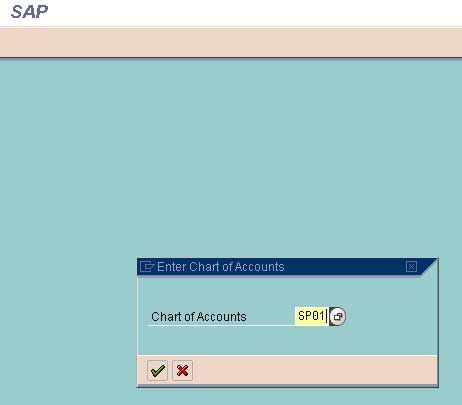
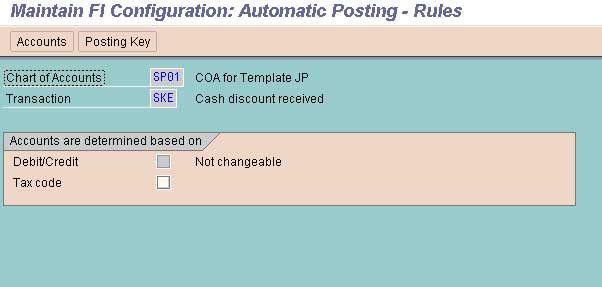
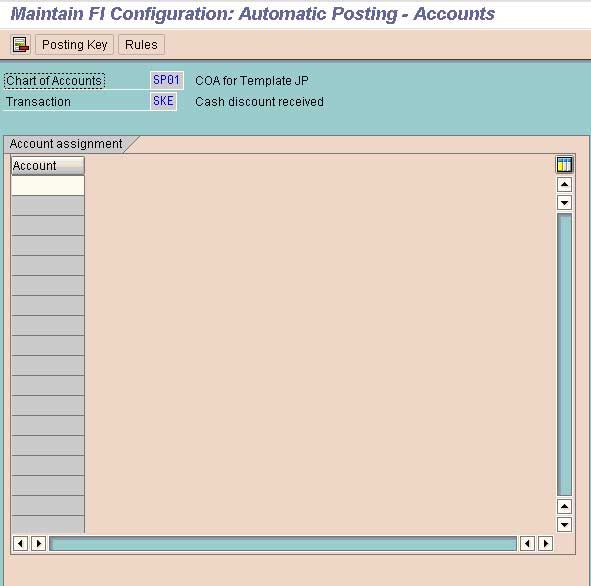
Define Account For Cash Discount Given (OBXU)
Financial Accounting
Accounts Receivables & Accounts Payables
Vendor Account
Business Transactions
Outgoing Payment
Outgoing Payment Global Setting
Define Account For Cash Discount Given
Maintain Terms of Payments (OBB8)
T-code (OBB8)
Path
Financial Accounting
Accounts Receivables & Payables
Business Transactions
Incoming Invoices/Credit Memos
Maintain Terms of Payments
In the step Maintain terms of payment, you can define rules with which the system can determine the required terms of payment automatically.
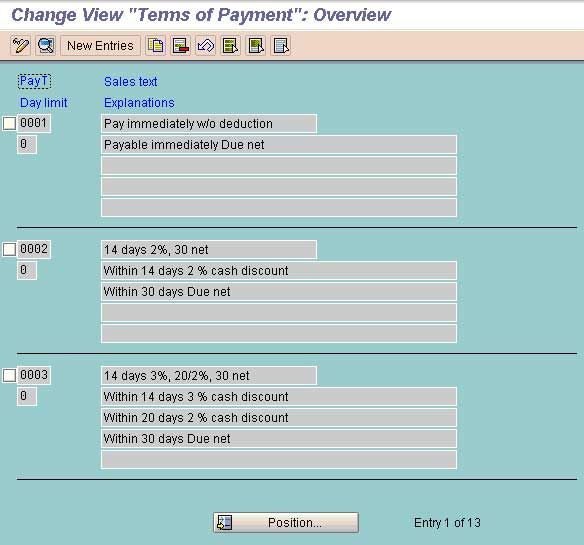
Select the option Copy for Copying from Existing Terms of payments or New Entries for defining new terms of payments
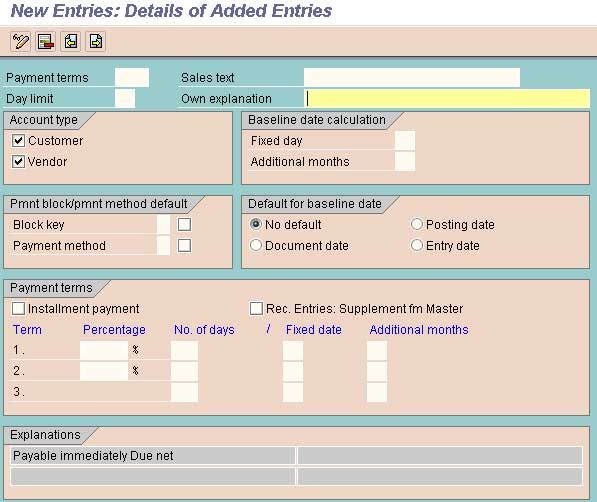
Payment Terms: Key for defining payment terms composed of cash discount percentages and payment periods.
Bank Accounting Define Bank Accounting (FI12)
Define House Bank
Financial Accounting
Bank Accounting
Bank Accounts
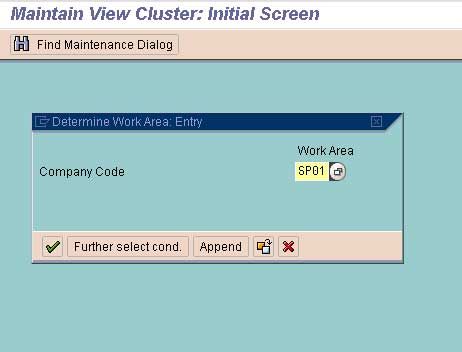
Define House Bank
Press Enter
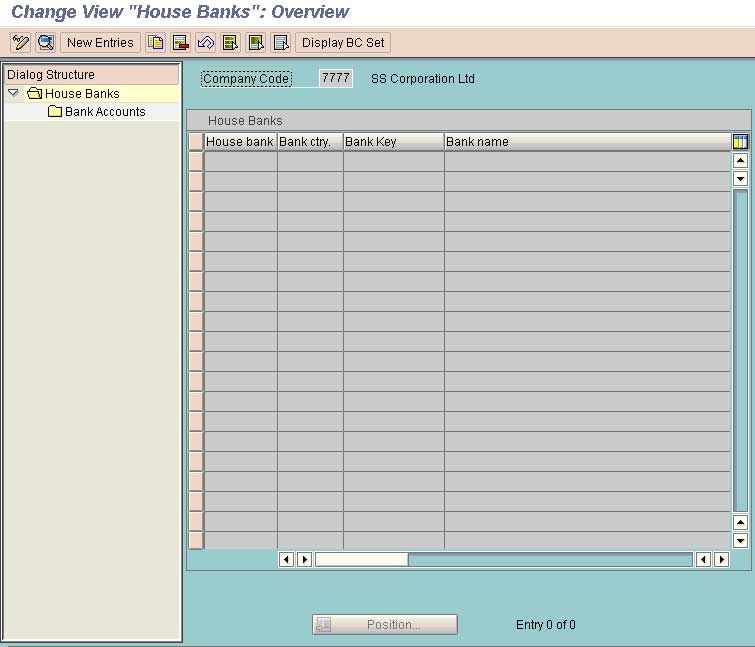
Select New Entries
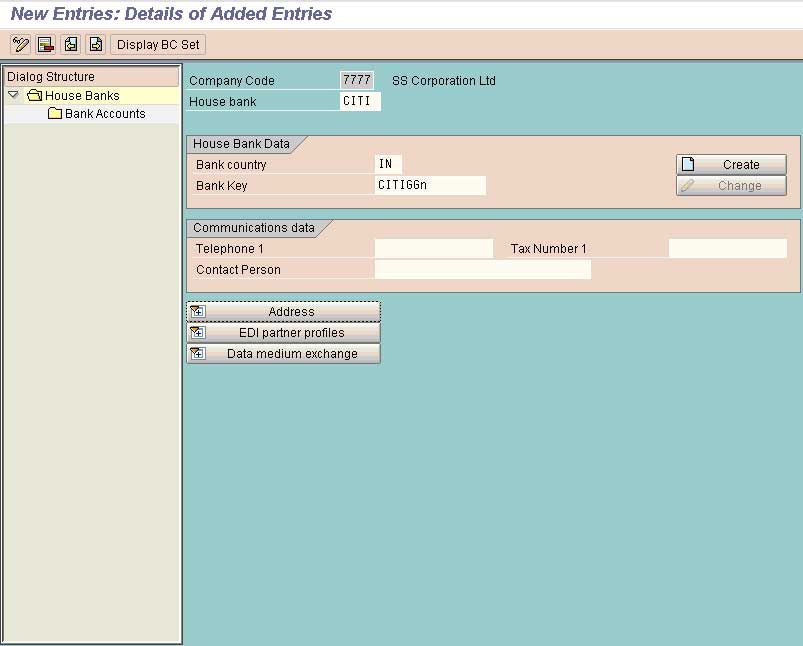
House Bank represents the Bank in which the accounts are maintained
Bank Key Represents the Branch of the House Bank
Select Create to complete the address of the corresponding bank.
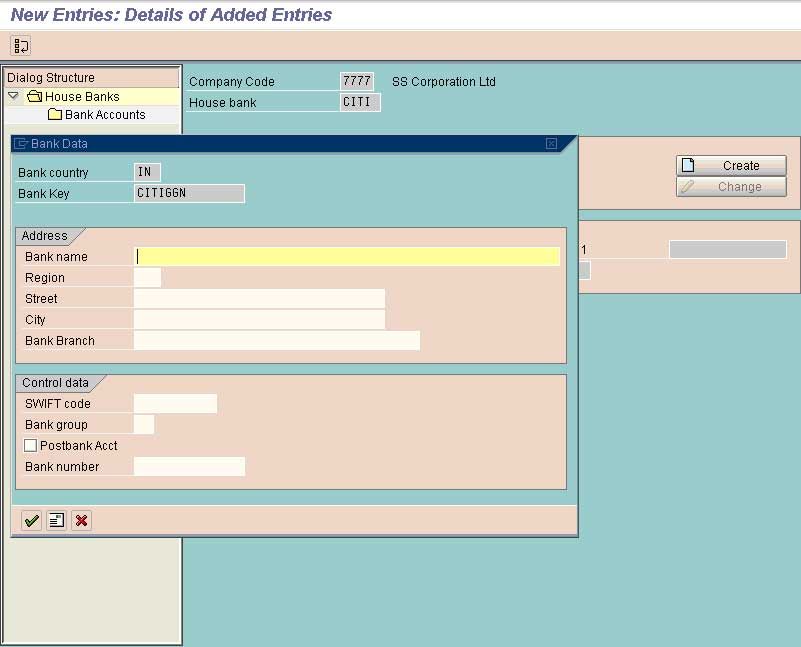
Enter Required Details & Save
Go to the option Bank Accounts
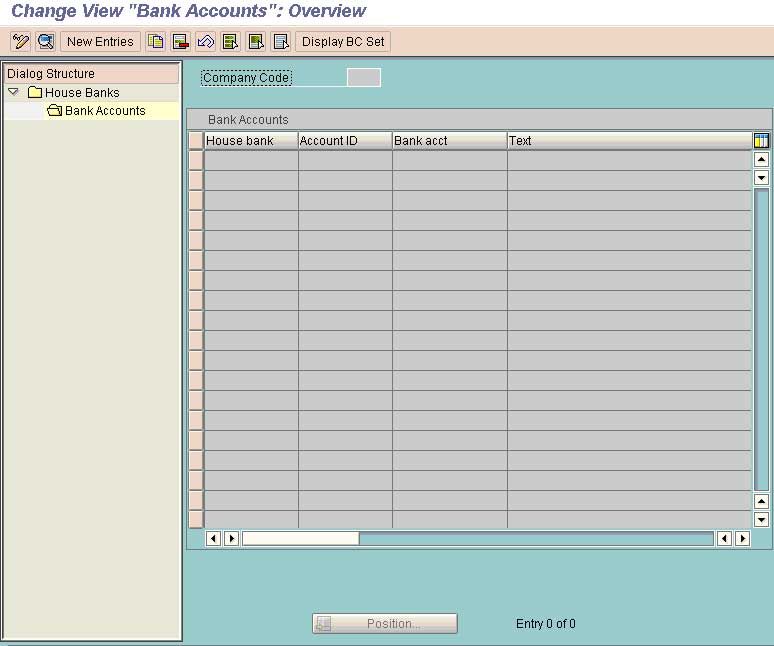
Select New Entries
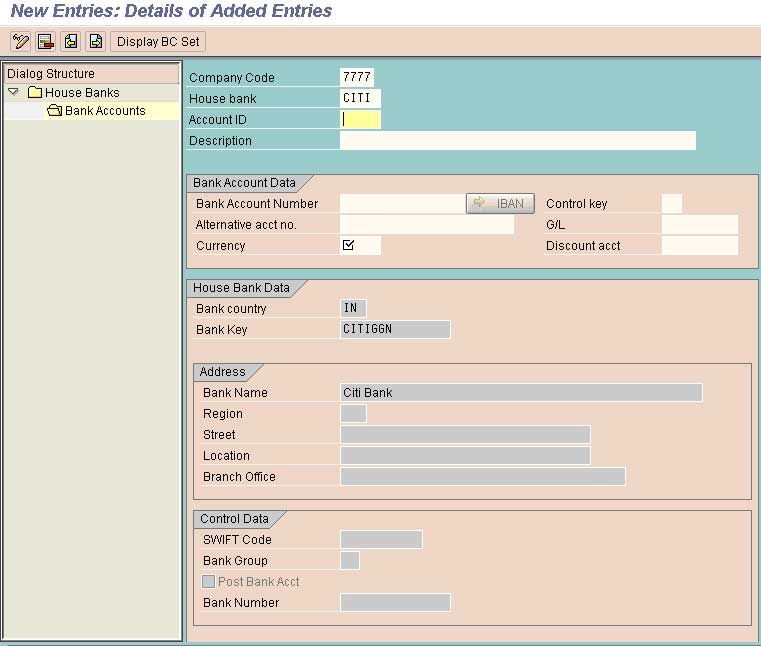
Bank A/C No: The Bank Account Number as allotted by Bank. This field contains the number under which the account is managed at the bank
Complete the data and save
Define posting key ad Posting Rules for Bank Transactions in
Financial Accounting
Bank Accounting
Business Transaction
Payment Transaction
Manual Bank Statement
Create & Assign Business Transaction
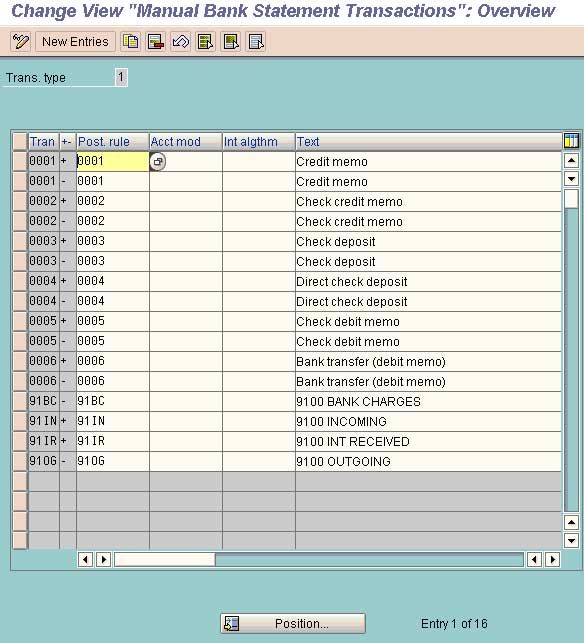
New Entries
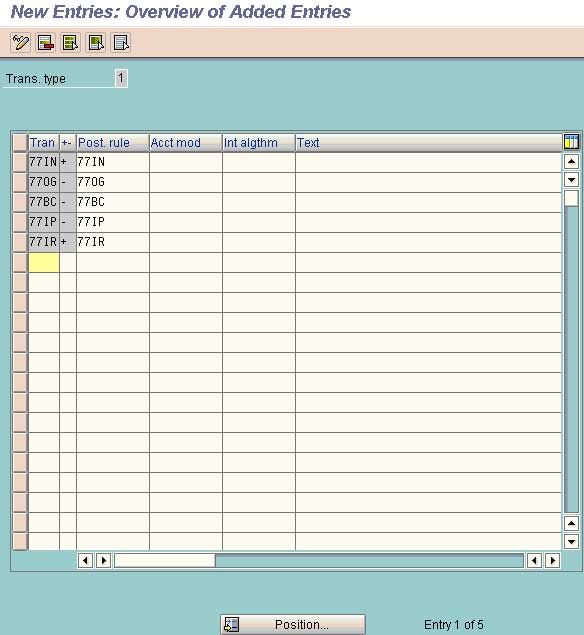
Tran: Type of transaction to be carried out under this type. If the Main bank Account balance get increased under a particular transaction type then use the sign + and vice versa.
Save and Exit
Define Tolerance Group for GL Account (OBA0)
T-code (oba0)
(This is to be done before Clearing the GL open Transections)
Define Tolerance Group for GL Account
Financial Accounting
GL Accounting
Business Transections
Open Item Clearing
Clearing Differences
Define tolerance for GL Accounts
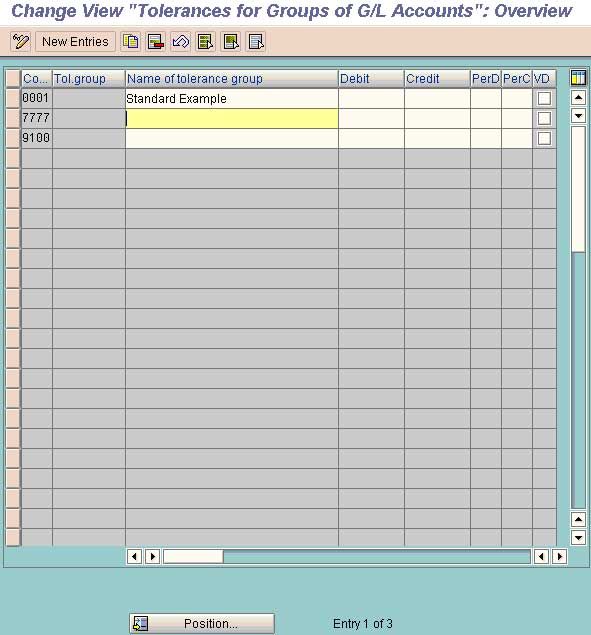
Select New Entries
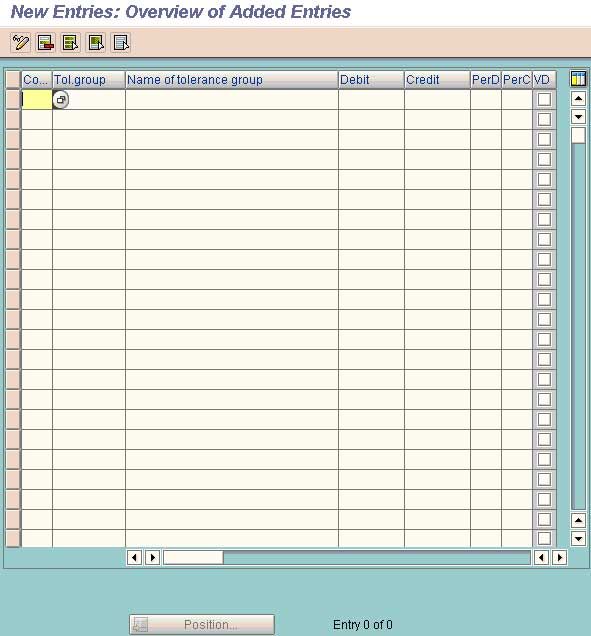
Enter the company code and text for the tolerance Group.
Define Reconciliation Accounts for Customer Down Payments (OBXR)
T-code (OBXR)
Path
Financial Accounting
Accounts Receivables & Payables
Business Transactions
Down payment Received
Define Reconciliation Accounts for Customer Down Payments
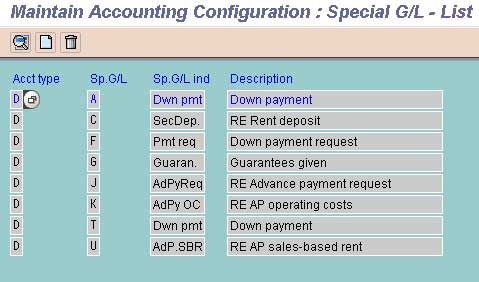
Can be selected from the pre defined Spl GL Indicators or can be created new. For creating new select the option create from the task Bar
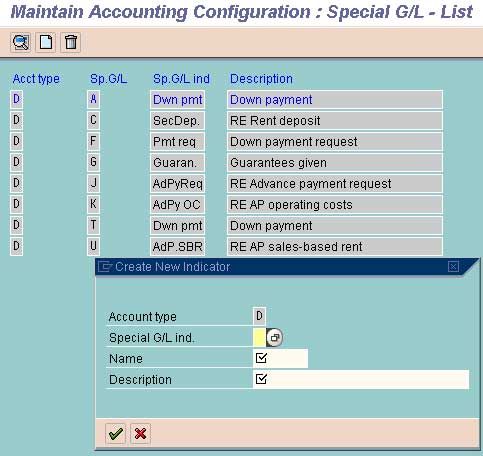
If to be selected from the predefined SPL GL Indicator then following screen will appear.
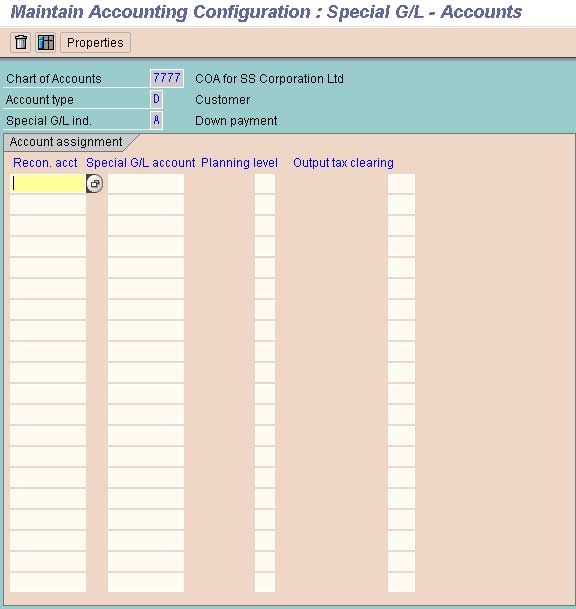
Here defined the GL accounts created for customer reconciliation and Advance from Reconciliation A/C.
Save the data.
How to Create GL Account for Cash Journal in SAP FICO
- Create GL Account for Cash Journal
- (FS00)
- Define Document Types for Cash Journal
- Define Number Range Interval for Cash Journal Document
- Set up cash Journal
- Create, Change, Delete Business Transaction
- Set up Print Parameter for cash journal
- For Posting the transaction in cash journal
BILL OF EXCHANGE TRANSACTION
- Define Alternative Accounts for Bil/Exch receivables (OBYN)
- Define bank sub accounts (OBYK)
- Define B/E Payment Period (Protest Period) (OB86)
- For Receiving the B/E from customer (F-36)
- For Discounting theB/E with the Bank (F-33)
- For Reversing the Contingent Liabilities
WITHHOLDING TAX (TDS) in SAP
- Check Withholding tax Countries
- Define Official Withholding Tax Code (Key)
- Define Reasons for exemption
- Define Business Places
- Assign Factory Calendar to Business Places
- Maintain Tax Due Dates
- Define Withholding Tax Type for Invoice Posting
- Define Withholding Tax Type for Payment Posting
How to Define Withholding Tax Codes in SAP FICO
Financial Accounting
Financial Account Global Setting
Witholding Tax
Extended Withholding Tax
Calculations
Withholding Tax Codes
Define Withholding Tax Codes
Here we define the tax base amount that will be subject to tax and the perentage of the tax that will be applicable for calculating the tax on the base amount.
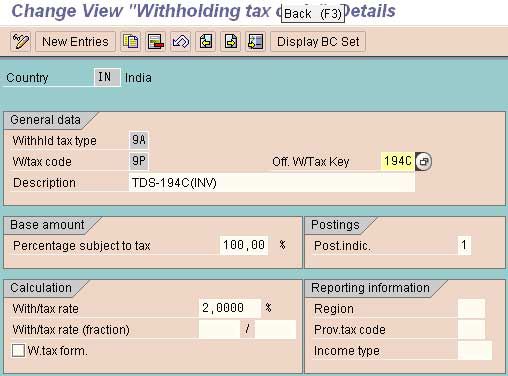
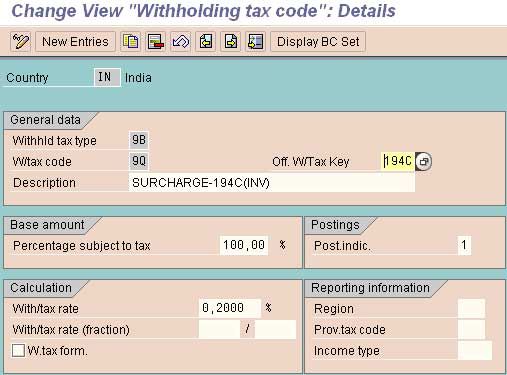
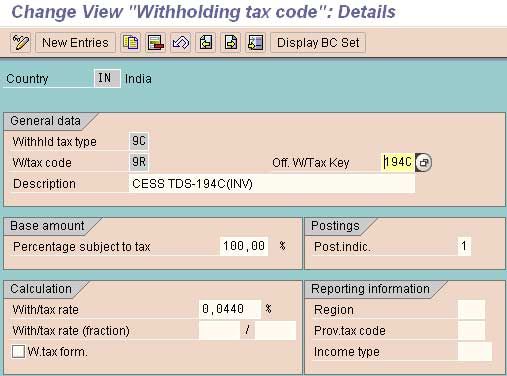
Maintain Surcharge Calculation Methods
Financial Accounting
Financial Account Gloabal Setting
Witholding Tax
Extended Withholding Tax
Calculations
India
Surcharges
Maintain Surcharge Calculation methods
In this IMG activity, you specify which method you want to use to handle surcharge taxes, according to whether you wish your business to show basic withholding tax and surcharges separately, or whether they can be combined. The SAP System offers you two choices:
• You can define tax codes that contain both the basic tax and the surcharge tax.
• You can define separate tax codes for basic tax and surcharge tax respectively.
Some tax offices prefer you to show surcharges separately from basic withholding tax; others prefer the two to be rolled into one. You cannot customize this information at business place (tax office) level, so we recommend that you use the method that is preferred by the majority of your tax offices.
For each company code, specify which method you want.
Under this option we have to either tick the box against each company code or leave it blank.
This Controls whether surcharge tax rates are maintained independently of basic withholding tax,
1) Check box ticked: Means Separate tax types and tax codes for basic withholding tax and surcharge.
2) Check box not ticked: Combined tax types and tax code for basic withholding tax and surcharge.
Maintain Surcharge Tax Codes
Financial Accounting
Financial Account Gloabal Setting
Witholding Tax
Extended Withholding Tax
Calculations
India
Surcharges
Maintain Surcharge Tax Codes
In this IMG activity, you maintain the tax codes that you want to use for surcharges.
Assign Withholding Tax Types to Company Codes
Financial Accounting
Financial Account Gloabal Setting
Witholding Tax
Extended Withholding Tax
Company Code
Assign Withholding Tax Types to Company Codes
In this activity the withholding tax types are defined to company codes.
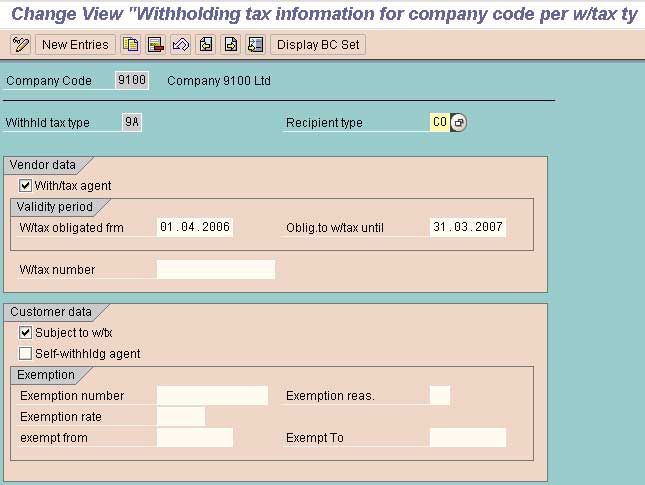
Activate Extended W/Tax in Co. Code
Financial Accounting
Financial Account Gloabal Setting
Witholding Tax
Extended Withholding Tax
Company Code
Activate Extended W/Tax
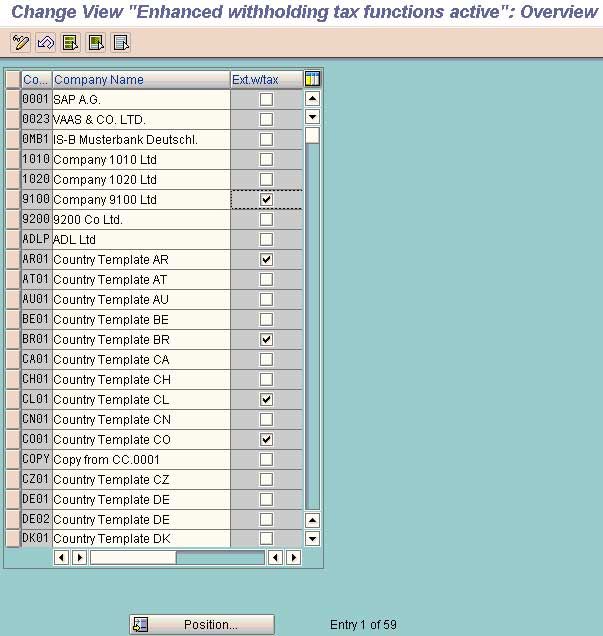
Activate the W/Tax by clicking the box opposite to the company code.
Define a/cs for w/tax to be paid over
Financial Account Gloabal Setting
Witholding Tax
Extended Withholding Tax
Posting
Define a/cs for w/tax to be paid over
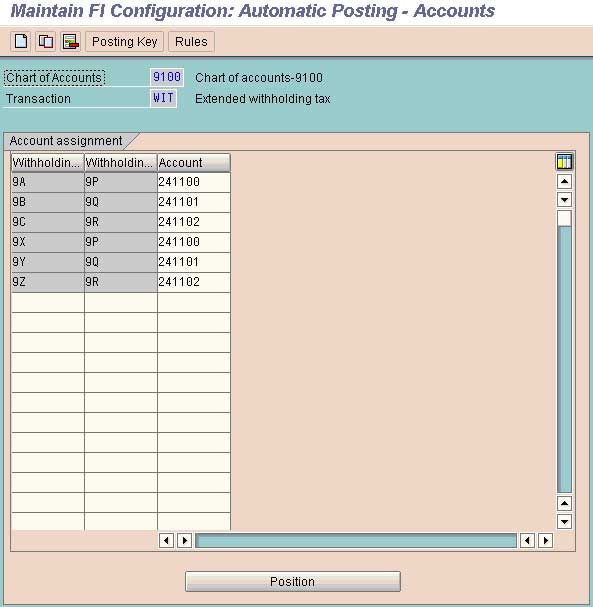
Specify Document Types (Account Payable)
Financial Account Gloabal Setting
Witholding Tax
Extended Withholding Tax
Posting
India
Remittance Challan
Document Types
Specify Document Types (Account Payable)
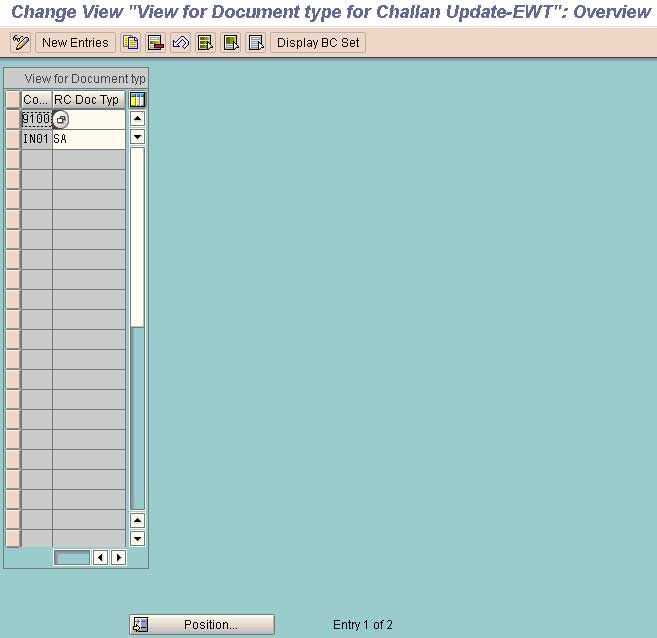
Any kind of document type can be used.
Maintain No. Groups
Financial Account Global Setting
Withholding Tax
Extended Withholding Tax
Posting
India
Remittance Challan
Maintain No Groups

Assign Number Range to Number Groups
Financial Account Global Setting
Withholding Tax
Extended Withholding Tax
Posting
India
Remittance Challan
Assign Number Range to Number Groups
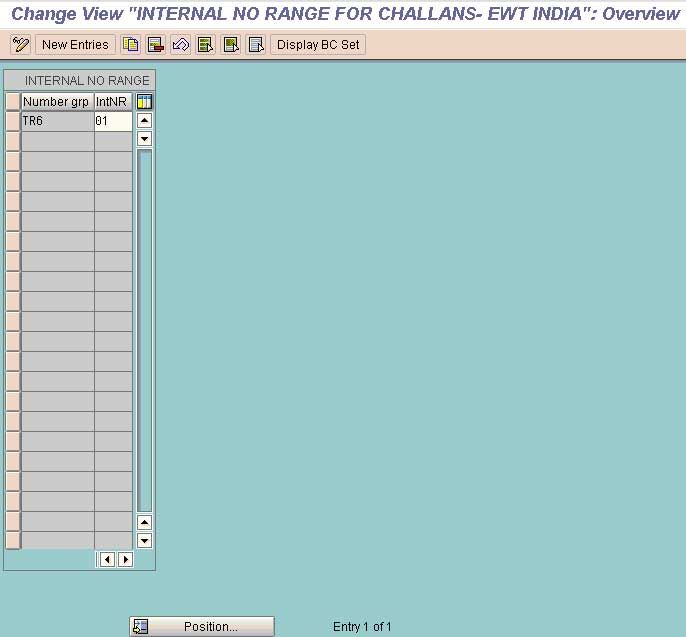
Maintain Number Ranges
Financial Account Global Setting
Withholding Tax
Extended Withholding Tax
Posting
India
Maintain Number Ranges
In this activity we define the number range against each number group and that will be used by the remittance challan.
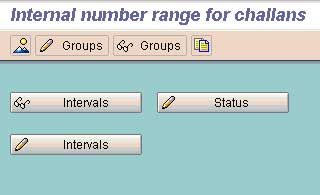
Select task group from task bar.
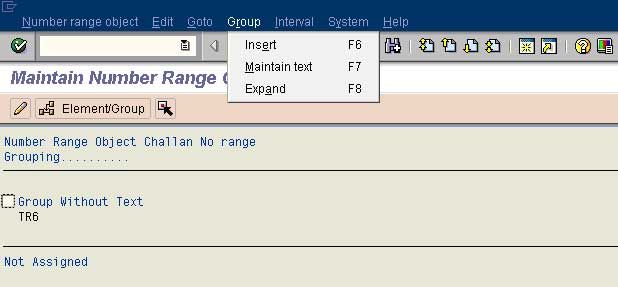
Change the tax to be used by selecting the maintain tax from the drop down menu Group.
Select the group to which the number range to assigned by clicking the box.
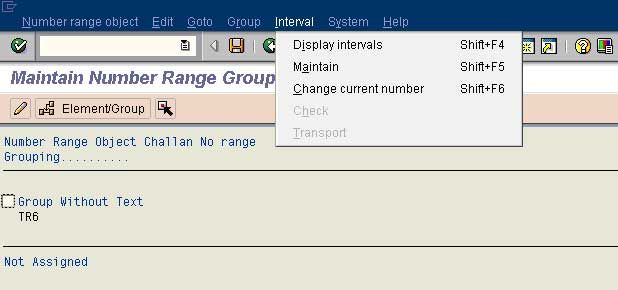
Go to the option maintain interval through the drop down menu as shown above.
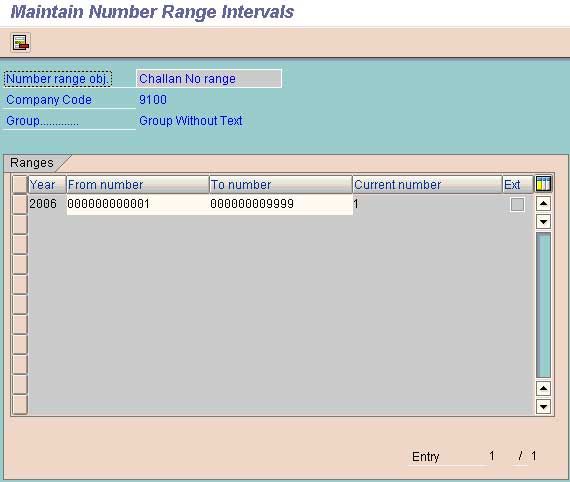
Maintain the number range that is to be used.
Maintain Number Groups and SAP Script Forms
Financial Account Global Setting
Withholding Tax
Extended Withholding Tax
Posting
India
W/Tax certificate for Customers/Vendors
Maintain No. Groups and SAP Script Forms
In this activity we define which SAP script forms the business would like to use for printing the tax forms for customers and vendors.
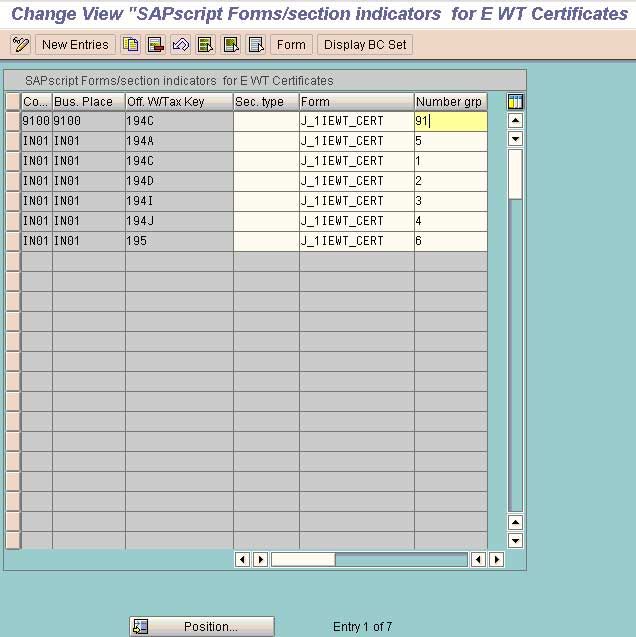
Assign Number Range to Number Groups
Financial Account Global Setting
Withholding Tax
Extended Withholding Tax
Posting
India
W/Tax certificate for Customers/Vendors
Assign Number Range To Number Groups
In this IMG activity, you assign a number range (through a number key) to each number group that you have defined in the previous activity.
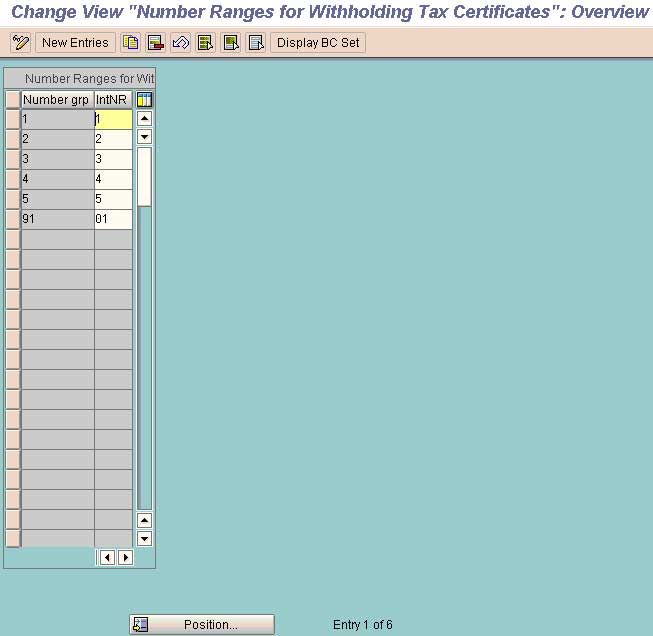
Maintain Number Ranges
Financial Account Global Setting
Withholding Tax
Extended Withholding Tax
Posting
India
W/Tax certificate for Customers/Vendors
Maintain Number Ranges
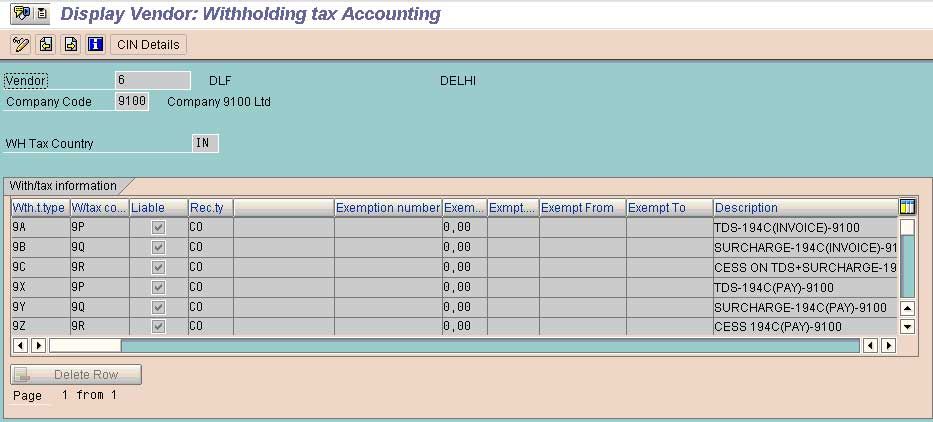
Set the tax code and tax type in the Vendor Master Record
The same is to be set under the screen withholding tax accounting
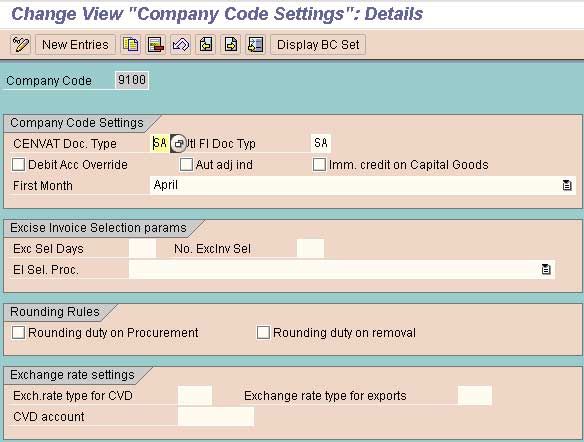
Maintain Co Code Setting
Logistics-General
Tax on Goods Movement
India
Basic Setting
Maintain Co Code settings
Once the Tax Codes ad Tax Types are assigned to the vendor master records the system will calculate the TDS automatically when the bill is posted. The TDS so deducted should be remitted to the Govt. To remit the TDS to the Gvt following procedure should be followed.
- Maintain Surcharge Calculation Methods
- Maintain Surcharge Tax Codes
- Assign Withholding Tax Types to Company Codes
- Activate Extended W/Tax in Co. Code
- Define a/cs for w/tax to be paid over
- Specify Document Types (Account Payable)
- Maintain No. Groups
- Assign Number Range to Number Groups
- Maintain Number Ranges
- Maintain Number Groups and SAP Script Forms
- Assign Number Range to Number Groups
- Maintain Number Ranges
How to create remitted challan in Withholding tax
Solution
Create Remittance challan
Accounting
Accounts Payable
Withholding Tax
Extended W/Tax
Remittance of W/Tax
Create Remittance Challan
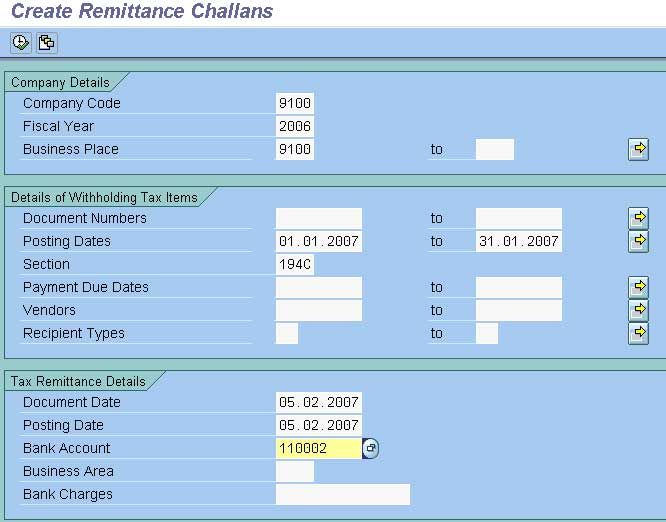
Enter the data and select the option execute
The system will generate a internal remittance challan
How to Update Bank Challan in SAP FICO
Accounting
Accounts Payable
Withholding Tax
Extended W/Tax
Remittance of W/Tax
Enter Bank Challan
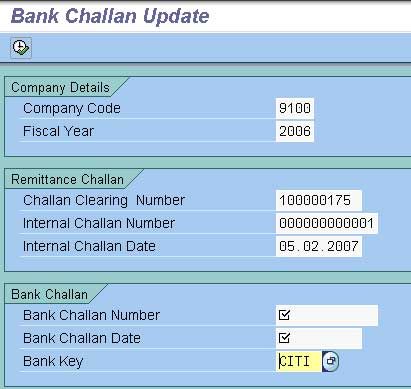
Enter the data and execute
Asset Accounting (FI-AA) Create View in SAP FICO
- Define Declining-Balance Methods
- Define Multi-Level Methods
- Maintain Depreciation Key
- Define Screen Layout for asset master Data
- Define Screen Layout Rules for Asset Depreciation Area
